# day14 Ajax&Axios&书城项目第六阶段
# 第一章 Ajax
# 1. 学习目标
- 了解服务器渲染和Ajax渲染的区别
- 了解同步和异步的区别
# 2. 内容讲解
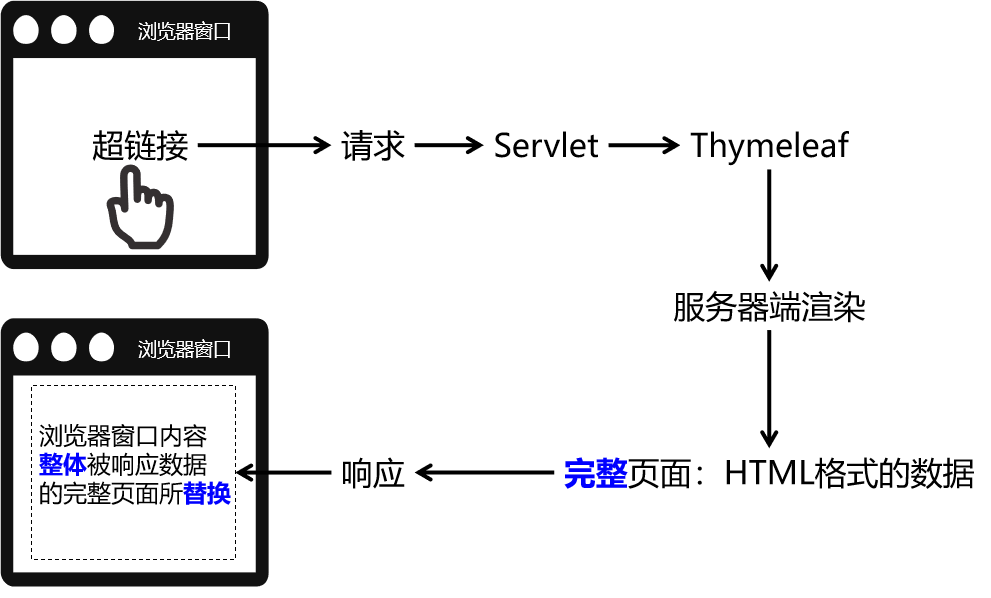
# 2.1 服务器端渲染
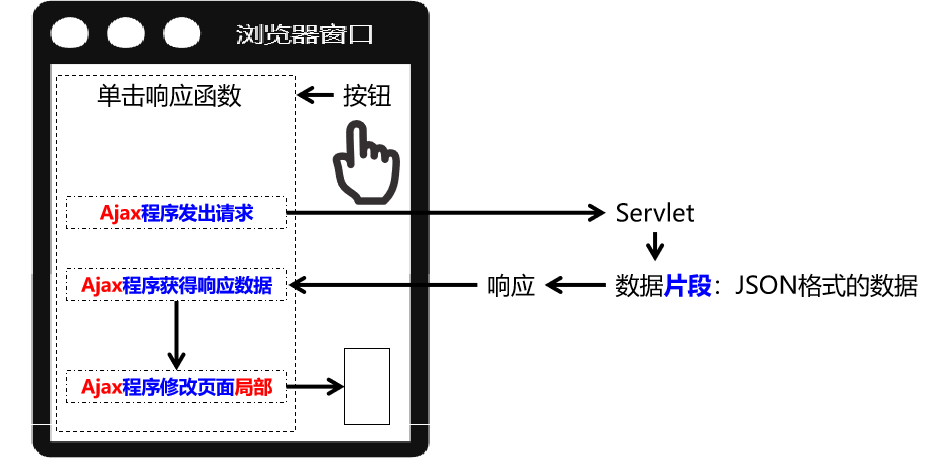
# 2.2 Ajax渲染(局部更新)
# 2.3 前后端分离
真正的前后端分离是前端项目和后端项目分服务器部署,在我们这里我们先理解为彻底舍弃服务器端渲染,数据全部通过Ajax方式以JSON格式来传递
# 2.4 同步与异步
Ajax本身就是Asynchronous JavaScript And XML的缩写,直译为:异步的JavaScript和XML。在实际应用中Ajax指的是:局部更新页面内容的技术。
『异步』是一对相对的概念,那么什么是同步,什么是异步呢?
# 2.4.1 同步
多个操作串行的。

# 2.4.2 异步
多个操作相继开始不用等谁。

# 第二章 Axios
# 1. 学习目标
- 了解Axios
- 掌握Axios发送异步请求
- 掌握Axios携带json类型的请求参数
- 掌握服务器端返回json数据
# 2. 内容讲解
# 2.1 Axios简介
使用原生的JavaScript程序执行Ajax极其繁琐,所以一定要使用框架来完成。而Axios就是目前最流行的前端Ajax框架。
Axios官网:http://www.axios-js.com/
使用Axios和使用Vue一样,导入对应的*.js文件即可。官方提供的script标签引入方式为:
<script src="https://unpkg.com/axios/dist/axios.min.js"></script>
我们可以把这个axios.min.js文件下载下来保存到本地来使用。
# 2.2 Axios基本用法
# 2.2.1 在前端页面引入开发环境
<script type="text/javascript" src="/demo/static/vue.js"></script>
<script type="text/javascript" src="/demo/static/axios.min.js"></script>
# 2.2.2 发送普通请求参数
# 2.2.2.1 前端代码
HTML标签:
<div id="app">
    <button @click="commonParam">普通请求参数</button>
</div>
Vue+axios代码:
var vue = new Vue({
    "el":"#app",
    "data":{
        "message":""
    },
    "methods":{
        commonParam(){
            //使用axios发送异步请求
            axios({
                "method":"post",
                "url":"demo01",
                "params":{
                    "userName":"tom",
                    "userPwd":"123456"
                }
            }).then(response => {
                //then里面是处理请求成功的响应数据
                //response就是服务器端的响应数据,是json类型的
                //response里面的data就是响应体的数据
                this.message = response.data
            }).catch(error => {
                //error是请求失败的错误描述
                //error.response就是请求失败时候的响应信息
                console.log(error.response)
            })
        }
    }
})
</script>
效果:所有请求参数都被放到URL地址后面了,哪怕我们现在用的是POST请求方式。
# 2.2.2.2 后端代码
package com.atguigu.servlet;

import javax.servlet.ServletException;
import javax.servlet.http.HttpServlet;
import javax.servlet.http.HttpServletRequest;
import javax.servlet.http.HttpServletResponse;
import java.io.IOException;

/**
 * @author Leevi
 * 日期2021-05-21  09:15
 */
public class ServletDemo01 extends HttpServlet {
    @Override
    protected void doPost(HttpServletRequest request, HttpServletResponse response) throws ServletException, IOException {
        doGet(request, response);
    }

    @Override
    protected void doGet(HttpServletRequest request, HttpServletResponse response) throws ServletException, IOException {
        request.setCharacterEncoding("UTF-8");
        response.setContentType("text/html;charset=UTF-8");
        //1. 接收请求参数userName和userPwd
        String userName = request.getParameter("userName");
        String userPwd = request.getParameter("userPwd");
        System.out.println(userName + ":" + userPwd);

        //模拟出现异常
        //int num = 10/0;

        //2. 向浏览器响应数据
        response.getWriter().write("hello world!!!");
    }
}
# 2.2.3 axios程序接收到的响应对象结构
| 属性名 | 作用 |
|---|---|
| config | 调用axios(config对象)方法时传入的JSON对象 |
| data | 服务器端返回的响应体数据 |
| headers | 响应消息头 |
| request | 原生JavaScript执行Ajax操作时使用的XMLHttpRequest |
| status | 响应状态码 |
| statusText | 响应状态码的说明文本 |
# 2.2.4 服务器端处理请求失败后
catch(error => {     // catch()服务器端处理请求出错后,会调用

    console.log(error);         // error就是出错时服务器端返回的响应数据
    console.log(error.response);        // 在服务器端处理请求失败后,获取axios封装的JSON格式的响应数据对象
    console.log(error.response.status); // 在服务器端处理请求失败后,获取响应状态码
    console.log(error.response.statusText); // 在服务器端处理请求失败后,获取响应状态说明文本
    console.log(error.response.data);   // 在服务器端处理请求失败后,获取响应体数据

});
在给catch()函数传入的回调函数中,error对象封装了服务器端处理请求失败后相应的错误信息。其中,axios封装的响应数据对象,是error对象的response属性。response属性对象的结构如下图所示:
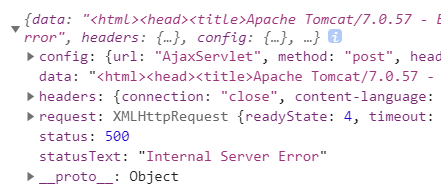
可以看到,response对象的结构还是和then()函数传入的回调函数中的response是一样的:
回调函数:开发人员声明,但是调用时交给系统来调用。像单击响应函数、then()、catch()里面传入的都是回调函数。回调函数是相对于普通函数来说的,普通函数就是开发人员自己声明,自己调用:
function sum(a, b) {
 return a+b;
}

var result = sum(3, 2);
console.log("result="+result);
# 2.3 发送请求体JSON
# 2.3.1 前端代码
HTML代码:
<button @click="sendJsonBody">请求体JSON</button>
Vue+axios代码:
<script>
    var vue = new Vue({
        "el":"#app",
        "data":{
            "message":""
        },
        "methods":{
            sendJsonBody(){
                axios({
                    "method":"post",
                    "url":"demo02",
                    "data":{
                        "username":"奥巴马",
                        "password":"123456",
                        "id":1,
                        "nickname":"圣枪游侠"
                    }
                }).then(response => {
                    console.log(response.data)
                })
            }
        }
    })
</script>
# 2.3.2 后端代码
# 2.3.2.1 加入Gson包
Gson是Google研发的一款非常优秀的JSON数据解析和生成工具,它可以帮助我们将数据在JSON字符串和Java对象之间互相转换。

# 2.3.2.2 User类
package com.atguigu.user;

/**
 * 包名:com.atguigu.user
 *
 * @author Leevi
 * 日期2021-05-21  10:18
 */
public class User {
    private Integer id;
    private String username;
    private String password;
    private String nickname;

    public User() {
    }

    @Override
    public String toString() {
        return "User{" +
                "id=" + id +
                ", username='" + username + '\'' +
                ", password='" + password + '\'' +
                ", nickname='" + nickname + '\'' +
                '}';
    }

    public User(Integer id, String username, String password, String nickname) {
        this.id = id;
        this.username = username;
        this.password = password;
        this.nickname = nickname;
    }

    public Integer getId() {
        return id;
    }

    public void setId(Integer id) {
        this.id = id;
    }

    public String getUsername() {
        return username;
    }

    public void setUsername(String username) {
        this.username = username;
    }

    public String getPassword() {
        return password;
    }

    public void setPassword(String password) {
        this.password = password;
    }

    public String getNickname() {
        return nickname;
    }

    public void setNickname(String nickname) {
        this.nickname = nickname;
    }
}
# 2.3.2.3 Servlet代码
package com.atguigu.servlet;

import com.atguigu.user.User;
import com.atguigu.utils.JsonUtils;

import javax.servlet.ServletException;
import javax.servlet.http.HttpServlet;
import javax.servlet.http.HttpServletRequest;
import javax.servlet.http.HttpServletResponse;
import java.io.IOException;

/**
 * @author Leevi
 * 日期2021-05-21  10:06
 */
public class ServletDemo02 extends HttpServlet {
    @Override
    protected void doPost(HttpServletRequest request, HttpServletResponse response) throws ServletException, IOException {
        doGet(request, response);
    }

    @Override
    protected void doGet(HttpServletRequest request, HttpServletResponse response) throws ServletException, IOException {
        request.setCharacterEncoding("UTF-8");
        response.setContentType("text/html;charset=UTF-8");

        // 1.由于请求体数据有可能很大,所以Servlet标准在设计API的时候要求我们通过输入流来读取
        BufferedReader reader = request.getReader();

        // 2.创建StringBuilder对象来累加存储从请求体中读取到的每一行
        StringBuilder builder = new StringBuilder();

        // 3.声明临时变量
        String bufferStr = null;

        // 4.循环读取
        while((bufferStr = reader.readLine()) != null) {
            builder.append(bufferStr);
        }

        // 5.关闭流
        reader.close();

        // 6.累加的结果就是整个请求体
        String requestBody = builder.toString();

        // 7.创建Gson对象用于解析JSON字符串
        Gson gson = new Gson();

        // 8.将JSON字符串还原为Java对象
        User user = gson.fromJson(requestBody, User.class);
        System.out.println("user = " + user);

        System.out.println("requestBody = " + requestBody);

        response.setContentType("text/html;charset=UTF-8");
        response.getWriter().write("hello world");
    }
}
P.S.:看着很麻烦是吧?别担心,将来我们有了@RequestBody注解就能够搞定,非常方便!
# 2.4 服务器端返回JSON数据
# 2.4.1 前端代码
sendJsonBody(){
    axios({
        "method":"post",
        "url":"demo03"
    }).then(response => {
        console.log(response.data.nickname)
    })
}
# 2.4.2 后端代码
# 2.4.2.1 加入Gson包
仍然需要Gson支持,不用多说
# 2.4.2.2 Servlet代码
package com.atguigu.servlet;

import com.atguigu.user.User;
import com.atguigu.utils.JsonUtils;

import javax.servlet.ServletException;
import javax.servlet.http.HttpServlet;
import javax.servlet.http.HttpServletRequest;
import javax.servlet.http.HttpServletResponse;
import java.io.IOException;

/**
 * @author Leevi
 * 日期2021-05-21  10:06
 */
public class ServletDemo03 extends HttpServlet {
    @Override
    protected void doPost(HttpServletRequest request, HttpServletResponse response) throws ServletException, IOException {
        doGet(request, response);
    }

    @Override
    protected void doGet(HttpServletRequest request, HttpServletResponse response) throws ServletException, IOException {
        request.setCharacterEncoding("UTF-8");
        response.setContentType("text/html;charset=UTF-8");
		//1. 创建user对象设置数据
		User user = new User(1,"aobama","123456","圣枪游侠");
        //2. 创建Gson对象用于将user对象转成json字符串
        Gson gson = new Gson();

        //3. 将user对象转成json字符串
        String jsonStr = gson.toJson(user);
        response.getWriter().write(jsonStr);
    }
}
# 第三章 书城项目第六阶段
# 功能一 注册页面用户名唯一性检查优化
# 1. 准备工作
- 创建module
- 迁移代码
# 2. 加入Ajax开发环境
# 2.1 前端所需axios库

# 2.2 后端所需Gson库

# 3. 封装CommonsResult
# 3.1 模型的作用
在整个项目中,凡是涉及到给Ajax请求返回响应,我们都封装到CommonsResult类型中。
# 3.2 模型的代码
package com.atguigu.bean;

/**
 * 包名:com.atguigu.bean
 *
 * @author Leevi
 * 日期2021-05-21  10:43
 */
public class CommonResult {
    /**
     * 服务器端处理请求的标示
     */
    private boolean flag;

    /**
     * 当服务器端处理请求成功的时候要显示给客户端的数据
     */
    private Object resultData;
    /**
     * 当服务器端处理请求失败的时候要响应给客户端的错误信息
     */
    private String message;

    /**
     * 处理请求成功
     * @return
     */
    public static CommonResult ok(){
        return new CommonResult().setFlag(true);
    }

    /**
     * 处理请求失败
     * @return
     */
    public static CommonResult error(){
        return new CommonResult().setFlag(false);
    }

    public boolean isFlag() {
        return flag;
    }

    private CommonResult setFlag(boolean flag) {
        this.flag = flag;
        return this;
    }

    public Object getResultData() {
        return resultData;
    }

    public CommonResult setResultData(Object resultData) {
        this.resultData = resultData;
        return this;
    }

    public String getMessage() {
        return message;
    }

    public CommonResult setMessage(String message) {
        this.message = message;
        return this;
    }

    public static void main(String[] args) {
        //如果处理请求成功
        /*CommonResult commonResult = CommonResult.ok().setResultData("成功时候的数据");
        System.out.println(commonResult);*/

        //如果处理请求失败
        System.out.println(CommonResult.error().setMessage("失败时候的信息..."));
    }

    @Override
    public String toString() {
        return "CommonResult{" +
                "flag=" + flag +
                ", resultData=" + resultData +
                ", message='" + message + '\'' +
                '}';
    }
}
各个属性的含义:
| 属性名 | 含义 |
|---|---|
| flag | 服务器端处理请求的结果,取值为true或者false |
| message | 服务器端处理请求失败之后,要响应给客户端的数据 |
| data | 服务器端处理请求成功之后,需要响应给客户端的数据 |
# 3.3 模型的好处
- 作为整个团队开发过程中,前后端交互时使用的统一的数据格式
- 有利于团队成员之间的协助,提高开发效率
# 4. 功能实现
# 4.1 定位功能的位置
在用户输入用户名之后,立即检查这个用户名是否可用。
# 4.2 思路
# 4.2.1 给用户名输入框绑定的事件类型
结论:不能在针对username设定的watch中发送Ajax请求。
原因:服务器端响应的速度跟不上用户输入的速度,而且服务器端异步返回响应数据,无法保证和用户输入的顺序完全一致。此时有下面几点问题:
- 给服务器增加不必要的压力
- 用户输入的数据在输入过程中是不断发生变化的
- 响应数据和输入顺序不对应,会发生错乱
解决办法:绑定的事件类型使用失去焦点事件。
# 4.2.2 流程图
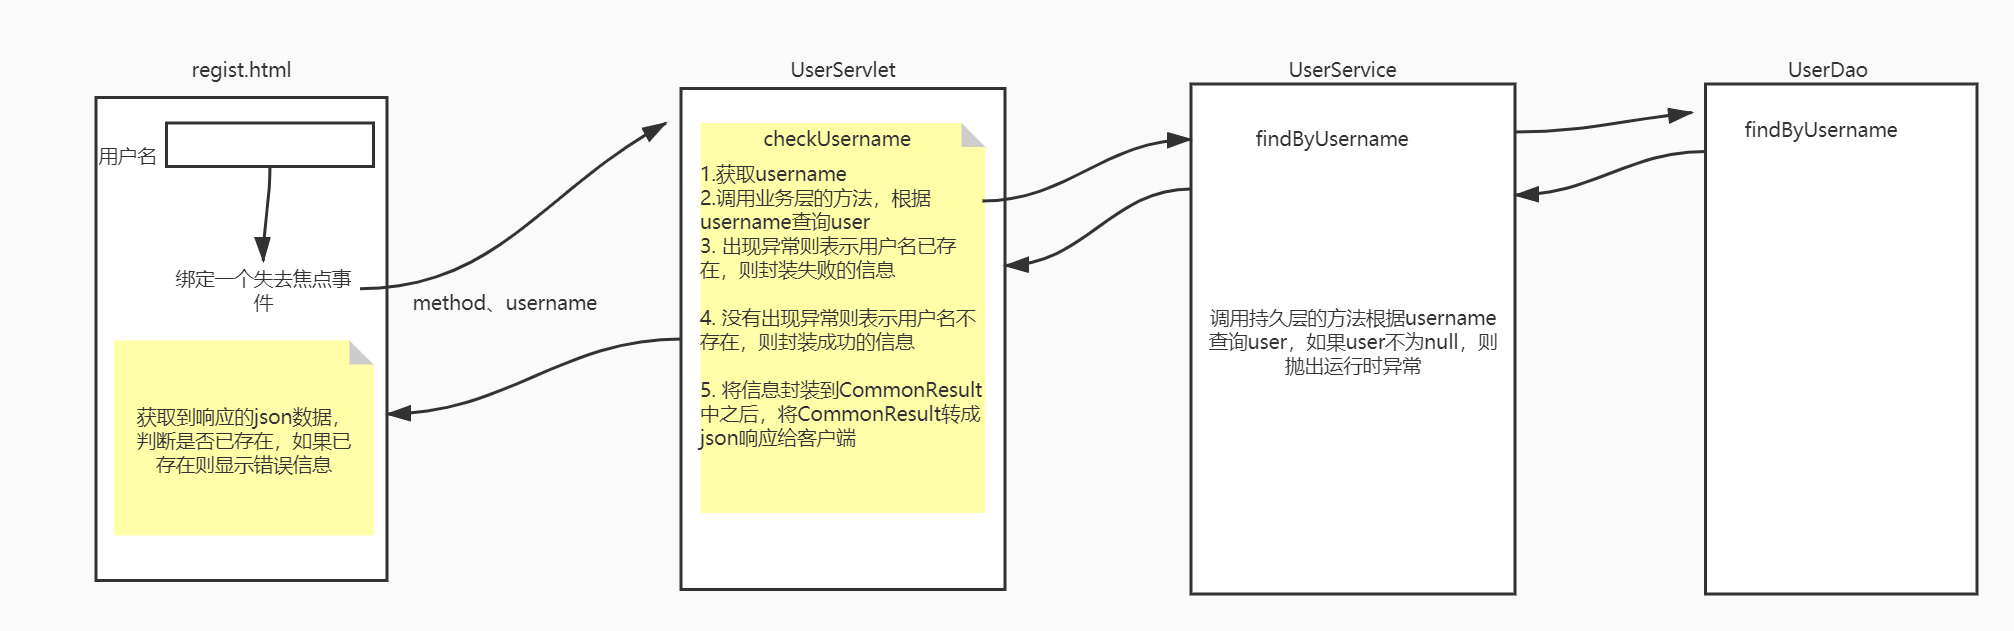
# 4.3 代码实现
# 4.3.1 在当前页面引入axios库文件
<script src="static/script/axios.js"></script>
# 4.3.2 给用户名输入框绑失去焦点事件
<input type="text" placeholder="请输入用户名" name="username" v-model="username" @blur="checkUsername"/>
# 4.3.3 JavaScript代码
//数据模型
"data":{
          "username":"[[${param.username}]]",//用户名
          "usernameErrorMessage":"",//用户名校验错误的提示信息
          //.....其它的省略了
      }
//方法
checkUsername(){
    //校验用户名是否符合规则
    //1. 编写一个正则表达式去描述这个规则
    var usernameRegExp = /^[A-Za-z0-9_]{5,8}$/;
    //2. 使用正则表达式校验用户名输入框里面的内容:this.username
    if (!usernameRegExp.test(this.username)) {
        //校验不通过
        this.usernameErrorMessage = "用户名必须是5-8位的数字、字母或者下划线"
    }else {
        //符合规则了,就重新设置提示信息为空
        this.usernameErrorMessage = ""
        //如果通过,就要开始校验用户名是否已存在:发送异步请求
        axios({
            "method":"post",
            "url":"user",
            "params":{
                "method":"checkUsername",
                "username":this.username
            }
        }).then(response => {
            if (!response.data.flag) {
                //用户名不可用
                this.usernameErrorMessage = response.data.message
            }
        })
    }
}
# 4.3.4 UserServlet
/**
     * 校验用户名是否已存在
     * @param request
     * @param response
     */
public void checkUsername(HttpServletRequest request,HttpServletResponse response) {
    CommonResult commonResult = null;
    try {
        //1. 获取username
        String username = request.getParameter("username");
        //2. 调用业务层的方法,根据username查询user
        userService.findByUsername(username);

        //表示用户名不存在,可以使用
        commonResult = CommonResult.ok();
    } catch (Exception e) {
        e.printStackTrace();
        //表示用户名已存在,不能使用
        commonResult = CommonResult.error().setMessage("用户名已存在,请重新输入用户名");
    }
    //将commonResult对象转成json响应给客户端
    JsonUtils.writeResult(response, commonResult);
}
# 4.3.5 UserService
@Override
public void findByUsername(String username) throws Exception {
    //调用持久层的方法根据username查询user
    User user = userDao.findByUsername(username);
    if (user != null) {
        throw new RuntimeException("用户名已存在");
    }
}
# 功能二 加入购物车
# 1、思路
# 2. 代码实现
# 2.1 加入layer弹层组件

<script type="text/javascript" src="static/script/jquery-1.7.2.js"></script>
<script type="text/javascript" src="static/layer/layer.js"></script>
# 2.2 顶层bar绑定Vue对象
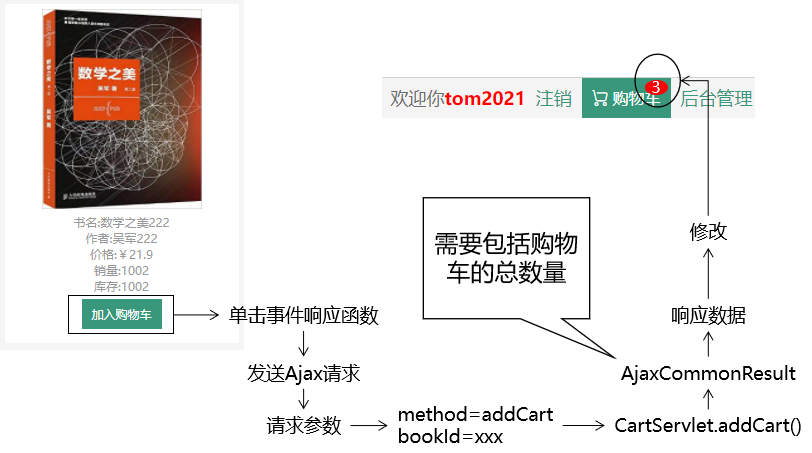
Thymeleaf在服务器端渲染的过程中将购物车总数量计算得到,通过表达式设置写入JavaScript代码,作为Vue对象的初始值。然后由Vue对象通过v-show判断是否显示数量标签。
# 2.2.1 在首页引入Vue和axios库文件
<script src="static/script/vue.js" type="text/javascript" charset="utf-8"></script>
<script src="static/script/axios.js" type="text/javascript" charset="utf-8"></script>
# 2.2.2 在HTML标签上标记id
由于要考虑是否登录的情况,所以id加到了两种情况外层的div
<div id="app">
    <div class="topbar">
        <div class="w">
            <div class="topbar-left">
                <i>送至:</i>
                <i>北京</i>
                <i class="iconfont icon-ai-arrow-down"></i>
            </div>
            <div class="topbar-right" th:if="${session.loginUser == null}">
                <a href="user?method=toLoginPage" class="login">登录</a>
                <a href="user?method=toRegisterPage" class="register">注册</a>
                <a
                   href="protected/cart?method=toCartPage"
                   class="cart iconfont icon-gouwuche
                          "
                   >
                    购物车
                    <div class="cart-num" v-if="totalCount > 0" v-text="totalCount"></div>
                </a>
                <a href="admin?method=toManagerPage" class="admin">后台管理</a>
            </div>
            <!--登录后风格-->
            <div class="topbar-right" th:unless="${session.loginUser == null}">
                <span>欢迎你<b th:text="${session.loginUser.username}">张总</b></span>
                <a href="user?method=logout" class="register">注销</a>
                <a
                   href="protected/cart?method=toCartPage"
                   class="cart iconfont icon-gouwuche
                          ">
                    购物车
                    <div class="cart-num" v-if="totalCount > 0" v-text="totalCount"></div>
                </a>
                <a href="admin?method=toManagerPage" class="admin">后台管理</a>
            </div>
        </div>
    </div>
# 2.2.3 创建Vue对象
var vue = new Vue({
    "el": "#app",
    "data": {
        "totalCount": [[${(session.cart == null)?"0":session.cart.totalCount}]]
    }
});
# 2.3 图书列表div绑定Vue对象
# 2.3.1 绑定单击响应函数
给加入购物车按钮绑定单击响应函数
<a href="javascript:;" @click="addCartItem(book.bookId)">加入购物车</a>
Vue代码:
var vue = new Vue({
    "el":"#app",
    "data": {
        "totalCount": [[${(session.cart == null)?"0":session.cart.totalCount}]]
    },
    "methods":{
        addCartItem(bookId){
            //发送异步请求
            axios({
                "method":"post",
                "url":"protected/cart",
                "params":{
                    "method":"addCartItem",
                    "id":bookId
                }
            }).then(response=>{
                if (response.data.flag) {
                    this.totalCount = response.data.resultData
                    //弹框
                    layer.msg("加入购物车成功")
                }else {
                    if(response.data.message == "unlogin"){
                        //表示用户未登录
                        layer.msg("请先登录再添加购物车")
                        //延时一秒
                        setTimeout(function () {
                            //跳转到登录页面
                            location.href = "user?method=toLoginPage"
                        },1000)
                    }else {
                        //添加失败
                        layer.msg(response.data.message)
                    }
                }
            })
        }
    }
});
# 2.4 后端代码
CartServlet
/**
     * 添加商品进购物车
     * @param request
     * @param response
     */
public void addCartItem(HttpServletRequest request, HttpServletResponse response) {
    CommonResult commonResult = null;
    try {
        //1. 获取请求参数id的值
        Integer id = Integer.valueOf(request.getParameter("id"));
        //2. 调用bookService的方法根据id查询book信息
        Book book = bookService.getBookById(id);
        //3. 尝试从会话域中获取购物车
        HttpSession session = request.getSession();
        Cart cart = (Cart) session.getAttribute(BookStoreConstants.CARTSESSIONKEY);
        //4. 判断之前是否已经添加过购物车了
        if (cart == null) {
            //说明这是第一次添加购物车
            //那么就要新创建一个购物车对象
            cart = new Cart();
            //然后将当前book加入到这个购物车
            cart.addBookToCart(book);
            //然后将cart存入到session
            session.setAttribute(BookStoreConstants.CARTSESSIONKEY, cart);
        } else {
            //说明不是第一次添加购物车
            //那么就直接用之前的购物车,添加当前book就行
            cart.addBookToCart(book);
        }

        //添加购物车成功
        //获取购物车中的商品数量cart.getTotalCount()

        commonResult = CommonResult.ok().setResultData(cart.getTotalCount());
    } catch (Exception e) {
        e.printStackTrace();
        //添加购物车失败
        commonResult = CommonResult.error().setMessage("添加购物车失败");
    }
    JsonUtils.writeResult(response, commonResult);
}
修改LoginFilter代码,因为添加购物车要经过Filter过滤器,判断未登录的话需要跳转到登录页面,而异步请求中是无法由服务器发起重定向跳转的
package com.atguigu.filter;

import com.atguigu.bean.CommonResult;
import com.atguigu.bean.User;
import com.atguigu.constant.BookStoreConstants;
import com.atguigu.utils.JsonUtils;

import javax.servlet.*;
import javax.servlet.http.HttpServletRequest;
import javax.servlet.http.HttpServletResponse;
import javax.servlet.http.HttpSession;
import java.io.IOException;

/**
 * @author Leevi
 * 日期2021-05-18  14:20
 */
public class LoginFilter implements Filter {
    @Override
    public void destroy() {
    }

    @Override
    public void doFilter(ServletRequest req, ServletResponse resp, FilterChain chain) throws ServletException, IOException {
        //1. 判断当前是否已登录
        HttpServletRequest request = (HttpServletRequest) req;
        HttpServletResponse response = (HttpServletResponse) resp;

        HttpSession session = request.getSession();
        User loginUser = (User) session.getAttribute(BookStoreConstants.USERSESSIONKEY);
        if (loginUser == null) {

            //响应数据给客户端,告诉客户端未登录
            CommonResult commonResult = CommonResult.error().setMessage("unlogin");
            JsonUtils.writeResult(response,commonResult);
            return;
        }

        //3. 如果已登录,则放行
        chain.doFilter(req, resp);
    }

    @Override
    public void init(FilterConfig config) throws ServletException {

    }
}
# 功能三 显示购物车数据
# 1、思路
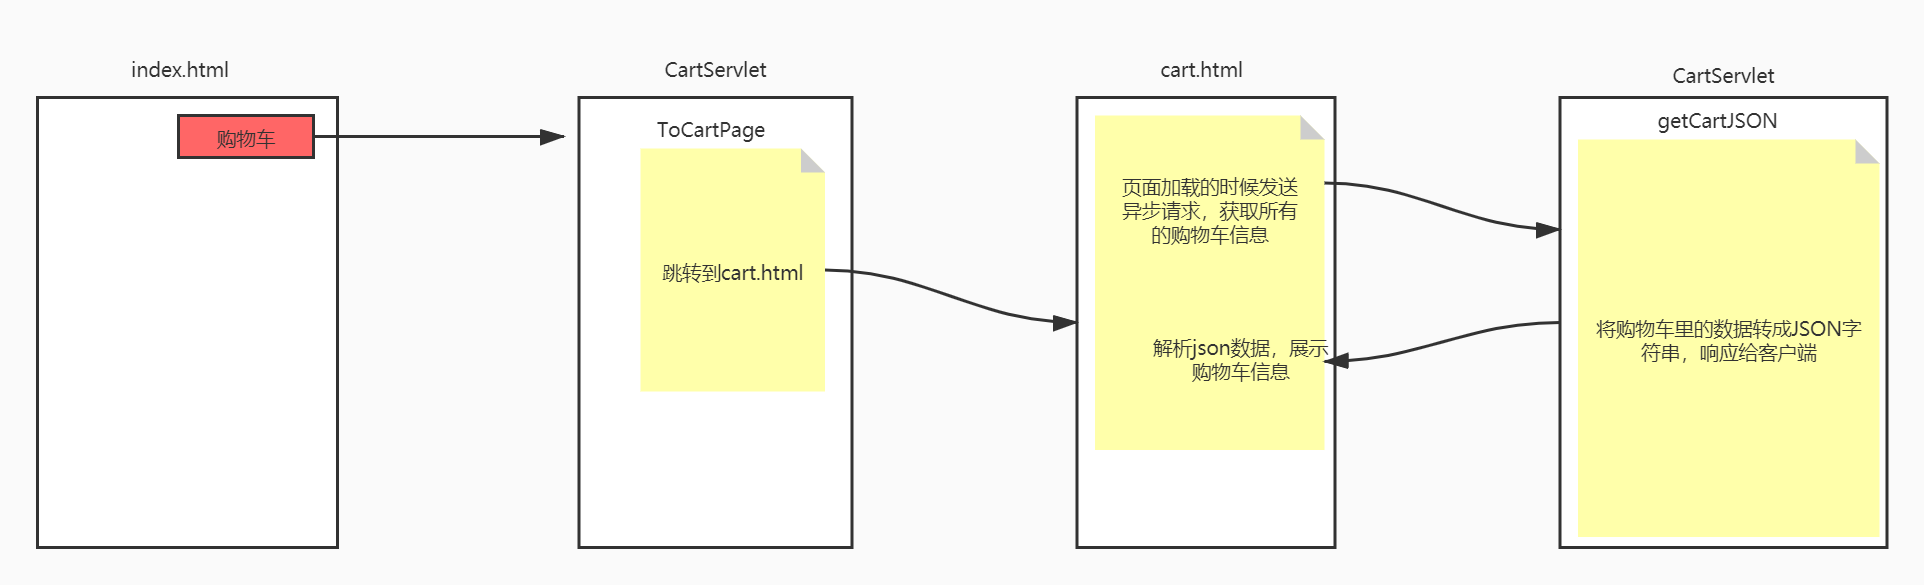
# 2. 代码实现
# 2.1 CartServlet增加getCartJSON()方法
# 2.1.1 Cart模型的局限性

目前的Cart对象转换为JSON后,没有totalCount、totalAmount这样的属性,Map结构也不如LIst遍历方便。
# 2.1.2 调整方式
把前端页面需要的属性,存入Map中即可。
# 2.1.3 方法代码
修改CartItem
在getAmount方法中给amount属性赋值
package com.atguigu.bean;

import java.math.BigDecimal;

/**
 * 包名:com.atguigu.bean
 *
 * @author Leevi
 * 日期2021-05-17  09:06
 */
public class CartItem {
    private Integer bookId;
    private String bookName;
    private String imgPath;
    /**
     * 商品的单价
     */
    private Double price;
    private Integer count;

    /**
     * 购物项的金额
     */
    private Double amount;

    public CartItem() {
    }

    @Override
    public String toString() {
        return "CartItem{" +
                "bookId=" + bookId +
                ", bookName='" + bookName + '\'' +
                ", imgPath='" + imgPath + '\'' +
                ", price=" + price +
                ", count=" + count +
                ", amount=" + amount +
                '}';
    }

    public CartItem(Integer bookId, String bookName, String imgPath, Double price, Integer count, Double amount) {
        this.bookId = bookId;
        this.bookName = bookName;
        this.imgPath = imgPath;
        this.price = price;
        this.count = count;
        this.amount = amount;
    }

    public Integer getBookId() {
        return bookId;
    }

    public void setBookId(Integer bookId) {
        this.bookId = bookId;
    }

    public String getBookName() {
        return bookName;
    }

    public void setBookName(String bookName) {
        this.bookName = bookName;
    }

    public String getImgPath() {
        return imgPath;
    }

    public void setImgPath(String imgPath) {
        this.imgPath = imgPath;
    }

    public Double getPrice() {
        return price;
    }

    public void setPrice(Double price) {
        this.price = price;
    }

    public Integer getCount() {
        return count;
    }

    public void setCount(Integer count) {
        this.count = count;
    }

    /**
     * 这个方法获取总价:要通过计算才能获取
     * @return
     */
    public Double getAmount() {
        //1. 将price和count封装成BigDecimal类型
        BigDecimal bigDecimalPrice = new BigDecimal(price + "");
        BigDecimal bigDecimalCount = new BigDecimal(count + "");

        //2. 使用bigDecimal的方法进行乘法
        this.amount = bigDecimalCount.multiply(bigDecimalPrice).doubleValue();
        return this.amount;
    }

    public void setAmount(Double amount) {
        this.amount = amount;
    }

    /**
     * 数量+1
     */
    public void countIncrease(){
        this.count ++;
    }

    /**
     * 数量-1
     */
    public void countDecrease(){
        this.count --;
    }
}
/**
     * 获取购物车的json数据
     * @param request
     * @param response
     */
public void getCartJSON(HttpServletRequest request,HttpServletResponse response) {
    Map<String, Object> responseMap = null;
    CommonResult commonResult = null;
    try {
        //1. 获取购物车信息
        HttpSession session = request.getSession();
        Cart cart = (Cart) session.getAttribute(BookStoreConstants.CARTSESSIONKEY);

        //2. 我们要响应给客户端的是{"totalCount":总条数,"totalAmount":总金额,"cartItemList":购物项的集合}
        responseMap = new HashMap<>();
        responseMap.put("totalCount", cart.getTotalCount());
        responseMap.put("totalAmount", cart.getTotalAmount());

        //获取购物项列表
        Collection<CartItem> cartItemCollection = cart.getCartItemMap().values();
        List<CartItem> cartItemList = new ArrayList<>(cartItemCollection);

        responseMap.put("cartItemList", cartItemList);

        //查询成功
        commonResult = CommonResult.ok().setResultData(responseMap);
    } catch (Exception e) {
        e.printStackTrace();
        commonResult = CommonResult.error().setMessage("查询购物车信息失败");
    }

    //3. 将responseMap转成json并且响应给客户端
    JsonUtils.writeResult(response, commonResult);
}
# 2.2 前端代码
# 2.2.1 去除Thymeleaf痕迹
将cart.html页面中,由Thymeleaf渲染数据的部分去掉。
# 2.2.2 在mounted生命周期环境发Ajax请求
记得加入axios库和vue库:
<script src="static/script/axios.js"></script>
<script src="static/script/vue.js"></script>
var vue = new Vue({
    "el":"#app",
    "data":{
        "cart":{
            "totalCount":0,
            "totalAmount":0,
            "carItemList":[]
        }
    },
    "methods":{
        //查询购物车信息
        getCart(){
            //发送异步请求
        axios({
            "method":"post",
            "url":"protected/cart?method=getCartJSON"
        }).then(response => {
            if (response.data.flag) {
                this.cart = response.data.resultData
            }else {
                //查询购物车失败
                layer.msg(response.data.message)
            }
        })
        }
    },
    //钩子函数
    created(){
        //调用方法查询购物车信息
        this.getCart()
    }
});
</script>
# 2.2.4 完成Vue页面渲染
<div class="list" id="app">
    <div class="w">
        <table>
            <thead>
                <tr>
                    <th>图片</th>
                    <th>商品名称</th>

                    <th>数量</th>
                    <th>单价</th>
                    <th>金额</th>
                    <th>操作</th>
                </tr>
            </thead>
            <tbody v-if="cart.totalCount == 0">
                <tr>
                    <td th:colspan="6">
                        <a href="index.html">购物车空空如也,请抓紧购物吧!!!!</a>
                    </td>
                </tr>
            </tbody>
            <tbody v-if="cart.totalCount > 0">
                <tr v-for="(cartItem,index) in cart.cartItemList">
                    <td>
                        <img :src="cartItem.imgPath" alt="" />
                    </td>
                    <td v-text="cartItem.bookName">活着</td>
                    <td>
                        <a class="count" href="javascript:;">-</a>
                        <input class="count-num" type="text" v-model="cartItem.count" />
                        <a class="count" href="javascript:;">+</a>
                    </td>
                    <td v-text="cartItem.price">36.8</td>
                    <td v-text="cartItem.amount">36.8</td>
                    <td><a href="javascript:;">删除</a></td>
                </tr>
            </tbody>
        </table>
        <div>
            <div class="footer" v-if="cart.totalCount > 0">
                <div class="footer-left">
                    <a href="protected/cart?method=cleanCart" @click="cleanCart" class="clear-cart">清空购物车</a>
                    <a href="#">继续购物</a>
                </div>
                <div class="footer-right">
                    <div>共<span v-text="cart.totalCount">3</span>件商品</div>
                    <div class="total-price">总金额<span v-text="cart.totalAmount">99.9</span>元</div>
                    <a class="pay" href="protected/orderClient?method=checkout">去结账</a>
                </div>
            </div>
        </div>
    </div>
</div>
# 功能四(扩展功能) 点击+号将购物项数量加一
# HTML和Vue代码
<a class="count" href="javascript:;" @click="cartItemCountIncrease(cartItem.bookId,index)">+</a>
cartItemCountIncrease(id,index){
    //其实就是往服务器发送一个异步请求进行+1
    axios({
        "method":"post",
        "url":"protected/cart",
        "params":{
            "method":"countIncrease",
            "id":id
        }
    }).then(response => {
        if (response.data.flag) {
            this.cart.cartItemList[index].count ++

            //重新设置页面totalCount和totalAmount
            this.cart.totalCount = response.data.resultData.totalCount
            this.cart.totalAmount = response.data.resultData.totalAmount
            //重新设置当前购物项的金额
            this.cart.cartItemList[index].amount = response.data.resultData.amount
        }
    })
}
# CartServlet的代码
/**
     * 购物车中某个一个购物项的数量+1
     * @param request
     * @param response
     * @throws IOException
     */
public void countIncrease(HttpServletRequest request,HttpServletResponse response) throws IOException {
    CommonResult commonResult = null;
    try {
        //1. 获取到要-+1的书的id
        Integer id = Integer.valueOf(request.getParameter("id"));
        //2. 从session中获取购物车信息
        Cart cart = (Cart) request.getSession().getAttribute(BookStoreConstants.CARTSESSIONKEY);
        //3. 调用购物车的+1方法
        cart.itemCountIncrease(id);

        //使用Map封装响应数据
        Map<String, Object> responseMap = getResponseMap(id, cart);

        commonResult = CommonResult.ok().setResultData(responseMap);
    } catch (Exception e) {
        e.printStackTrace();
        commonResult = CommonResult.error();
    }

    JsonUtils.writeResult(response,commonResult);
}
/**
     * 封装响应的Map数据
     * @param id
     * @param cart
     * @return
     */
private Map<String, Object> getResponseMap(Integer id, Cart cart) {
    //将服务器端最新的购物车totalCount和totalAmount响应给客户端
    Map<String, Object> responseMap = new HashMap<>();
    responseMap.put("totalCount", cart.getTotalCount());
    responseMap.put("totalAmount", cart.getTotalAmount());

    if (cart.getCartItemMap().get(id) != null) {
        //直接将当前购物项的总金额也封装到map中
        responseMap.put("amount", cart.getCartItemMap().get(id).getAmount());
    }
    return responseMap;
}
# 功能五(扩展功能) 点击-号将购物项的数量减一
# HTML和Vue的代码
<a @click="cartItemCountDecrease(cartItem.count,cartItem.bookName,cartItem.bookId,index)" class="count" href="javascript:;">-</a>
cartItemCountDecrease(count,bookName,id,index){
    //判断:输入框的内容是否是1
    if (count == 1) {
        //则弹出提示框问你是否要删除
        if (!confirm(bookName + "的数量已经是1了,你确定还要减少吗?")) {
            //不需要减少
            return;
        }
    }
    //需要减少:发送异步请求
    axios({
        "method":"post",
        "url":"protected/cart",
        "params":{
            "method":"countDecrease",
            "id":id
        }
    }).then(response => {
        if (response.data.flag) {
            //减1成功
            this.cart.cartItemList[index].count --

            //判断如果count是0,就将这条数据删掉
            if (this.cart.cartItemList[index].count == 0) {
                this.cart.cartItemList.splice(index,1)
            }

            //重新设置页面totalCount和totalAmount
            this.cart.totalCount = response.data.resultData.totalCount
            this.cart.totalAmount = response.data.resultData.totalAmount
            //重新设置当前购物项的金额
            this.cart.cartItemList[index].amount = response.data.resultData.amount
        }
    })
}
# CartServlet的代码
/**
     * 购物车中某个一个购物项的数量-1
     * @param request
     * @param response
     * @throws IOException
     */
public void countDecrease(HttpServletRequest request,HttpServletResponse response) throws IOException {
    CommonResult commonResult = null;
    try {
        //1. 获取到要-1的书的id
        Integer id = Integer.valueOf(request.getParameter("id"));
        //2. 从session中获取购物车信息
        Cart cart = (Cart) request.getSession().getAttribute(BookStoreConstants.CARTSESSIONKEY);
        //3. 调用购物车的-1方法
        cart.itemCountDecrease(id);

        //使用Map封装响应数据
        Map<String, Object> responseMap = getResponseMap(id, cart);
        commonResult = CommonResult.ok().setResultData(responseMap);
    } catch (Exception e) {
        e.printStackTrace();
        commonResult = CommonResult.error();
    }
    JsonUtils.writeResult(response, commonResult);
}
# 功能六(扩展功能) 点击删除按钮删除购物项
# HTML和Vue的代码
<td><a href="javascript:;" @click="deleteCartItem(cartItem.bookName,cartItem.bookId,index)">删除</a></td>
deleteCartItem(bookName,id,index){
    if (confirm("你确定要删除这个"+bookName+"吗?")) {
        //表示要删除,才发送异步请求
        axios({
            "method":"post",
            "url":"protected/cart",
            "params":{
                "method":"removeCartItem",
                "id":id
            }
        }).then(response => {
            if (response.data.flag) {
                //表示要将当前这行,就是将cart.cartItemList对应index的这行删掉
                this.cart.cartItemList.splice(index,1)

                //重新设置页面totalCount和totalAmount
                this.cart.totalCount = response.data.resultData.totalCount
                this.cart.totalAmount = response.data.resultData.totalAmount
                //重新设置当前购物项的金额
            	this.cart.cartItemList[index].amount = response.data.resultData.amount
            }
        })
    }
}
# CartServlet的代码
/**
     * 删除购物项
     * @param request
     * @param response
     * @throws IOException
     */
public void removeCartItem(HttpServletRequest request,HttpServletResponse response) throws IOException {
    CommonResult commonResult = null;
    try {
        //1. 获取要删除的购物项的书的id
        Integer id = Integer.valueOf(request.getParameter("id"));
        //2.从session中获取购物车
        Cart cart = (Cart) request.getSession().getAttribute(BookStoreConstants.CARTSESSIONKEY);
        //3. 调用cart的删除购物项的方法
        cart.removeCartItem(id);

        //使用Map封装响应数据
        Map<String, Object> responseMap = getResponseMap(id, cart);
        commonResult = CommonResult.ok().setResultData(responseMap);
    } catch (Exception e) {
        e.printStackTrace();
        commonResult = CommonResult.error();
    }
    JsonUtils.writeResult(response,commonResult);
}
# 功能七(扩展功能) 修改购物项的数量
# HTML和Vue的代码
<input @change="updateCartItemCount(cartItem.bookId,index)" class="count-num" type="text" v-model="cartItem.count" />
updateCartItemCount(bookId,index){
    //获取newCount
    var newCount = event.target.value;

    //校验newCount的格式是否正确
    var reg = /^[1-9][0-9]*$/

    if (reg.test(newCount)) {
        //发送异步请求携带请求参数
        axios({
            "method":"post",
            "url":"protected/cart",
            "params":{
                "method":"updateCartItemCount",
                "id":bookId,
                "newCount":newCount
            }
        }).then(response => {
            if (response.data.flag) {
                //重新设置页面totalCount和totalAmount
                this.cart.totalCount = response.data.resultData.totalCount
                this.cart.totalAmount = response.data.resultData.totalAmount
                //重新设置当前购物项的金额
            	this.cart.cartItemList[index].amount = response.data.resultData.amount
            }
        })
    }else {
        alert("请输入正确的数量")
    }
}
# CartServlet的代码
/**
* 修改购物项的数量
* @param request
* @param response
* @throws IOException
*/
public void updateCartItemCount(HttpServletRequest request,HttpServletResponse response) throws IOException {
    CommonResult commonResult = null;
    try {
        //1. 获取请求参数:id,newCount
        Integer id = Integer.valueOf(request.getParameter("id"));
        Integer newCount = Integer.valueOf(request.getParameter("newCount"));
        //2. 从session中获取购物车信息
        Cart cart = (Cart) request.getSession().getAttribute(BookStoreConstants.CARTSESSIONKEY);
        //3. 调用cart中跟新数量的方法
        cart.updateItemCount(id,newCount);

        //使用Map封装响应数据
        Map<String, Object> responseMap = getResponseMap(id, cart);
        commonResult = CommonResult.ok().setResultData(responseMap);

    } catch (Exception e) {
        e.printStackTrace();
        commonResult = CommonResult.error();
    }

    JsonUtils.writeResult(response,commonResult);
}