# SpringBoot基础
# 一、SpringBoot简介
# 1.2 SpringBoot的概述
# 1.2.1 什么是Spring Boot
Spring Boot 是所有基于 Spring Framework 5.0 开发的项目。Spring Boot 的设计是为了让你尽可能快的跑起来 Spring 应用程序,并且尽可能减少你的配置文件。
设计目的: 用来简化 Spring 应用的初始搭建以及开发过程。
从最根本上来讲,Spring Boot 就是一些库的集合,它能够被任意项目所使用。它使用 “习惯优于配置” (项目中存在大量的配置,此外还内置一个习惯性的配置)的理念让你的项目快速运行起来。spring boot 其实不是什么新的框架,它默认配置了很多框架的使用方式,就像 maven 整合了所有的 jar 包,spring boot 整合了所有的框架,总结一下及几点:
为所有 Spring 开发提供一个更快更广泛的入门体验。
零配置。无冗余代码生成和XML 强制配置,遵循“约定大于配置” 。
集成了大量常用的第三方库的配置, Spring Boot 应用为这些第三方库提供了几乎可以零配置的开箱即用的能力。
提供一系列大型项目常用的非功能性特征,如嵌入服务器等。
使用 Spring Boot有什么好处
其实就是简单、快速、方便!平时如果我们需要搭建一个 Spring Web 项目的时候需要怎么做呢?
- 配置 web.xml,加载 Spring 和 Spring mvc
- 配置数据库连接、配置 Spring 事务
- 配置加载配置文件的读取,开启注解
- 配置日志文件
…
配置完成之后部署 Tomcat 调试
…
现在非常流行微服务,如果我这个项目仅仅只是需要发送一个邮件,如果我的项目仅仅是生产一个积分;我都需要这样折腾一遍!
但是如果使用 Spring Boot 呢?
很简单,我仅仅只需要非常少的几个配置就可以迅速方便的搭建起来一套 Web 项目或者是构建一个微服务!
# 1.2.2 SpringBoot的特点
为基于Spring的开发提供更快的入门体验
开箱即用,没有代码生成,也无需XML配置。同时也可以修改默认值来满足特定的需求
提供了一些大型项目中常见的非功能性特性,如嵌入式服务器、外部配置等
SpringBoot不是对Spring功能上的增强,而是提供了一种快速使用Spring的方式
# 1.2.3 SpringBoot的核心功能
起步依赖
起步依赖本质上是一个Maven项目对象模型(Project Object Model,POM),定义了对其他库的传递依赖,这些东西加在一起即支持某项功能。
简单的说,起步依赖就是将具备某种功能的坐标打包到一起,并提供一些默认的功能。
自动配置
Spring Boot的自动配置是一个运行时(更准确地说,是应用程序启动时)的过程,考虑了众多因素,才决定Spring配置应该用哪个,不该用哪个。该过程是Spring自动完成的。
# 二、SpringBoot快速入门
# 2.1 代码实现
# 2.1.1 创建Maven工程
使用idea工具创建一个maven工程,该工程为普通的java工程即可
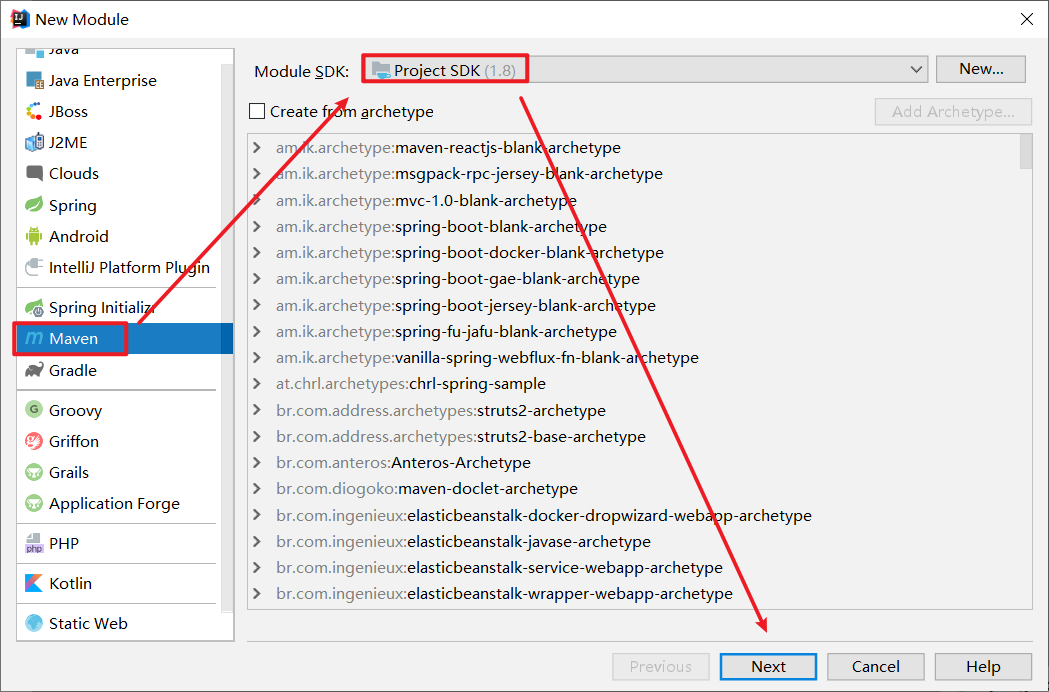
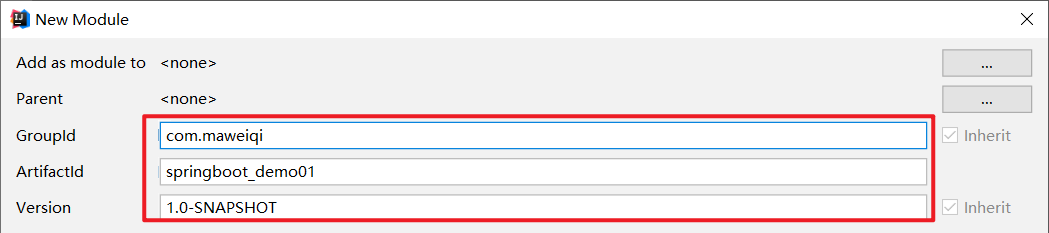
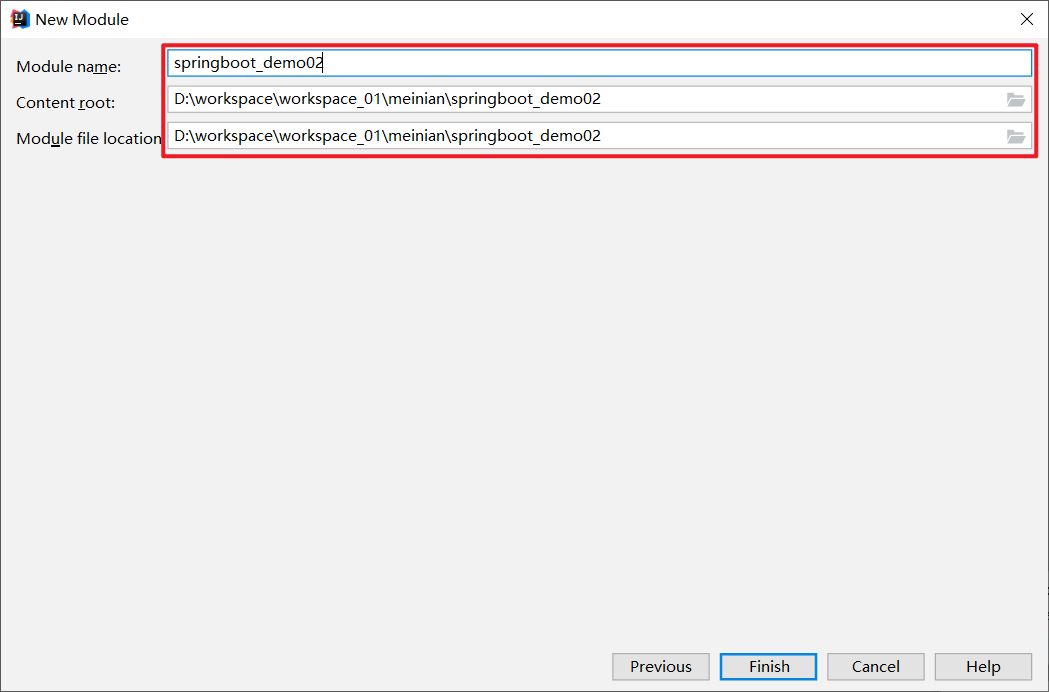
创建项目 springboot_demo01

# 2.1.2 添加SpringBoot的起步依赖
添加pom文件
<?xml version="1.0" encoding="UTF-8"?>
<project xmlns="http://maven.apache.org/POM/4.0.0"
xmlns:xsi="http://www.w3.org/2001/XMLSchema-instance"
xsi:schemaLocation="http://maven.apache.org/POM/4.0.0 http://maven.apache.org/xsd/maven-4.0.0.xsd">
<modelVersion>4.0.0</modelVersion>
<groupId>com.maweiqi</groupId>
<artifactId>springboot_demo01</artifactId>
<version>1.0-SNAPSHOT</version>
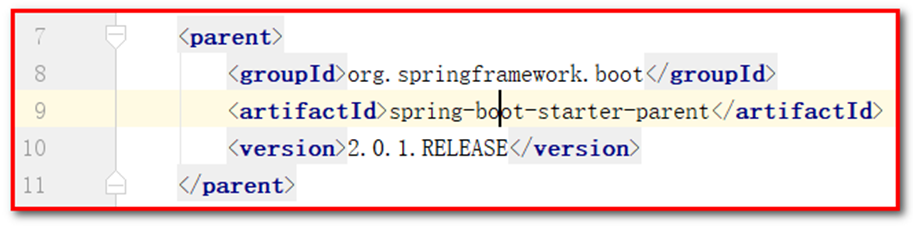
<!--父工程-->
<parent>
<groupId>org.springframework.boot</groupId>
<artifactId>spring-boot-starter-parent</artifactId>
<version>2.1.6.RELEASE</version>
</parent>
<dependencies>
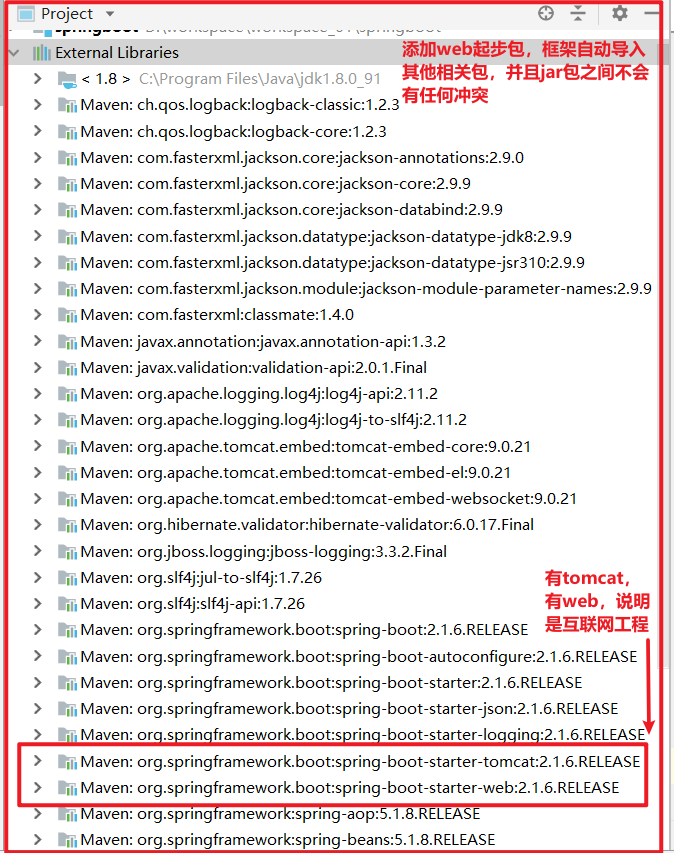
<!--web起步包
注意:虽然是web工程,但不需要打war包,直接打jar就行
-->
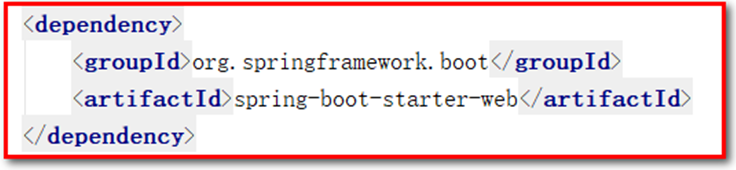
<dependency>
<groupId>org.springframework.boot</groupId>
<artifactId>spring-boot-starter-web</artifactId>
</dependency>
</dependencies>
</project>
# 2.1.3 编写SpringBoot引导类
要通过SpringBoot提供的引导类起步SpringBoot才可以进行访问
package com.maweiqi;

import org.springframework.boot.SpringApplication;
import org.springframework.boot.autoconfigure.SpringBootApplication;

// 声明该类是一个SpringBoot引导类
@SpringBootApplication
public class MySpringBootApplication {
    // main是java程序的入口
    public static void main(String[] args) {
        // run方法 表示运行SpringBoot的引导类 run参数就是SpringBoot引导类的字节码对象
        SpringApplication.run(MySpringBootApplication.class,args);
    }
}
# 2.1.4 编写Controller
在引导类MySpringBootApplication同级包或者子级包中创建QuickStartController
package com.maweiqi.controller;

import org.springframework.web.bind.annotation.RequestMapping;
import org.springframework.web.bind.annotation.RestController;

@RestController
@RequestMapping
public class QuickStartController {

    @RequestMapping("/quick")
    public String quick(){
        return "springboot 访问成功!";
    }
}
# 2.1.5 测试
执行SpringBoot起步类的主方法,控制台打印日志如下:
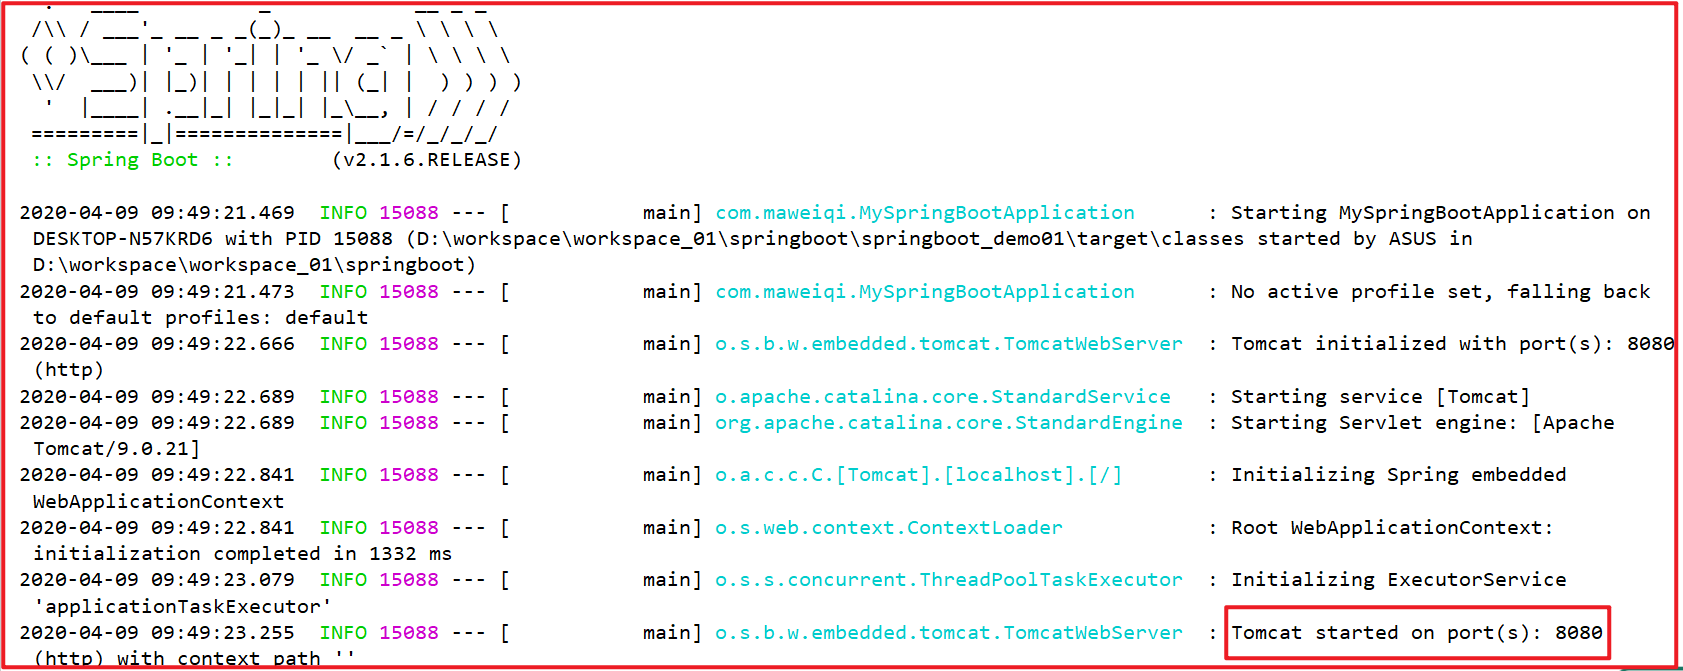
通过日志发现,Tomcat started on port(s): 8080 (http) with context path ’’
tomcat已经起步,端口监听8080,web应用的虚拟工程名称为空(默认“/”)
打开浏览器访问url地址为:http://localhost:8080/quick
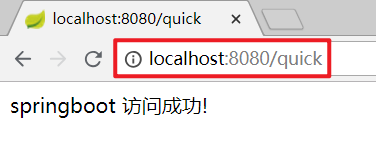
可以发现我们省去了springmvc.xml的配置。
# 2.2 快速入门解析
# 2.2.2 SpringBoot代码解析
@SpringBootApplication:标注SpringBoot的启动类,该注解具备多种功能(后面详细剖析)
SpringApplication.run(MySpringBootApplication.class) 代表运行SpringBoot的启动类,参数为SpringBoot启动类的字节码对象
# 2.2.3 SpringBoot工程热部署
我们在开发中反复修改类、页面等资源,每次修改后都是需要重新启动才生效,这样每次启动都很麻烦,浪费了大量的时间,我们可以在修改代码后不重启就能生效,在 pom.xml 中添加如下配置就可以实现这样的功能,我们称之为热部署。
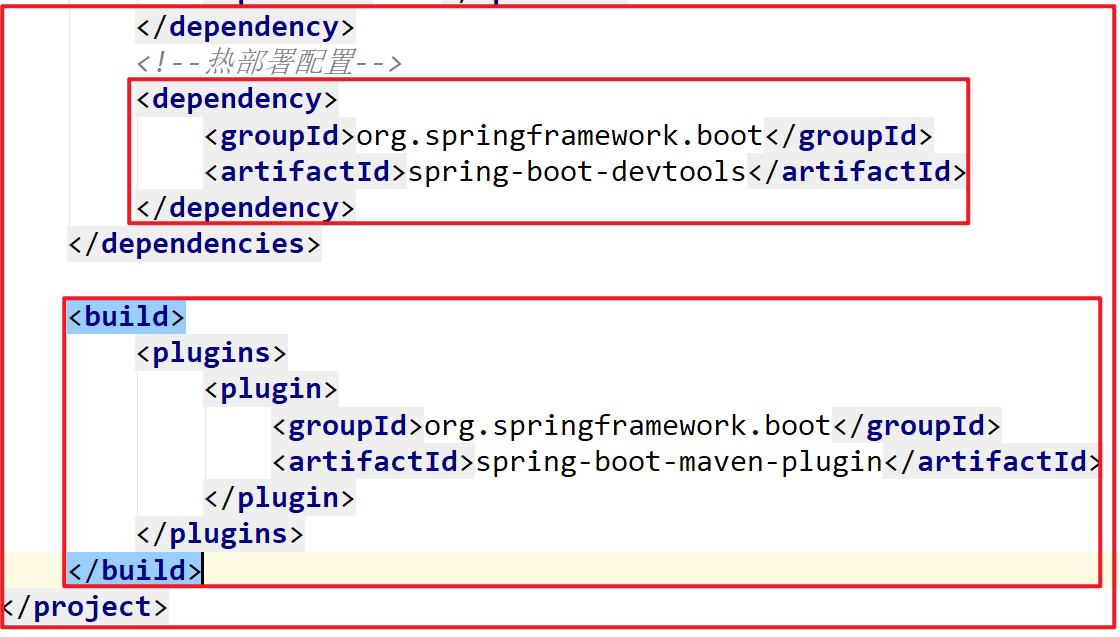
<!--热部署配置-->
<dependency>
    <groupId>org.springframework.boot</groupId>
    <artifactId>spring-boot-devtools</artifactId>
</dependency>

<build>
    <plugins>
        <plugin>
            <groupId>org.springframework.boot</groupId>
            <artifactId>spring-boot-maven-plugin</artifactId>
        </plugin>
    </plugins>
</build>
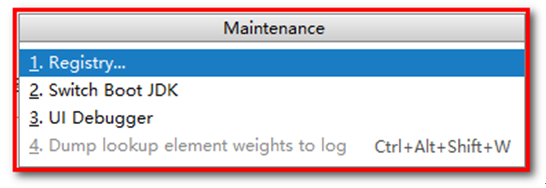
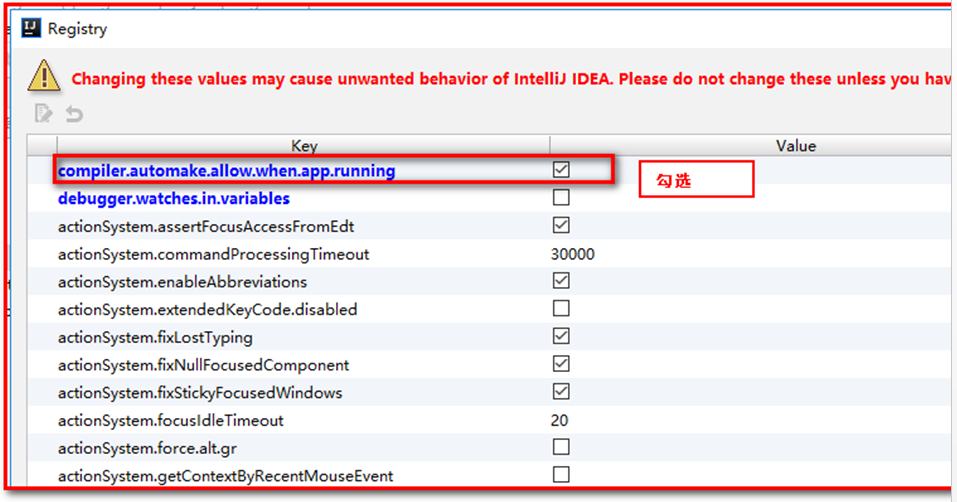
开启 Intellij IEDA 自动编译,需要对IDEA进行自动编译的设置,如下:

正常情况下就可以进行热部署, 如果还是不行,在加入如下操作,如果已经可以热部署,就不需要看后面的操作
然后 Shift+Ctrl+Alt+/,选择Registry
# 2.2.4 使用idea快速创建SpringBoot项目
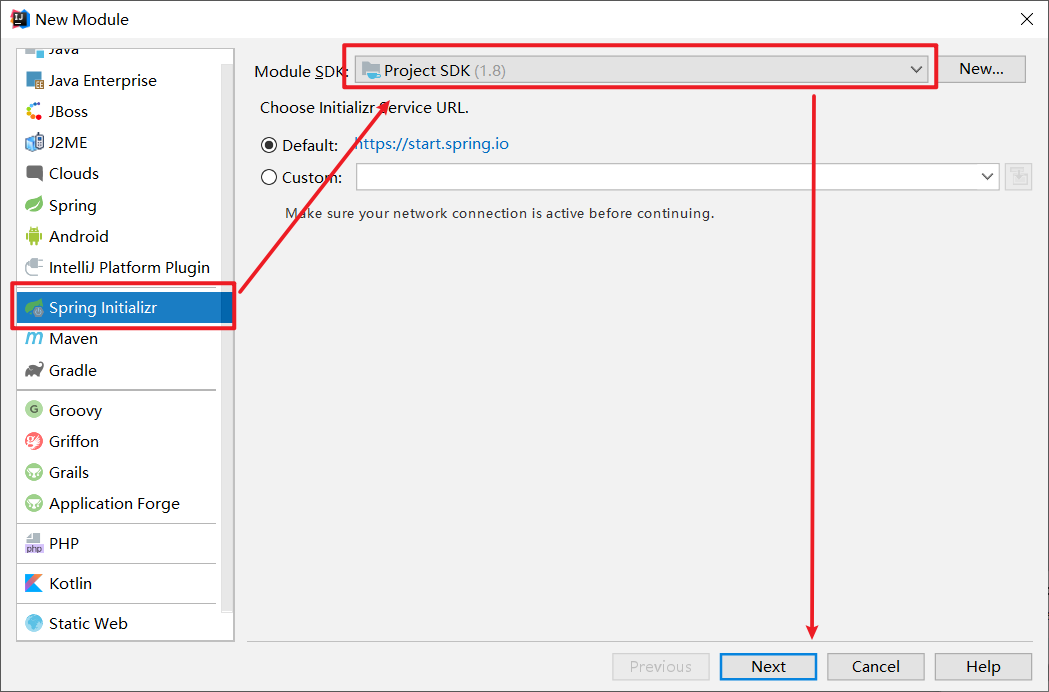
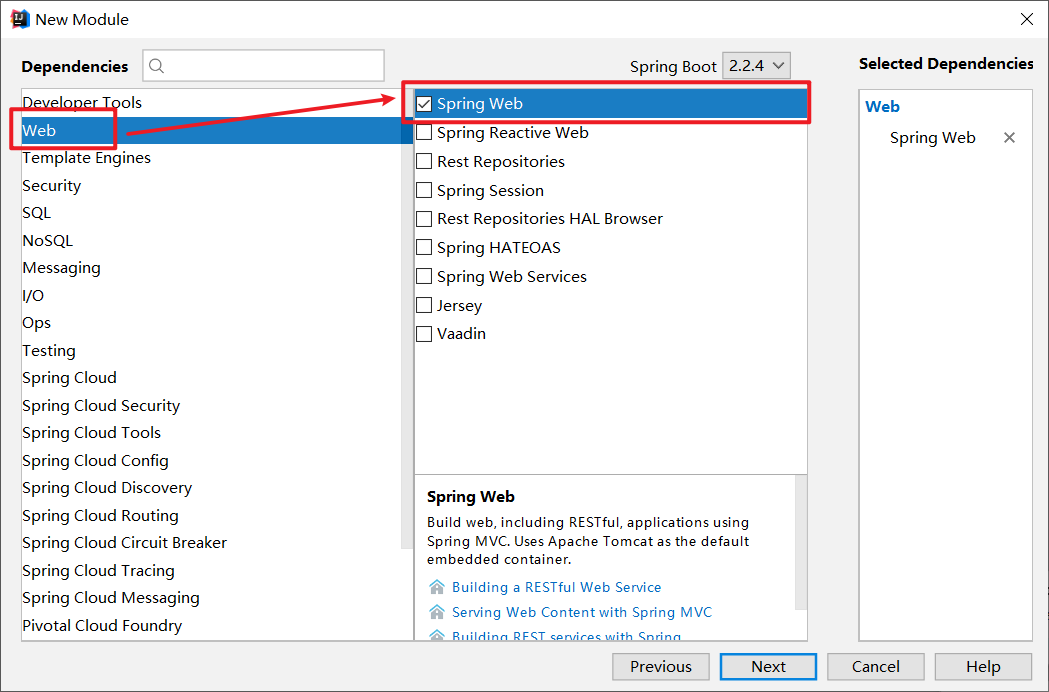
通过idea快速创建的SpringBoot项目的pom.xml中已经导入了我们选择的web的起步依赖的坐标
详情
<?xml version="1.0" encoding="UTF-8"?>
<project xmlns="http://maven.apache.org/POM/4.0.0" xmlns:xsi="http://www.w3.org/2001/XMLSchema-instance"
xsi:schemaLocation="http://maven.apache.org/POM/4.0.0 https://maven.apache.org/xsd/maven-4.0.0.xsd">
<modelVersion>4.0.0</modelVersion>
<parent>
<groupId>org.springframework.boot</groupId>
<artifactId>spring-boot-starter-parent</artifactId>
<version>2.2.4.RELEASE</version>
<relativePath/> <!-- lookup parent from repository -->
</parent>
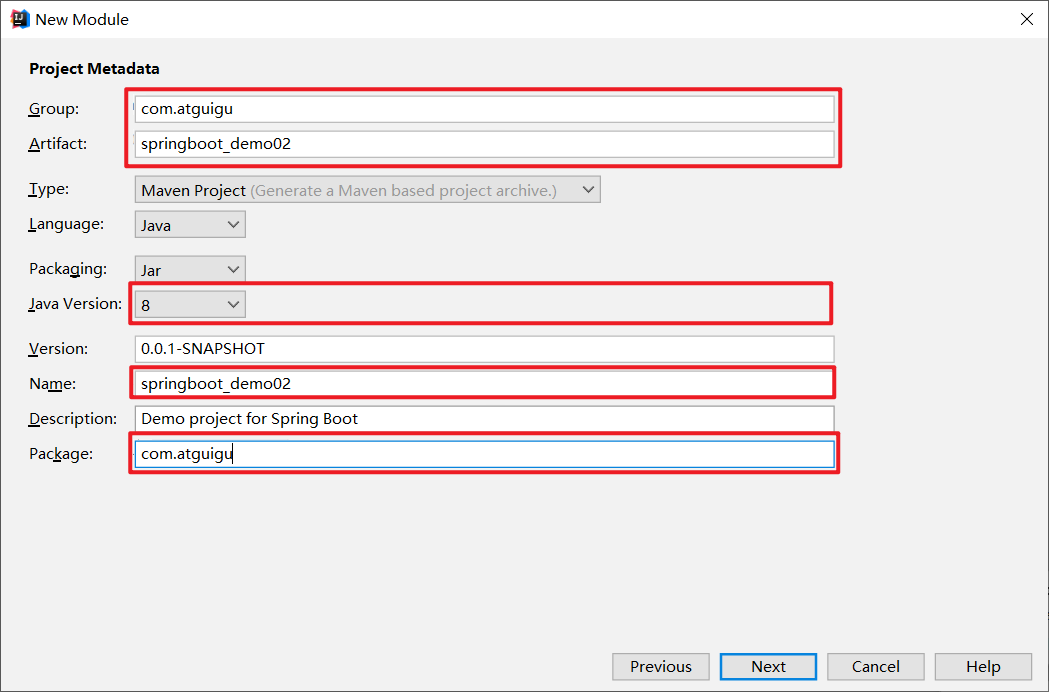
<groupId>com.atguigu</groupId>
<artifactId>springboot_demo02</artifactId>
<version>0.0.1-SNAPSHOT</version>
<name>springboot_demo02</name>
<description>Demo project for Spring Boot</description>
<properties>
<java.version>1.8</java.version>
</properties>
<dependencies>
<dependency>
<groupId>org.springframework.boot</groupId>
<artifactId>spring-boot-starter-web</artifactId>
</dependency>
<dependency>
<groupId>org.springframework.boot</groupId>
<artifactId>spring-boot-starter-test</artifactId>
<scope>test</scope>
<exclusions>
<exclusion>
<groupId>org.junit.vintage</groupId>
<artifactId>junit-vintage-engine</artifactId>
</exclusion>
</exclusions>
</dependency>
</dependencies>
<build>
<plugins>
<plugin>
<groupId>org.springframework.boot</groupId>
<artifactId>spring-boot-maven-plugin</artifactId>
</plugin>
</plugins>
</build>
</project>
可以使用快速入门的方式创建Controller进行访问,此处不再赘述
# 三、SpringBoot原理分析
# 3.1 起步依赖原理分析
# 3.1.1 分析spring-boot-starter-parent
按住Ctrl点击pom.xml中的spring-boot-starter-parent,跳转到了spring-boot-starter-parent的pom.xml,xml配置如下(只摘抄了部分重点配置):

按住Ctrl点击pom.xml中的spring-boot-starter-dependencies,跳转到了spring-boot-starter-dependencies的pom.xml,xml配置如下(只摘抄了部分重点配置):
详情
<properties>
  	<activemq.version>5.15.3</activemq.version>
  	<antlr2.version>2.7.7</antlr2.version>
  	<appengine-sdk.version>1.9.63</appengine-sdk.version>
  	<artemis.version>2.4.0</artemis.version>
  	<aspectj.version>1.8.13</aspectj.version>
  	<assertj.version>3.9.1</assertj.version>
  	<atomikos.version>4.0.6</atomikos.version>
  	<bitronix.version>2.1.4</bitronix.version>
  	<build-helper-maven-plugin.version>3.0.0</build-helper-maven-plugin.version>
  	<byte-buddy.version>1.7.11</byte-buddy.version>
  	... ... ...
</properties>
<dependencyManagement>
  	<dependencies>
      	<dependency>
        	<groupId>org.springframework.boot</groupId>
        	<artifactId>spring-boot</artifactId>
        	<version>2.0.1.RELEASE</version>
      	</dependency>
      	<dependency>
        	<groupId>org.springframework.boot</groupId>
        	<artifactId>spring-boot-test</artifactId>
        	<version>2.0.1.RELEASE</version>
      	</dependency>
      	... ... ...
	</dependencies>
</dependencyManagement>
<build>
  	<pluginManagement>
    	<plugins>
      		<plugin>
        		<groupId>org.jetbrains.kotlin</groupId>
        		<artifactId>kotlin-maven-plugin</artifactId>
        		<version>${kotlin.version}</version>
      		</plugin>
      		<plugin>
        		<groupId>org.jooq</groupId>
        		<artifactId>jooq-codegen-maven</artifactId>
        		<version>${jooq.version}</version>
      		</plugin>
      		<plugin>
        		<groupId>org.springframework.boot</groupId>
        		<artifactId>spring-boot-maven-plugin</artifactId>
        		<version>2.0.1.RELEASE</version>
      		</plugin>
          	... ... ...
    	</plugins>
  	</pluginManagement>
</build>
总结:从上面的spring-boot-starter-dependencies的pom.xml中我们可以发现,一部分坐标的版本、依赖管理、插件管理已经定义好,所以我们的SpringBoot工程继承spring-boot-starter-parent后已经具备版本锁定等配置了(不会出现版本冲突的问题)。所以起步依赖的作用就是进行依赖的传递。
# 3.1.2 分析spring-boot-starter-web
不是所有的jar都传递,需要指定,用到哪个jar包,导入哪个jar包。
按住Ctrl点击pom.xml中的spring-boot-starter-web,跳转到了spring-boot-starter-web的pom.xml,xml配置如下(只摘抄了部分重点配置):
详情
<?xml version="1.0" encoding="UTF-8"?>
<project xsi:schemaLocation="http://maven.apache.org/POM/4.0.0 http://maven.apache.org/xsd/maven-4.0.0.xsd" xmlns="http://maven.apache.org/POM/4.0.0"
    xmlns:xsi="http://www.w3.org/2001/XMLSchema-instance">
  	<modelVersion>4.0.0</modelVersion>
  	<parent>
    	<groupId>org.springframework.boot</groupId>
    	<artifactId>spring-boot-starters</artifactId>
    	<version>2.0.1.RELEASE</version>
  	</parent>
  	<groupId>org.springframework.boot</groupId>
  	<artifactId>spring-boot-starter-web</artifactId>
  	<version>2.0.1.RELEASE</version>
  	<name>Spring Boot Web Starter</name>

  	<dependencies>
    	<dependency>
      		<groupId>org.springframework.boot</groupId>
      		<artifactId>spring-boot-starter</artifactId>
      		<version>2.0.1.RELEASE</version>
      		<scope>compile</scope>
    	</dependency>
    	<dependency>
      		<groupId>org.springframework.boot</groupId>
      		<artifactId>spring-boot-starter-json</artifactId>
      		<version>2.0.1.RELEASE</version>
      		<scope>compile</scope>
    	</dependency>
    	<dependency>
      		<groupId>org.springframework.boot</groupId>
      		<artifactId>spring-boot-starter-tomcat</artifactId>
      		<version>2.0.1.RELEASE</version>
      		<scope>compile</scope>
    	</dependency>
    	<dependency>
      		<groupId>org.hibernate.validator</groupId>
      		<artifactId>hibernate-validator</artifactId>
      		<version>6.0.9.Final</version>
      		<scope>compile</scope>
    	</dependency>
    	<dependency>
      		<groupId>org.springframework</groupId>
      		<artifactId>spring-web</artifactId>
      		<version>5.0.5.RELEASE</version>
      		<scope>compile</scope>
    	</dependency>
    	<dependency>
      		<groupId>org.springframework</groupId>
      		<artifactId>spring-webmvc</artifactId>
      		<version>5.0.5.RELEASE</version>
      		<scope>compile</scope>
    	</dependency>
  	</dependencies>
</project>
总结:从上面的spring-boot-starter-web的pom.xml中我们可以发现,spring-boot-starter-web就是将web开发要使用的spring-web、spring-webmvc等坐标进行了“打包”,这样我们的工程只要引入spring-boot-starter-web起步依赖的坐标就可以进行web开发了,同样体现了依赖传递的作用,同时加载tomcat,只要启动main方法,就相当于起到tomcat进行开发;同时加载json,支持springmvc的数据请求和响应。
# 3.2 自动配置原理解析
详情
package com.atguigu;
import org.springframework.boot.SpringApplication;
import org.springframework.boot.autoconfigure.SpringBootApplication;
import org.springframework.context.ApplicationContext;
import org.springframework.context.ConfigurableApplicationContext;
@SpringBootApplication
public class SpringbootDemo02Application {
public static void main(String[] args) {
ApplicationContext act = SpringApplication.run(SpringbootDemo02Application.class, args);
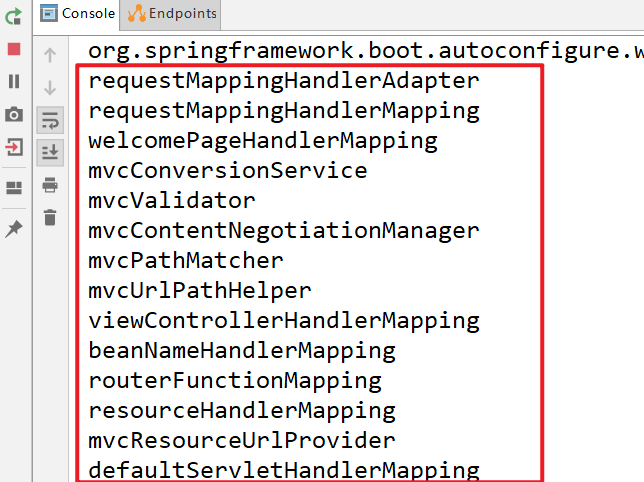
for (String name : act.getBeanDefinitionNames()) {
System.out.println(name);
}
}
}
运行默认自动配置加载的对象
按住Ctrl点击查看启动类MySpringBootApplication上的注解@SpringBootApplication
@SpringBootApplication
public class MySpringBootApplication {
    public static void main(String[] args) {
        SpringApplication.run(MySpringBootApplication.class);
    }
}
注解@SpringBootApplication的源码
@SpringBootApplication封装spring注解的复合注解,包含@ComponentScan,和@SpringBootConfiguration,@EnableAutoConfiguration
@Target(ElementType.TYPE)
@Retention(RetentionPolicy.RUNTIME)
@Documented
@Inherited
@SpringBootConfiguration
@EnableAutoConfiguration
@ComponentScan(excludeFilters = {
		@Filter(type = FilterType.CUSTOM, classes = TypeExcludeFilter.class),
		@Filter(type = FilterType.CUSTOM, classes = AutoConfigurationExcludeFilter.class) })
public @interface SpringBootApplication {

	/**
	 * Exclude specific auto-configuration classes such that they will never be applied.
	 * @return the classes to exclude
	 */
	@AliasFor(annotation = EnableAutoConfiguration.class)
	Class<?>[] exclude() default {};

//......

}
其中,
点进 @SpringBootApplication 注解后我们重点关注最后三个注解
@ComponentScan(包扫描)
component是组件,scan是扫描,所以这个注解的含义就是用来扫描组件的,
componentScan 扫描当前包及其子包下被 @Component,@Controller,@Service,@Repository注解标记的类并纳入到spring容器中进行管理,所以这个注解会自动注入所有在主程序所在包下的组件。默认把当前启动类所在的包作为扫描包的起点,例如咱们的项目,扫描 com.maweiqi 包
以前在ssm项目中我们需要去配置我们的包扫描
<context:component-scan base-package="com.xxx"></context:component-scan>
@SpringBootConfiguration : 表示当前类具有配置类的作用
按住Ctrl点击查看注解 @EnableAutoConfiguration
自动配置:根据当前引入的依赖包,猜测需要创建的工程类型,以及工程中有可能创建的对象,根据猜测自动创建工程所需的相关实例bean
程序启动,会自动加载扫描所有 classpath:/META-INF/spring.factories文件 ,并且创建对应实例
@Target(ElementType.TYPE)
@Retention(RetentionPolicy.RUNTIME)
@Documented
@Inherited
@AutoConfigurationPackage
@Import(AutoConfigurationImportSelector.class)
public @interface EnableAutoConfiguration {
	//... ... ...
}
其中,@Import(AutoConfigurationImportSelector.class) 导入了 AutoConfigurationImportSelector 类
按住Ctrl点击查看 AutoConfigurationImportSelector 源码 , 加载元数据
public String[] selectImports(AnnotationMetadata annotationMetadata) {
    ..................
    AutoConfigurationEntry autoConfigurationEntry = getAutoConfigurationEntry(autoConfigurationMetadata,
            annotationMetadata);
    ..................
    return StringUtils.toStringArray(autoConfigurationEntry.getConfigurations());
}

protected AutoConfigurationEntry getAutoConfigurationEntry(AutoConfigurationMetadata autoConfigurationMetadata,
        AnnotationMetadata annotationMetadata) {

    ....................
    List<String> configurations = getCandidateConfigurations(annotationMetadata, attributes);
    ....................
}

protected List<String> getCandidateConfigurations(AnnotationMetadata metadata, AnnotationAttributes attributes) {
// 在META-INF/spring.factories中找不到自动配置类。需要看看文件是否正确
"No auto configuration classes found in META-INF/spring.factories. If you "
            + "are using a custom packaging, make sure that file is correct.");
    return configurations;
}
其中,SpringFactoriesLoader.loadFactoryNames 方法的作用就是从META-INF/spring.factories文件中读取指定类对应的类名称列表
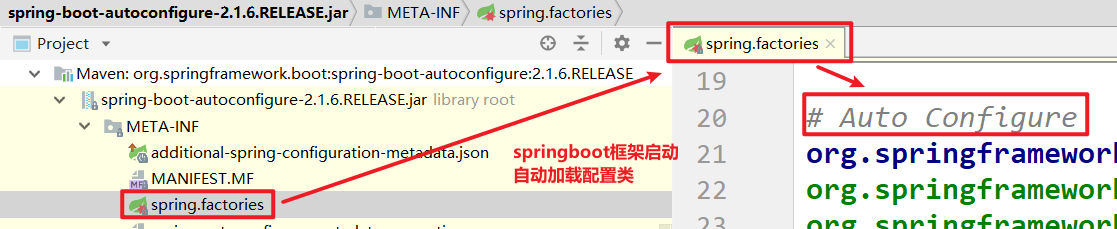
spring.factories 文件中有关自动配置的配置信息如下:摘抄重点,springboot 启动之后,会自动加载 dispatcherServlet
... ... ...
org.springframework.boot.autoconfigure. EnableAutoConfiguration=
org.springframework.boot.autoconfigure.web.servlet. DispatcherServletAutoConfiguration,
... ... ...
上面配置文件存在大量的以 Configuration 为结尾的类名称,这些类就是存有自动配置信息的类,而SpringApplication 在获取这些类名后再加载
我们以 DispatcherServletAutoConfiguration 为例来分析:
@AutoConfigureOrder(Ordered.HIGHEST_PRECEDENCE)
@Configuration
@ConditionalOnWebApplication(type = Type.SERVLET)
@ConditionalOnClass(DispatcherServlet.class)
@AutoConfigureAfter(ServletWebServerFactoryAutoConfiguration.class)
public class DispatcherServletAutoConfiguration {

	/*
	 * The bean name for a DispatcherServlet that will be mapped to the root URL "/"
	 */
	public static final String DEFAULT_DISPATCHER_SERVLET_BEAN_NAME = "dispatcherServlet";
# 3.3 举例自动配置
新建包 com.atguigu.pojo , 创建类 User
package com.atguigu.domain;

public class User {
}
package com.atguigu;

import org.springframework.boot.SpringApplication;
import org.springframework.boot.autoconfigure.SpringBootApplication;
import org.springframework.context.ApplicationContext;
import org.springframework.context.ConfigurableApplicationContext;

@SpringBootApplication
public class SpringbootDemo02Application {

    public static void main(String[] args) {
        ApplicationContext act = SpringApplication.run(SpringbootDemo02Application.class, args);
        for (String name : act.getBeanDefinitionNames()) {
            System.out.println(name);
        }
    }

}
在 resources文件夹下面 新建 /META-INF/spring.factories 文件
org.springframework.boot.autoconfigure. EnableAutoConfiguration=com.atguigu.pojo. User
运行程序

# 四、SpringBoot的配置文件
# 4.1 SpringBoot配置文件类型
# 4.1.1 SpringBoot配置文件类型和作用
SpringBoot是基于约定的,所以很多配置都有默认值,但如果想使用自己的配置替换默认配置的话,就可以使用application.properties或者application.yml(application.yaml)进行配置。
SpringBoot默认会从Resources目录下加载application.properties或application.yml(application.yaml)文件
其中,application.properties文件是键值对类型的文件,之前一直在使用,所以此处不在对properties文件的格式进行阐述。除了properties文件外,SpringBoot还可以使用yml文件进行配置,下面对yml文件进行讲解。
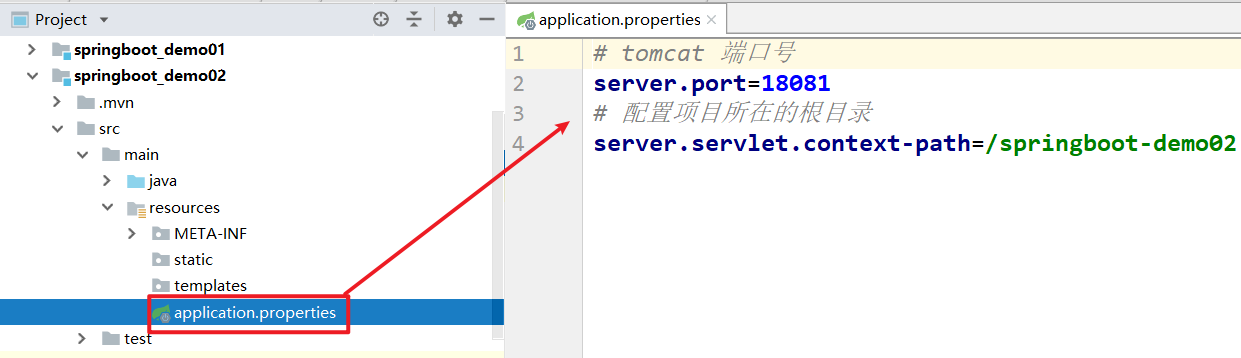
# tomcat 端口号
server.port=18081
# 配置项目所在的根目录
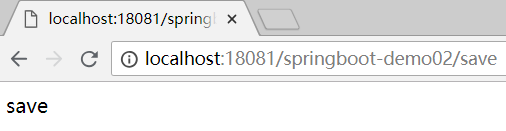
server.servlet.context-path=/springboot-demo02
新建controller
package com.atguigu.controller;

import org.springframework.web.bind.annotation.RequestMapping;
import org.springframework.web.bind.annotation.RestController;

@RestController
public class UserController {

    @RequestMapping("/save")
    public String save(){
        return "save";
    }
}
运行程序
同级目录下打开:spring-configuration-metadata.json
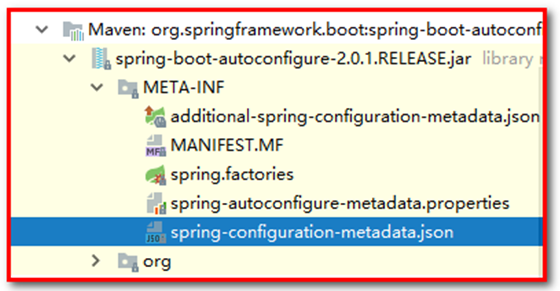
搜素:server.port

为什么可以在resources下创建application.properties文件呢?我们查看springboot的启动依赖:
点击spring-boot-starter-parent
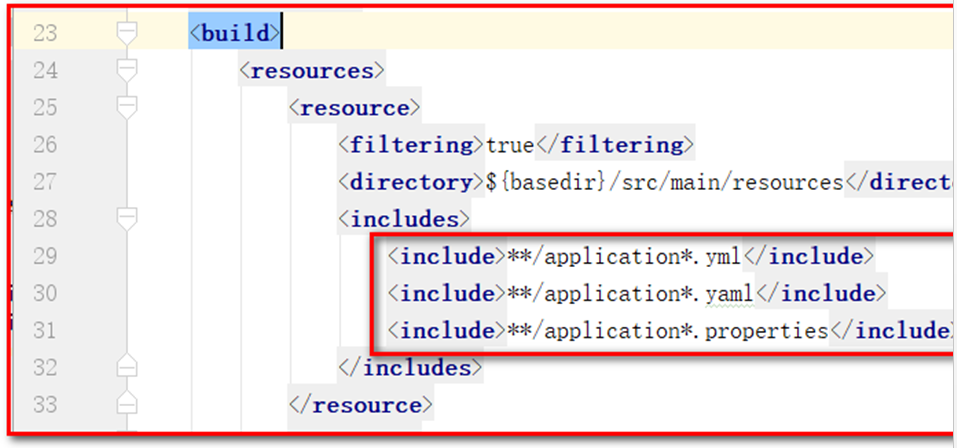
发现除了可以使用 application.propertes 文件,也可以使用 application.yml 或者 application.yaml 文件。
# 4.1.2 application.yml配置文件
# 4.1.2.1 yml配置文件简介
YML文件格式是YAML (YAML Aint Markup Language)编写的文件格式,YAML是一种直观的能够被电脑识别的的数据数据序列化格式,并且容易被人类阅读,容易和脚本语言交互的,可以被支持YAML库的不同的编程语言程序导入,比如: C/C++, Ruby, Python, Java, Perl, C#, PHP等。YML文件是以数据为核心的,比传统的xml方式更加简洁。
YML文件的扩展名可以使用.yml或者.yaml。
# 4.1.2.2 yml配置文件的语法
# 4.1.2.2.1 配置普通数据
示例代码:
# 属性的配置
# 语法: key: value
name: maweiqi
注意:value之前有一个空格
在resource文件夹下面,新建application.yml文件
server:
  port: 18082
# 4.1.2.2.2 配置对象数据
语法:
key:
     key1: value1
     key2: value2
或者:
key: {key1: value1,key2: value2}
在resource文件夹下面新建 application.yml 文件
注意:key1前面的空格个数不限定,在yml语法中,相同缩进代表同一个级别,一般按一下tab键
server:
port: 18082
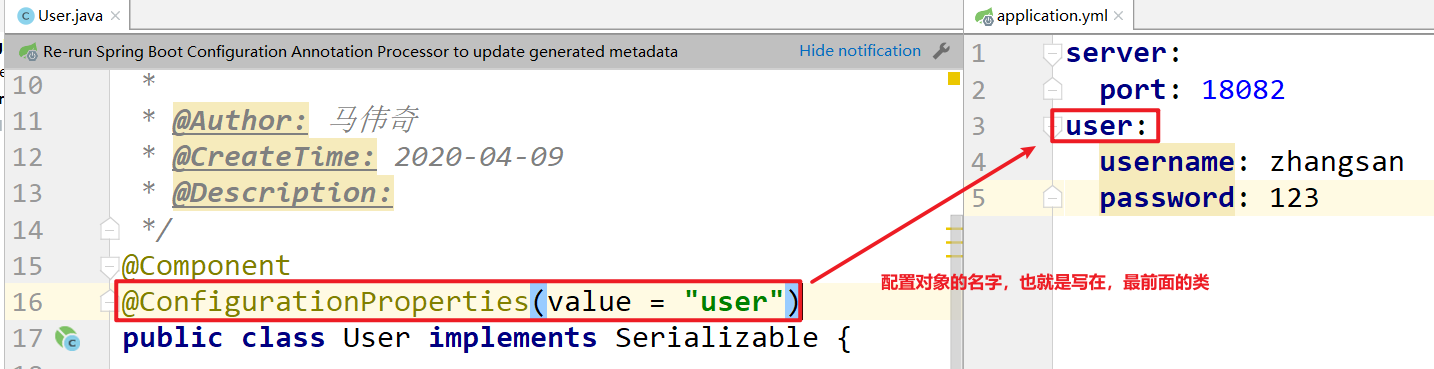
user:
username: zhangsan
password: 123
user类,通过注解 @ConfigurationProperties (prefix=“配置文件中的key的前缀”)可以将配置文件中的配置自动与实体进行映射
 package com.atguigu.pojo;

import org.springframework.boot.context.properties.ConfigurationProperties;
import org.springframework.stereotype.Component;

@Component
@ConfigurationProperties(value = "user")
public class User implements Serializable{

	private String username;
	private String password;

	//生成 set get  tostring
}
报错提示,请在pom文件添加配置信息

在pom文件添加如下配置
# 读取配置文件注解
<dependency>
    <groupId>org.springframework.boot</groupId>
    <artifactId>spring-boot-configuration-processor</artifactId>
    <optional>true</optional>
</dependency>
修改 SpringbootDemo02Application
package com.atguigu;

import com.atguigu.pojo.User;
import org.springframework.boot.SpringApplication;
import org.springframework.boot.autoconfigure.SpringBootApplication;
import org.springframework.context.ApplicationContext;
import org.springframework.context.ConfigurableApplicationContext;

@SpringBootApplication
public class SpringbootDemo02Application {

    public static void main(String[] args) {
        ApplicationContext act = SpringApplication.run(SpringbootDemo02Application.class, args);
        User user = (User) act.getBean("user");
        System.out.println(user);
    }

}
运行程序
# 4.1.2.2.2 配置Map数据
# 语法:
map:
    key: value1
    key: value2
示例代码:
# map结构
map:
  key1: value1
  key2: value2
# 4.1.2.2.3 配置数组(List、Set)数据
# 语法:
  key:

   - value1
   - value2
     或者:
      key: [value1,value2]
     示例代码:
# 配置数据集合
    city:
        - beijing
        - tianjin
        - shanghai
        - chongqing
# 或者行内注入
city: [beijing, tianjin, shanghai, chongqing] 注意:value1与之间的 - 之间存在一个空格
在 pojo包里面,新建 Mobile 类
package com.atguigu.pojo;

public class Mobile {
    private String num;
    private String brand;

    @Override
    public String toString() {
        return "Mobile{" +
                "num='" + num + '\'' +
                ", brand='" + brand + '\'' +
                '}';
    }

    public String getNum() {
        return num;
    }

    public void setNum(String num) {
        this.num = num;
    }

    public String getBrand() {
        return brand;
    }

    public void setBrand(String brand) {
        this.brand = brand;
    }
}
修改 user 类
package com.atguigu.pojo;

import org.springframework.boot.context.properties.ConfigurationProperties;
import org.springframework.stereotype.Component;

import java.util.List;

@Component
@ConfigurationProperties(value = "user")
public class User {

    private String username;
    private String password;

    private List<String> nicknames;

    private List<Mobile> mobiles;

    // 生成set ,get 和 tostring方法
}
修改 yml 配置文件,示例代码:
server:
  port: 18082
user:
  username: zhangsan
  password: 123
  nicknames:
    - lisi
    - zhaoliu
  mobiles:
    - num: 1001
      brand: 华为
    - num: 1002
      brand: 小米
注意:value1与之间的 - 之间存在一个空格
运行程序

# 4.2 配置文件与配置类的属性映射方式
# 4.2.1 使用注解@Value映射
我们可以通过@Value注解将配置文件中的值映射到一个Spring管理的Bean的字段上
例如:
application.yml配置如下:
person:
  name: zhangsan
  age: 18
实体Bean代码如下:
package com.atguigu.controller;

import org.springframework.beans.factory.annotation.Value;
import org.springframework.stereotype.Controller;
import org.springframework.web.bind.annotation.RequestMapping;
import org.springframework.web.bind.annotation.ResponseBody;

@Controller
public class Quick2Controller {

    @Value("${person.name}")
    private String name;

    @Value("${person.addr}")
    private String addr;

    @RequestMapping("/quick")
    @ResponseBody
    public String quick(){
        //获得配置文件的信息

        return "name:"+name+",addr="+addr;
    }

}
浏览器访问地址:http://localhost:8080/quick 结果如下:

# 五、SpringBoot与整合其他技术
# 5.1 SpringBoot整合Mybatis
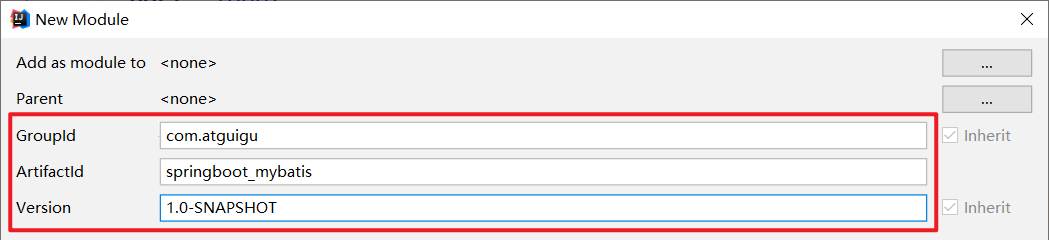
新建项目 springboot_mybatis

# 5.1.1 添加Mybatis的起步依赖
详情
 <parent>
        <groupId>org.springframework.boot</groupId>
        <artifactId>spring-boot-starter-parent</artifactId>
        <version>2.0.1.RELEASE</version>
        <relativePath/> <!-- lookup parent from repository -->
    </parent>

    <properties>
        <project.build.sourceEncoding>UTF-8</project.build.sourceEncoding>
        <project.reporting.outputEncoding>UTF-8</project.reporting.outputEncoding>
        <java.version>1.8</java.version>
    </properties>

    <dependencies>
        <dependency>
            <groupId>org.springframework.boot</groupId>
            <artifactId>spring-boot-starter-web</artifactId>
        </dependency>

        <!--SpingBoot集成junit测试的起步依赖-->
        <dependency>
            <groupId>org.springframework.boot</groupId>
            <artifactId>spring-boot-starter-test</artifactId>
            <scope>test</scope>
        </dependency>

        <!--mybatis起步依赖-->
        <dependency>
            <groupId>org.mybatis.spring.boot</groupId>
            <artifactId>mybatis-spring-boot-starter</artifactId>
            <version>1.1.1</version>
        </dependency>

        <!-- MySQL连接驱动 -->
        <dependency>
            <groupId>mysql</groupId>
            <artifactId>mysql-connector-java</artifactId>
        </dependency>

    </dependencies>

    <build>
        <plugins>
            <plugin>
                <groupId>org.springframework.boot</groupId>
                <artifactId>spring-boot-maven-plugin</artifactId>
            </plugin>
        </plugins>
    </build>
# 5.1.3 添加数据库连接信息
在 application.yml 中添加数据量的连接信息
mybatis:
  type-aliases-package: com.atguigu.domain # 指定mybatis别名包
  mapper-locations: classpath:com/atguigu/dao/*.xml # 指定xml映射文件路径
logging:
  level:
    com.atguigu.dao: debug # 配置日志
spring:
  datasource:
    username: root
    password: root
    url: jdbc:mysql://127.0.0.1:3306/springboot?useUnicode=true&characterEncoding=utf8
    driver-class-name: com.mysql.jdbc.Driver
server:
  port: 18081
# 5.1.4 创建user表
在test数据库中创建user表
-- ----------------------------
-- Table structure for `user`
-- ----------------------------
DROP TABLE IF EXISTS `user`;
CREATE TABLE `user` (
`id` int(11) NOT NULL AUTO_INCREMENT,
`username` varchar(50) DEFAULT NULL,
`password` varchar(50) DEFAULT NULL,
`name` varchar(50) DEFAULT NULL,
PRIMARY KEY (`id`)
) ENGINE=InnoDB AUTO_INCREMENT=10 DEFAULT CHARSET=utf8;
-- ----------------------------
-- Records of user
-- ----------------------------
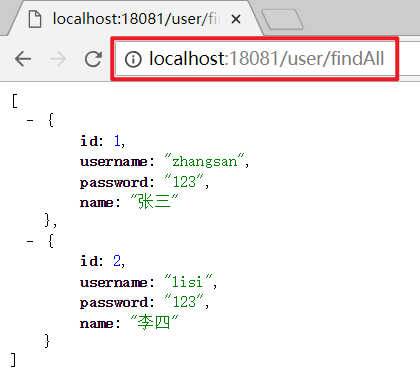
INSERT INTO `user` VALUES ('1', 'zhangsan', '123', '张三');
INSERT INTO `user` VALUES ('2', 'lisi', '123', '李四');
# 5.1.5 创建实体Bean
package com.atguigu.domain;

public class User implements Serializable {
    // 主键
    private Long id;
    // 用户名
    private String username;
    // 密码
    private String password;
    // 姓名
    private String name;

    //此处省略getter和setter方法 .. ..

}
# 5.1.6 编写Mapper
package com.atguigu.dao;

import com.atguigu.domain.User;
import org.apache.ibatis.annotations.Mapper;

import java.util.List;

@Mapper
public interface UserDao {
    public List<User> findAll();
}
注意:@Mapper标记该类是一个mybatis的mapper接口,可以被spring boot自动扫描到spring上下文中
# 5.1.7 配置Mapper映射文件
在resource文件夹下面新建 com/atguigu/dao/UserDao.xml ,路径下加入UserDao.xml配置文件"
<?xml version="1.0" encoding="utf-8" ?>
<!DOCTYPE mapper PUBLIC "-//mybatis.org//DTD Mapper 3.0//EN"
        "http://mybatis.org/dtd/mybatis-3-mapper.dtd" >
<mapper namespace="com.atguigu.dao.UserDao">
    <select id="findAll" resultType="user">
        select * from user
    </select>
</mapper>
# 5.1.8 在application.yml中添加mybatis的信息
#spring集成Mybatis环境 #pojo别名扫描包 mybatis.type-aliases-package=com.atguigu.domain #加载Mybatis映射文件 mybatis.mapper-locations=classpath:com/atguigu/dao/*.xml
# 5.1.9 编写测试Controller
package com.atguigu.controller;

import com.atguigu.domain.User;
import com.atguigu.service.UserService;
import org.springframework.beans.factory.annotation.Autowired;
import org.springframework.web.bind.annotation.RequestMapping;
import org.springframework.web.bind.annotation.RestController;

import java.util.List;

@RestController
@RequestMapping("/user")
public class UserController {

    @Autowired
    private UserService userService;

    @RequestMapping("/findAll")
    private List<User> findAll(){
        return userService.findAll();
    }

}
5.1.10 新建service
package com.atguigu.service;

import com.atguigu.domain.User;

import java.util.List;

public interface UserService {

    List<User> findAll();
}

package com.atguigu.service.impl;

import com.atguigu.dao.UserDao;
import com.atguigu.domain.User;
import com.atguigu.service.UserService;
import org.springframework.beans.factory.annotation.Autowired;
import org.springframework.stereotype.Service;

import java.util.List;

@Service
public class UserServiceImpl implements UserService {

    @Autowired
    private UserDao userDao;

    @Override
    public List<User> findAll() {
        return userDao.findAll();
    }
}
# 5.1.11 测试
如果运行报错:说明jar冲突
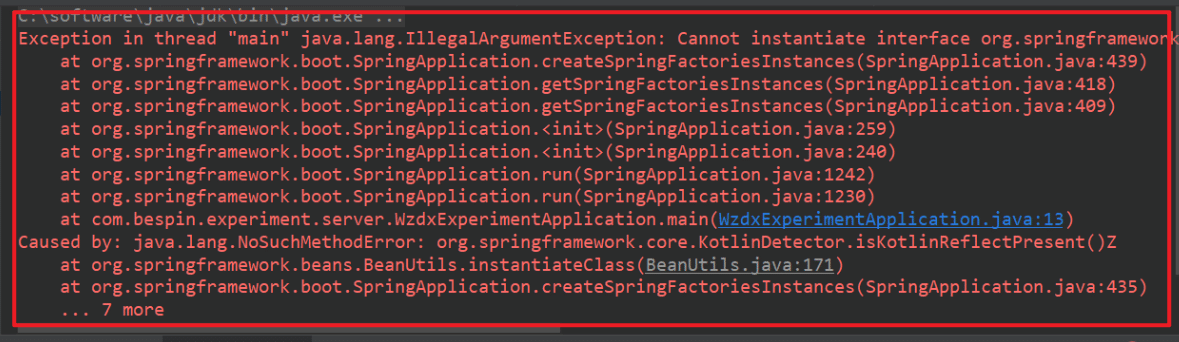
解决方案:
因为pom.xml中引入了spring-boot-starter-web ,同时pom.xml也引入了spring-core,spring-beans,这里去掉spring-core,spring-beans即可。
# 5.2 SpringBoot整合Junit
# 5.2.1 添加Junit的起步依赖
<!--测试的起步依赖-->
<dependency>

    <groupId>org.springframework.boot</groupId>
    <artifactId>spring-boot-starter-test</artifactId>

</dependency>
# 5.2.2 编写测试类
在test文件夹下面新建测试类
package com.atguigu;

import com.atguigu.domain.User;
import com.atguigu.service.UserService;
import org.junit.Test;
import org.junit.runner.RunWith;
import org.springframework.beans.factory.annotation.Autowired;
import org.springframework.boot.test.context.SpringBootTest;
import org.springframework.test.context.junit4.SpringRunner;

import java.util.List;

@RunWith(SpringRunner.class)
@SpringBootTest
public class MapperTest {

    @Autowired
    private UserService userService;

    @Test
    public void testUser(){
        List<User> users = userService.findAll();
        for (User user : users) {
            System.out.println(user);
        }
    }

}
# 5.2.3 控制台打印信息

# 5.3 SpringBoot整合Spring Data JPA
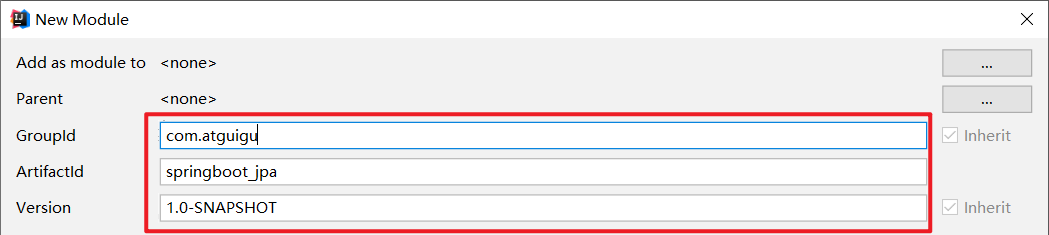
新建项目 springboot_jpa

# 5.3.1 添加Spring Data JPA的起步依赖
详情
<parent>
<groupId>org.springframework.boot</groupId>
<artifactId>spring-boot-starter-parent</artifactId>
<version>2.0.1.RELEASE</version>
<relativePath/> <!-- lookup parent from repository -->
</parent>
<properties>
<project.build.sourceEncoding>UTF-8</project.build.sourceEncoding>
<project.reporting.outputEncoding>UTF-8</project.reporting.outputEncoding>
<java.version>1.8</java.version>
</properties>
<dependencies>
<dependency>
<groupId>org.springframework.boot</groupId>
<artifactId>spring-boot-starter-web</artifactId>
</dependency>
<dependency>
<groupId>org.springframework.boot</groupId>
<artifactId>spring-boot-starter-test</artifactId>
<scope>test</scope>
</dependency>
<!-- springBoot JPA的起步依赖 -->
<dependency>
<groupId>org.springframework.boot</groupId>
<artifactId>spring-boot-starter-data-jpa</artifactId>
</dependency>
<!-- MySQL连接驱动 -->
<dependency>
    <groupId>mysql</groupId>
    <artifactId>mysql-connector-java</artifactId>
</dependency>
<!-- 配置使用redis启动器 -->
<dependency>
<groupId>org.springframework.boot</groupId>
<artifactId>spring-boot-starter-data-redis</artifactId>
</dependency>
</dependencies>
# 5.3.2 添加数据库驱动依赖
<!-- MySQL连接驱动 -->
<dependency>
<groupId>mysql</groupId>
<artifactId>mysql-connector-java</artifactId>
</dependency>
# 5.3.3 在application.yml中配置数据库和jpa的相关属性
logging:
  level:
    com.atguigu.dao: debug # 配置日志
spring:
  datasource:
    username: root
    password: root
    url: jdbc:mysql://127.0.0.1:3306/springboot?useUnicode=true&characterEncoding=utf8
    driver-class-name: com.mysql.jdbc.Driver
  redis: #Redis
    port: 6379
    host: 127.0.0.1
  jpa:
    database: mysql
    show-sql: true
    generate-ddl: true
    hibernate:
      ddl-auto: update
      naming_strategy: org.hibernate.cfg.ImprovedNamingStrategy
server:
  port: 18081
# 5.3.4 创建实体配置实体
package com.atguigu.domain;

import javax.persistence.*;

@Entity
@Table(name = "user")
public class User{

    @Id
    @GeneratedValue(strategy = GenerationType.IDENTITY)
    @Column(name = "id")
    private Long id;
    @Column(name = "username")
    private String username;
    @Column(name = "password")
    private String password;
    @Column(name = "name")
    private String name;

    //此处省略setter和getter方法... ...
}
# 5.3.5 编写UserRepository
package com.atguigu.dao;

import com.atguigu.domain.User;
import org.springframework.data.jpa.repository.JpaRepository;

public interface UserDao extends JpaRepository<User,Integer> {
}
# 5.3.6 编写service类
package com.atguigu.service;

import com.atguigu.domain.User;

import java.util.List;

public interface UserService {
    List<User> findUsers();

    User findUserById(Integer id);

    void saveUser(User user);

    void updateUser(User user);

    void deleteUserById(Integer id);
}
package com.atguigu.service.impl;

import com.atguigu.dao.UserDao;
import com.atguigu.domain.User;
import com.atguigu.service.UserService;
import org.springframework.beans.factory.annotation.Autowired;
import org.springframework.stereotype.Service;

import java.util.List;

@Service
public class UserServiceImpl implements UserService {

    @Autowired
    private UserDao userDao;

    /**
     * 查询所有
     * @return
     */
    @Override
    public List<User> findUsers() {
        return userDao.findAll();
    }
    /**
     * 根据id查询
     * @return
     */
    @Override
    public User findUserById(Integer id) {
        return userDao.findById(id).get();
    }
    /**
     * 保存
     * @return
     */
    @Override
    public void saveUser(User user) {
        userDao.save(user);
    }
    /**
     * 更新
     * @return
     */
    @Override
    public void updateUser(User user) {
        userDao.save(user);
    }
    /**
     * 根据id删除
     * @return
     */
    @Override
    public void deleteUserById(Integer id) {
        userDao.deleteById(id);
    }
}
# 5.3.6 编写controller类
package com.atguigu.controller;

import com.atguigu.domain.User;
import com.atguigu.service.UserService;
import org.springframework.beans.factory.annotation.Autowired;
import org.springframework.web.bind.annotation.RequestMapping;
import org.springframework.web.bind.annotation.RestController;

import java.util.List;

@RestController
@RequestMapping("/user")
public class UserController {

    @Autowired
    private UserService userService;

    @RequestMapping("/findAll")
    public List<User> findAll(){
        return userService.findUsers();
    }
}
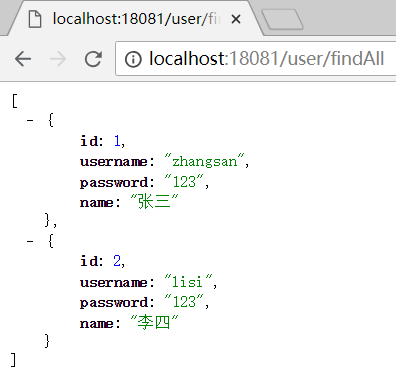
# 5.3.7 控制台打印信息

注意:如果是jdk9,执行报错如下:

原因:jdk缺少相应的jar
解决方案:手动导入对应的maven坐标,如下:
<!--jdk9需要导入如下坐标-->
<dependency>

    <groupId>javax.xml.bind</groupId>
    <artifactId>jaxb-api</artifactId>
    <version>2.3.0</version>

</dependency>
# 5.4 SpringBoot整合Redis
找到上面的 springboot_mybatis 项目,添加pom文件
# 5.4.1 添加redis的起步依赖
<!-- 配置使用redis启动器 -->
<dependency>

    <groupId>org.springframework.boot</groupId>
    <artifactId>spring-boot-starter-data-redis</artifactId>

</dependency>
# 5.4.2 配置redis的连接信息
在 application.yml 文件 添加 redis 的配置信息
mybatis:
  type-aliases-package: com.atguigu.domain # 指定mybatis别名包
  mapper-locations: classpath:com/atguigu/dao/*.xml # 指定xml映射文件路径
logging:
  level:

    com.atguigu.dao: debug # 配置日志

spring:
  datasource:

    username: root
    password: root
    url: jdbc:mysql://127.0.0.1:3306/springboot?useUnicode=true&characterEncoding=utf8
    driver-class-name: com.mysql.jdbc.Driver

  redis: #Redis

    port: 6379
    host: 127.0.0.1

server:
  port: 18081
# 5.4.3 注入RedisTemplate测试redis操作
在 service 的实现类里面实现业务逻辑
package com.atguigu.service.impl;

import com.atguigu.dao. UserDao;
import com.atguigu.domain. User;
import com.atguigu.service. UserService;
import org.springframework.beans.factory.annotation. Autowired;
import org.springframework.data.redis.core. RedisTemplate;
import org.springframework.stereotype. Service;

import java.util. List;

@Service
public class UserServiceImpl implements UserService {

    @Autowired
    private UserDao userDao;

    @Autowired
    private RedisTemplate redisTemplate;

    @Override
    public List<User> findAll() {
        // redis的key
        String key = "alluser";
        // 先查询redis中是否有数据,如果有直接返回redis的数据
        List<User> users = (List<User>) redisTemplate.boundValueOps(key).get();
        if (users!=null) {
            return users;
        }

        // 如果没有,查询数据库
        users = userDao.findAll();
        // 将数据库数据存入到redis中
        if (users != null && users.size()>0) {
            redisTemplate.boundValueOps(key).set(users);
        }

        return users;

    }

}
运行程序
# 5.5 SpringBoot整合定时任务
创建项目 springboot_task
添加pom文件
<!--父工程-->

    <parent>

        <groupId>org.springframework.boot</groupId>
        <artifactId>spring-boot-starter-parent</artifactId>
        <version>2.1.6.RELEASE</version>
        <relativePath/> <!-- lookup parent from repository -->
    </parent>

    <dependencies>
        <dependency>
            <groupId>org.springframework.boot</groupId>
            <artifactId>spring-boot-starter-web</artifactId>
        </dependency>


        <dependency>
            <groupId>org.springframework.boot</groupId>
            <artifactId>spring-boot-starter-test</artifactId>
            <scope>test</scope>
        </dependency>

        <!-- 添加 Scheduled 坐标 -->
        <dependency>
            <groupId>org.springframework</groupId>
            <artifactId>spring-context-support</artifactId>
            <version>5.0.5. RELEASE</version>
        </dependency>

    </dependencies>
创建 BootApplication
package com.maweiqi;
import org.springframework.boot. SpringApplication;
import org.springframework.boot.autoconfigure. SpringBootApplication;
import org.springframework.scheduling.annotation. EnableScheduling;

@SpringBootApplication
@EnableScheduling
public class BootApplication {

    public static void main(String[] args) {
        SpringApplication.run(BootApplication.class, args);

    }

}
创建 TaskController
package com.maweiqi.controller;
import java.text. SimpleDateFormat;
import java.util. Date;

import org.slf4j. Logger;
import org.slf4j. LoggerFactory;
import org.springframework.scheduling.annotation. Scheduled;
import org.springframework.stereotype. Component;
import org.springframework.stereotype. Controller;

@Component
public class TaskController {

    /**
     *  @Scheduled:定时规则
     *       cron:,项目启动后每5秒执行一次
     *
     *       fixedDelay:距离上一次定时任务执行完毕后N毫秒在执行,
     *       执行A任务花了5秒,比如参数是3000,A任务执行完成之后,在过3秒执行
     *
     *       fixedRate:执行周期,执行频率,
     *       定时任务执行开始,在过N毫秒后执行,
     *       执行A任务花了2秒,比如参数是3000,A任务执行完成之后,在过1秒后执行,
     *       执行A任务花了15秒,比如参数是3000,A任务执行完成之后,立即执行。
     *
     * @auther
     * @return void
     */
    @Scheduled(fixedDelay = 3000)
    public void myTask() {

        SimpleDateFormat simpleDateFormat = new SimpleDateFormat("yyyy-MM-dd HH:mm:ss");
        System.out.println(simpleDateFormat.format(new Date()));

    }

}
运行程序 , 每隔 3秒钟 执行一次

修改程序 , 增加休眠时间 , 测试

运行程序 ,每隔 6秒 执行一次

修改程序 ,换成 fixedRate 参数
    @Scheduled(fixedRate = 3000)
    public void myTask() {

        SimpleDateFormat simpleDateFormat = new SimpleDateFormat("yyyy-MM-dd HH:mm:ss");
        System.out.println(simpleDateFormat.format(new Date()));

        try {
         //   Thread.sleep(3000);
        } catch (Exception e) {
            e.printStackTrace();
        }

    }
运行程序 ,每隔 3秒 执行一次

修改程序 , 添加休眠
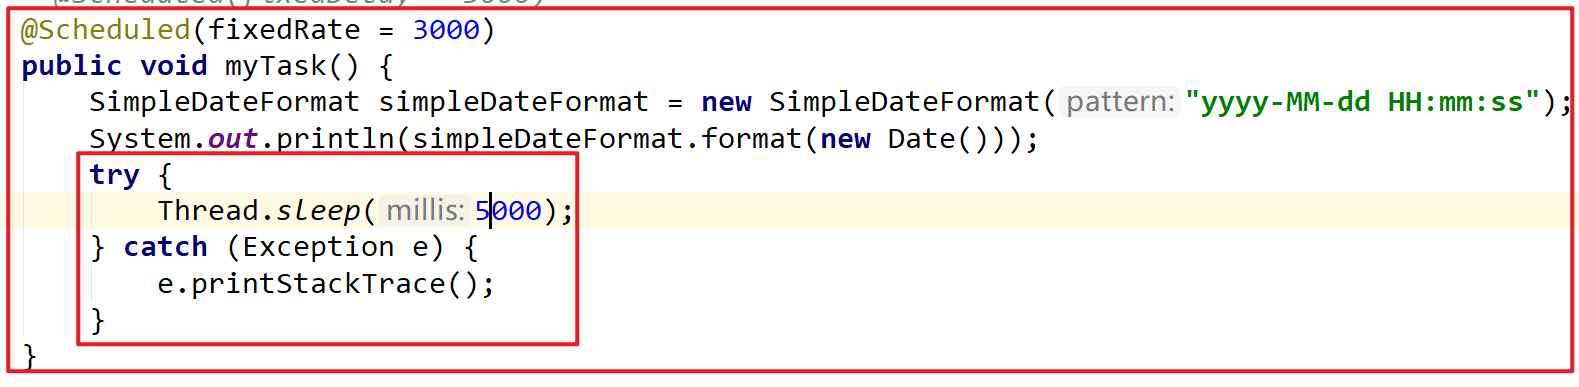
运行程序 ,每隔 5 秒 执行一次

修改程序 ,换成 cron 参数
 @Scheduled(cron = "0/5 * * * * *")
public void myTask() {

        SimpleDateFormat simpleDateFormat = new SimpleDateFormat("yyyy-MM-dd HH:mm:ss");
        System.out.println(simpleDateFormat.format(new Date()));

    }
运行程序 , 每隔5秒打印一次

# 5.6 SpringBoot整合模板
开发传统Java WEB工程时,我们可以使用JSP页面模板语言,但是在SpringBoot中已经不推荐使用了。SpringBoot支持如下页面模板语言
- Thymeleaf
- FreeMarker
- Velocity
- Groovy
- JSP
上面并没有列举所有SpringBoot支持的页面模板技术。其中Thymeleaf是SpringBoot官方所推荐使用的
# 5.6.1 Thymeleaf介绍
在应用开发中,你可以使用Thymeleaf来完全代替JSP
模板:将一些重复内容写好,其中某些可能发生变化的内容,采用占位符方式动态加载(JSP),类似10086群发短信 每个人收到的短信内容一模一样 , 只是名字不一样,一样的内容称之为模板
模板引擎技术:可以基于写好的模板,动态给写好的模板加载数据。
Thymeleaf:==Thymeleaf是一个模板引擎工具,主要用于页面渲染操作(页面数据填充操作),可以取代之前的jsp操作。==
# 5.6.2 Springboot整合thymeleaf
使用springboot 来集成使用Thymeleaf可以大大减少单纯使用thymleaf的代码量,所以我们接下来使用springboot集成使用thymeleaf.
实现的步骤为:
创建一个sprinboot项目
添加thymeleaf的起步依赖
添加spring web的起步依赖
编写html 使用thymleaf的语法获取变量对应后台传递的值
编写controller 设置变量的值到model中
==视图: prefix: 前缀 classpath:/templates/ suffix: 后缀 .html==
(1) 创建工程
创建一个独立的工程 springboot-thymeleaf
pom.xml依赖
详细信息
  <parent>

        <groupId>org.springframework.boot</groupId>
        <artifactId>spring-boot-starter-parent</artifactId>
        <version>2.1.6.RELEASE</version>
        <relativePath/> <!-- lookup parent from repository -->
    </parent>

    <properties>
        <project.build.sourceEncoding>UTF-8</project.build.sourceEncoding>
        <project.reporting.outputEncoding>UTF-8</project.reporting.outputEncoding>
        <java.version>1.8</java.version>
    </properties>

    <dependencies>
        <dependency>
            <groupId>org.springframework.boot</groupId>
            <artifactId>spring-boot-starter-thymeleaf</artifactId>
        </dependency>
        <dependency>
            <groupId>org.springframework.boot</groupId>
            <artifactId>spring-boot-starter-web</artifactId>
        </dependency>


        <dependency>
            <groupId>org.springframework.boot</groupId>
            <artifactId>spring-boot-starter-test</artifactId>
            <scope>test</scope>
        </dependency>


        <!--热部署插件-->
        <dependency>
            <groupId>org.springframework.boot</groupId>
            <artifactId>spring-boot-devtools</artifactId>
            <optional>true</optional>
        </dependency>


    </dependencies>


    <build>
        <plugins>
            <plugin>
                <groupId>org.springframework.boot</groupId>
                <artifactId>spring-boot-maven-plugin</artifactId>
            </plugin>
        </plugins>
    </build>
(2) 创建html
在 resources 中创建 templates 目录,在templates 目录创建 demo1.html , 代码如下:
<! DOCTYPE html>
    <!--这句声明使用thymeleaf标签-->
    <html xmlns:th="http://www.thymeleaf.org">

    <head>

        <title>Thymeleaf的入门</title>
        <meta http-equiv="Content-Type" content="text/html; charset=UTF-8" />

    </head>

    <body>
        <!--输出hello数据这句使用 th:text="${变量名}"
        表示 使用thymeleaf获取文本数据,类似于EL表达式。
        thymeleaf:都是作用于HTML标签之上-->
        <p th:text="${hello}"></p>
    </body>

    </html>
(3) 修改 application.yml 配置
创建 application.yml , 并设置 thymeleaf 的缓存设置,设置为false。
spring:
  thymeleaf:
    cache: false
(4) 控制层
创建 controller 用于测试后台 设置数据到model中。
创建 com.maweiqi.controller. TestController,代码如下:
package com.maweiqi.controller;
import org.springframework.stereotype. Controller;
import org.springframework.ui. Model;
import org.springframework.web.bind.annotation. RequestMapping;
@Controller
@RequestMapping("/test")
public class TestController {
/***
* 访问/test/hello 跳转到demo1页面
* @param model
* @return
*/
@RequestMapping("/hello")
public String hello(Model model){
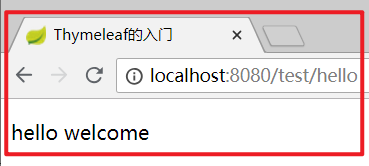
model.addAttribute("hello","hello welcome");
return "demo1";
}
}
(5) 测试
创建启动类com.maweiqi. ThymeleafApplication,代码如下:
package com.maweiqi;

import org.springframework.boot. SpringApplication;
import org.springframework.boot.autoconfigure. SpringBootApplication;

@SpringBootApplication
public class ThymeleafApplication {

    public static void main(String[] args) {
        SpringApplication.run(ThymeleafApplication.class, args);

    }

}
启动系统,并在浏览器访问 http://localhost:8080/test/hello
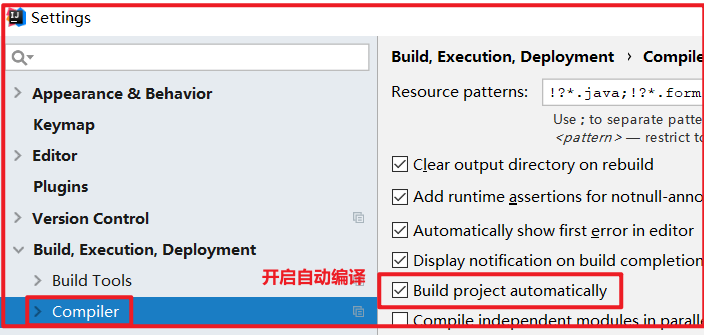
(6)设置缓存不起作用,开启自动编译
# 5.6.3 Thymeleaf基本语法
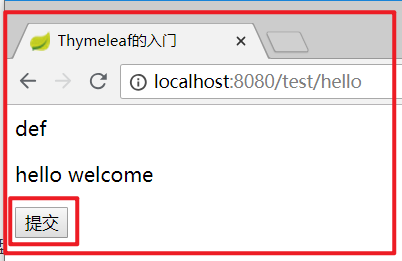
(1) th:action
定义后台控制器路径,类似 <form> 标签的action属性。
例如:修改刚刚 demo01.html 页面
<form id="login-form" th:action="@{/test/hello}">

    <button>提交</button>

</form>
表示提交的请求地址为/test/hello
在 controller 里面打一个断点,点击提交请求, 直接到 controller 里面
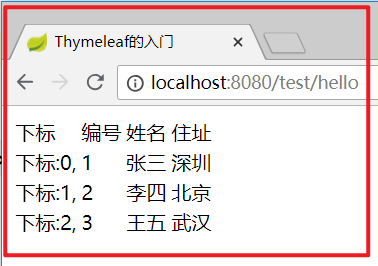
(2) th:each
对象遍历,功能类似 jstl 中的<c:forEach>标签。
创建 com.maweiqi.model. User , 代码如下:
package com.maweiqi.domain;

import java.io. Serializable;

public class User implements Serializable {

    private Integer id;
    private String name;
    private String address;
    //..get..set  toString

    public User(Integer id, String name, String address) {
        this.id = id;
        this.name = name;
        this.address = address;

    }

    public User() {

    }
Controller 添加数据
package com.maweiqi.controller;

import com.maweiqi.domain. User;
import org.springframework.stereotype. Controller;
import org.springframework.ui. Model;
import org.springframework.web.bind.annotation. RequestMapping;

import java.util. ArrayList;
import java.util. List;

@Controller
@RequestMapping("/test")
public class TestController {

    /***
     * 访问/test/hello  跳转到demo1页面
     * @param model
     * @return
     */
    @RequestMapping("/hello")
    public String hello(Model model){

        model.addAttribute("hello","hello welcome");

        //集合数据
        List<User> users = new ArrayList<User>();
        users.add(new User(1, "张三", "深圳"));
        users.add(new User(2, "李四", "北京"));
        users.add(new User(3, "王五", "武汉"));
        model.addAttribute("users", users);

        return "demo1";

    }

}
修改demo01.html 页面
<! DOCTYPE html>
    <!--这句声明使用thymeleaf标签-->
    <html xmlns:th="http://www.thymeleaf.org">

    <head>

        <title>Thymeleaf的入门</title>
        <meta http-equiv="Content-Type" content="text/html; charset=UTF-8" />

    </head>

    <body>

        <table>

            <tr>
                <td>下标</td>
                <td>编号</td>
                <td>姓名</td>
                <td>住址</td>
            </tr>

            <!--
     循环:第一个参数:user :当前被循环的对象
          第二个参数:userStat:当前循环的下标
    -->
            <tr th:each="user,userStat:${users}">
                <td>
                    下标:<span th:text="${userStat.index}"></span>,
                </td>
                <td th:text="${user.id}"></td>
                <td th:text="${user.name}"></td>
                <td th:text="${user.address}"></td>
            </tr>

        </table>

    </body>

    </html>
测试效果 http://localhost:8080/test/hello
(3) Map输出
后台添加Map
详情
package com.maweiqi.controller;
import com.maweiqi.domain. User;
import org.springframework.stereotype. Controller;
import org.springframework.ui. Model;
import org.springframework.web.bind.annotation. RequestMapping;
import java.util. ArrayList;
import java.util. HashMap;
import java.util. List;
import java.util. Map;
@Controller
@RequestMapping("/test")
public class TestController {
/***
* 访问/test/hello 跳转到demo1页面
* @param model
* @return
*/
@RequestMapping("/hello")
public String hello(Model model){
// model.addAttribute("hello", "hello welcome");
//
// //集合数据
// List<User> users = new ArrayList<User>();
// users.add(new User(1, "张三", "深圳"));
// users.add(new User(2, "李四", "北京"));
// users.add(new User(3, "王五", "武汉"));
// model.addAttribute("users", users);
//Map定义
Map<String, Object> dataMap = new HashMap<String, Object>();
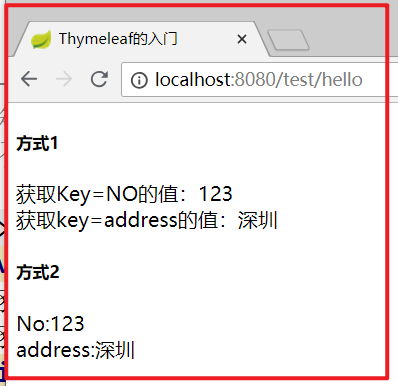
dataMap.put("No", "123");
dataMap.put("address", "深圳");
model.addAttribute("dataMap", dataMap);
return "demo1";
}
}
页面输出 修改 demo01.html
详情
<! DOCTYPE html>
    <!--这句声明使用thymeleaf标签-->
    <html xmlns:th="http://www.thymeleaf.org">

    <head>

        <title>Thymeleaf的入门</title>
        <meta http-equiv="Content-Type" content="text/html; charset=UTF-8" />

    </head>

    <body>

        <table>

            <!-- 读取map2种方式
    1:知道map的key , 直接根据key 获取数据
    2:不知道map的key,循环方式获取key,然后获取数据

   -->

            <h5>方式1</h5>
            <div>
                获取Key=NO的值:<span th:text="${dataMap.No}"></span><br />
                获取key=address的值:<span th:text="${dataMap.address}"></span> <br />
            </div>
            <h5>方式2</h5>
            <div th:each="map:${dataMap}">
                <span th:text="${map.key}"></span>:<span th:text="${map.value}"></span>
            </div>

        </table>

    </body>

    </html>
测试请求: http://localhost:8080/test/hello
(4) 数组输出
后台添加数组
详情
package com.maweiqi.controller;
import com.maweiqi.domain. User;
import org.springframework.stereotype. Controller;
import org.springframework.ui. Model;
import org.springframework.web.bind.annotation. RequestMapping;
import java.util. ArrayList;
import java.util. HashMap;
import java.util. List;
import java.util. Map;
@Controller
@RequestMapping("/test")
public class TestController {
/***
* 访问/test/hello 跳转到demo1页面
* @param model
* @return
*/
@RequestMapping("/hello")
public String hello(Model model){
//存储一个数组
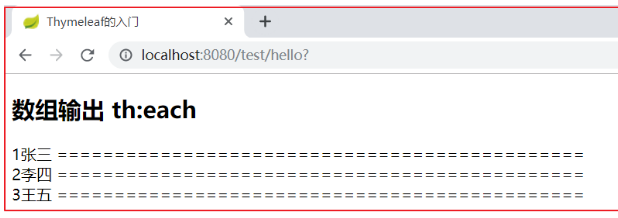
String[] names = {"张三", "李四", "王五"};
model.addAttribute("names", names);
return "demo1";
}
}
页面输出
详情
<div th:each="nm, nmStat:${names}">

    <span th:text="${nmStat.count}"></span><span th:text="${nm}"></span>

</div>
测试效果
(5) Date输出
后台添加日期
详情
package com.maweiqi.controller;
import com.maweiqi.domain. User;
import org.springframework.stereotype. Controller;
import org.springframework.ui. Model;
import org.springframework.web.bind.annotation. RequestMapping;
import java.util.*;
@Controller
@RequestMapping("/test")
public class TestController {
/***
* 访问/test/hello 跳转到demo1页面
* @param model
* @return
*/
@RequestMapping("/hello")
public String hello(Model model){
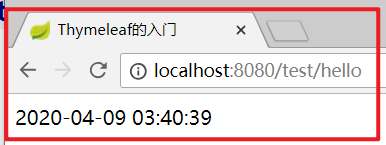
//日期
model.addAttribute("now", new Date());
return "demo1";
}
}
页面输出
详情
<! DOCTYPE html>
    <!--这句声明使用thymeleaf标签-->
    <html xmlns:th="http://www.thymeleaf.org">

    <head>

        <title>Thymeleaf的入门</title>
        <meta http-equiv="Content-Type" content="text/html; charset=UTF-8" />

    </head>

    <body>

        <div>

            <span th:text="${#dates.format(now,'yyyy-MM-dd HH:mm:ss')}"></span>

</div>

</body>
</html>
测试效果
(6) th:if条件
后台添加年龄
详情
package com.maweiqi.controller;
import com.maweiqi.domain. User;
import org.springframework.stereotype. Controller;
import org.springframework.ui. Model;
import org.springframework.web.bind.annotation. RequestMapping;
import java.util.*;
@Controller
@RequestMapping("/test")
public class TestController {
/***
* 访问/test/hello 跳转到demo1页面
* @param model
* @return
*/
@RequestMapping("/hello")
public String hello(Model model){
//if条件
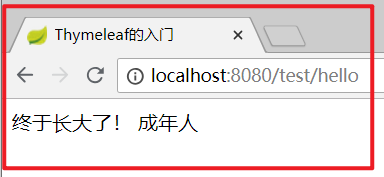
model.addAttribute("age", 22);
return "demo1";
}
}
页面输出
详情
<! DOCTYPE html>
    <!--这句声明使用thymeleaf标签-->
    <html xmlns:th="http://www.thymeleaf.org">

    <head>

        <title>Thymeleaf的入门</title>
        <meta http-equiv="Content-Type" content="text/html; charset=UTF-8" />

    </head>

    <body>

        <!--if:th:unless表示条件不成立 ,输出数据-->
        <div>

            <span th:if="${(age>=18)}">终于长大了!</span>
            <span th:unless="${age<18}">成年人</span>

        </div>

    </body>

    </html>
测试效果
(7) th:fragment 定义一个模块
可以定义一个独立的模块,在 templates 文件夹下面,创建一个 footer.html 代码如下:
详情
<! DOCTYPE html>
    <html xmlns:th="http://www.thymeleaf.org">

    <head>

        <meta http-equiv="Content-Type" content="text/html;charset=charset=utf-8">
        <title>fragment</title>

    </head>

    <body>
        <div th:fragment="copy">

            关于我们<br />

        </div>
    </body>
(8) th:include
可以直接引入th:fragment, 在 demo1.html 中引入如下代码:
详情
<! DOCTYPE html>
    <!--这句声明使用thymeleaf标签-->
    <html xmlns:th="http://www.thymeleaf.org">

    <head>

        <title>Thymeleaf的入门</title>
        <meta http-equiv="Content-Type" content="text/html; charset=UTF-8" />

    </head>

    <body>

        <div th:include="footer::copy"></div>
    </body>

    </html>
运行测试
