# 第2天 SpringCloud
# 1 Spring Cloud Feign
# 1.1 目标
了解Feign的作用
掌握Feign的使用过程
掌握Feign的负载均衡配置
掌握Feign的熔断配置
掌握Feign的压缩配置
掌握Feign的日志配置
# 1.2 讲解
# 1.2.1 Feign简介

Feign 的英文表意为“假装,伪装,变形”, 是一个http请求调用的轻量级框架
为什么叫伪装?
Feign可以把HTTP 的请求进行隐藏,伪装成类似 SpringMVC 的 Controller一样。你不用再自己拼接 url,拼接参数等等操作,一切都交给 Feign 去做。
创建好了用户,订单,商品微服务,这三个微服务是互相隔离的,那么微服务和微服务之间如何互相调用呢,显然三个微服务都可以采用http通信,也就是 restTemplate 进行互相访问,但是这种方式对参数传递和使用都不是很方便,所以弃用此方式,采用 feign 进行服务之间的调用,可以简化调用流程,真正感觉到是在同一个项目中调用另一个类的方法
当我们通过RestTemplate调用其它服务的API时,所需要的参数须在请求的URL中进行拼接,如果参数少的话或许我们还可以忍受,一旦有多个参数的话,这时拼接请求字符串就会效率低下,并且显得好傻。
在开发 Spring Cloud 微服务的时候,我们知道,服务之间都是以 HTTP 接口的形式对外提供服务的,因此消费者在进行调用的时候,底层就是通过 HTTP Client 的这种方式进行访问。Spring 的 RestTemplate 去实现服务间的调用。但是最方便、最优雅的方式是通过 Spring Cloud Feign 进行服务间的调用。使用 Feign 只需要创建一个接口加上对应的注解,比如:@FeignClient 注解。
总之总结下:
Feign 是一种声明式、模板化的 HTTP 客户端。在 Spring Cloud 中使用 Feign,可以做到使用 HTTP 请求访问远程服务,就像调用本地方法一样的,开发者完全感知不到这是在调用远程方法,更感知不到在访问 HTTP 请求。
接下来介绍一下 Feign 的特性,具体如下:
集成Ribbon的负载均衡功能 集成了Hystrix的熔断器功能 支持请求压缩 大大简化了远程调用的代码,同时功能还增强啦 Feign以更加优雅的方式编写远程调用代码,并简化重复代码
# 1.2.2 快速入门
使用 Feign 替代 RestTemplate 发送 HTTP请求。
实现步骤:
- 导入feign依赖
- 编写Feign客户端接口-将请求地址写到该接口上
- 消费者启动引导类开启Feign功能注解
- 访问接口测试 实现过程:
(1)导入依赖
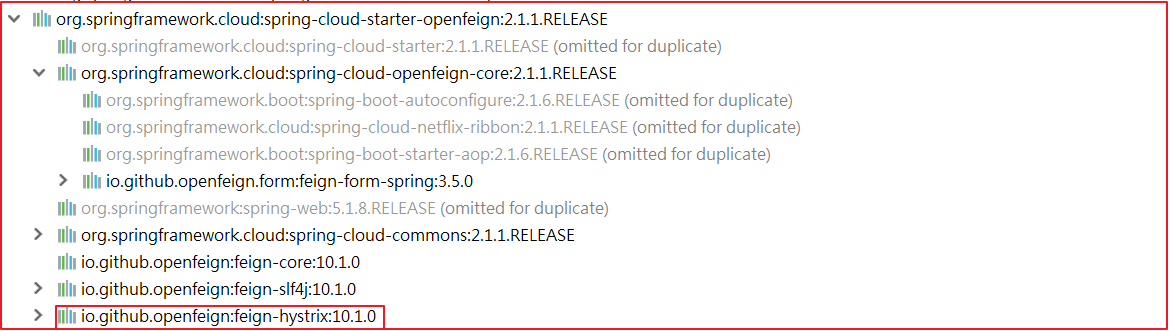
在user-consumer中添加spring-cloud-starter-openfeign依赖
<!--配置feign-->
<dependency>
    <groupId>org.springframework.cloud</groupId>
    <artifactId>spring-cloud-starter-openfeign</artifactId>
</dependency>
(2)创建Feign客户端
在user-consumer中创建com.atguigu.feign.UserClient接口,代码如下:
package com.atguigu.feign;
import com.atguigu.domain.User;
import org.springframework.cloud.openfeign.FeignClient;
import org.springframework.web.bind.annotation.PathVariable;
import org.springframework.web.bind.annotation.RequestMapping;
/**
* UserClient
*
* @Author: 马伟奇
* @CreateTime: 2020-03-22
* @Description:
*/
//@FeignClient(value = "要调用微服务的名字")
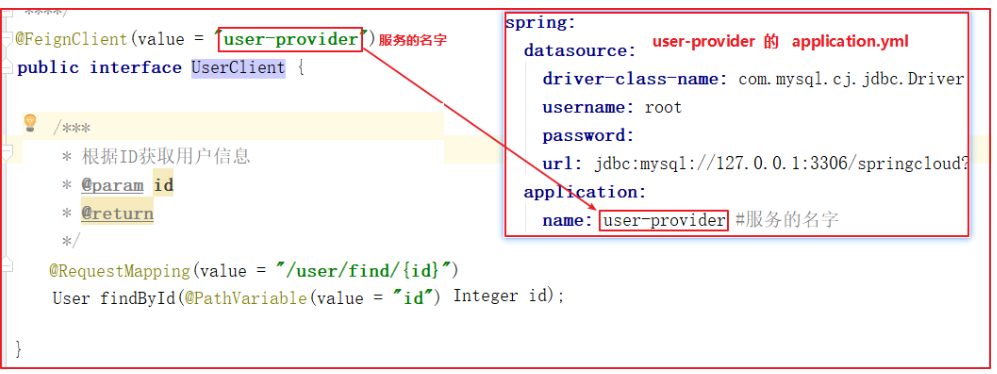
@FeignClient(value = "user-provider")
public interface UserClient {
/***
* 根据ID查询用户信息
* @param id
* @return
*/
@RequestMapping(value = "/user/find/{id}")
User findById(@PathVariable(value = "id") Integer id);
}
解释:
Feign会通过动态代理,帮我们生成实现类。 注解@FeignClient声明Feign的客户端,注解value指明服务名称 接口定义的方法,采用SpringMVC的注解。Feign会根据注解帮我们生成URL地址 注解@RequestMapping中的/user,不要忘记。因为Feign需要拼接可访问地址 (3)编写控制层
在user-consumer中创建com.atguigu.controller.ConsumerFeignController,在 Controller 中使用@Autowired注入FeignClient ,代码如下:
package com.atguigu.controller;

import com.atguigu.domain.User;
import com.atguigu.feign.UserClient;
import org.springframework.beans.factory.annotation.Autowired;
import org.springframework.web.bind.annotation.PathVariable;
import org.springframework.web.bind.annotation.RequestMapping;
import org.springframework.web.bind.annotation.RestController;

/**
 * ConsumerFeignController
 *
 * @Author: 马伟奇
 * @CreateTime: 2020-03-22
 * @Description:
 */
@RestController
@RequestMapping(value = "/feign")
public class ConsumerFeignController {


    @Autowired
    private UserClient userClient;

    @RequestMapping(value = "/{id}")
    public User queryById(@PathVariable(value = "id")Integer id){
        return userClient.findById(id);
    }
}
(4)开启Feign
修改user-consumer的启动类,在启动类上添加@EnableFeignClients注解,开启Feign,代码如下:

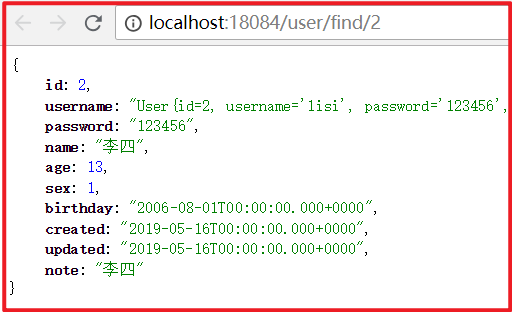
(5)测试
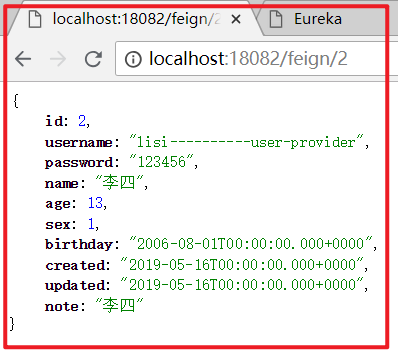
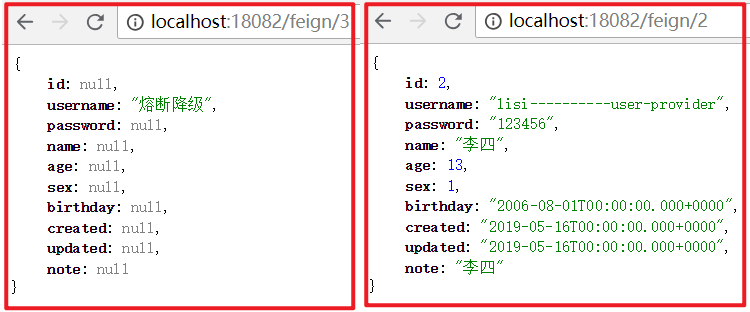
请求http://localhost:18082/feign/2,效果如下:

# 1.2.3 负载均衡
Feign自身已经集成了Ribbon,因此使用Feign的时候,不需要额外引入依赖。

Feign内置的ribbon默认设置了请求超时时长,默认是1000,可以修改
ribbon内部有重试机制,一旦超时,会自动重新发起请求。如果不希望重试可以关闭配置:
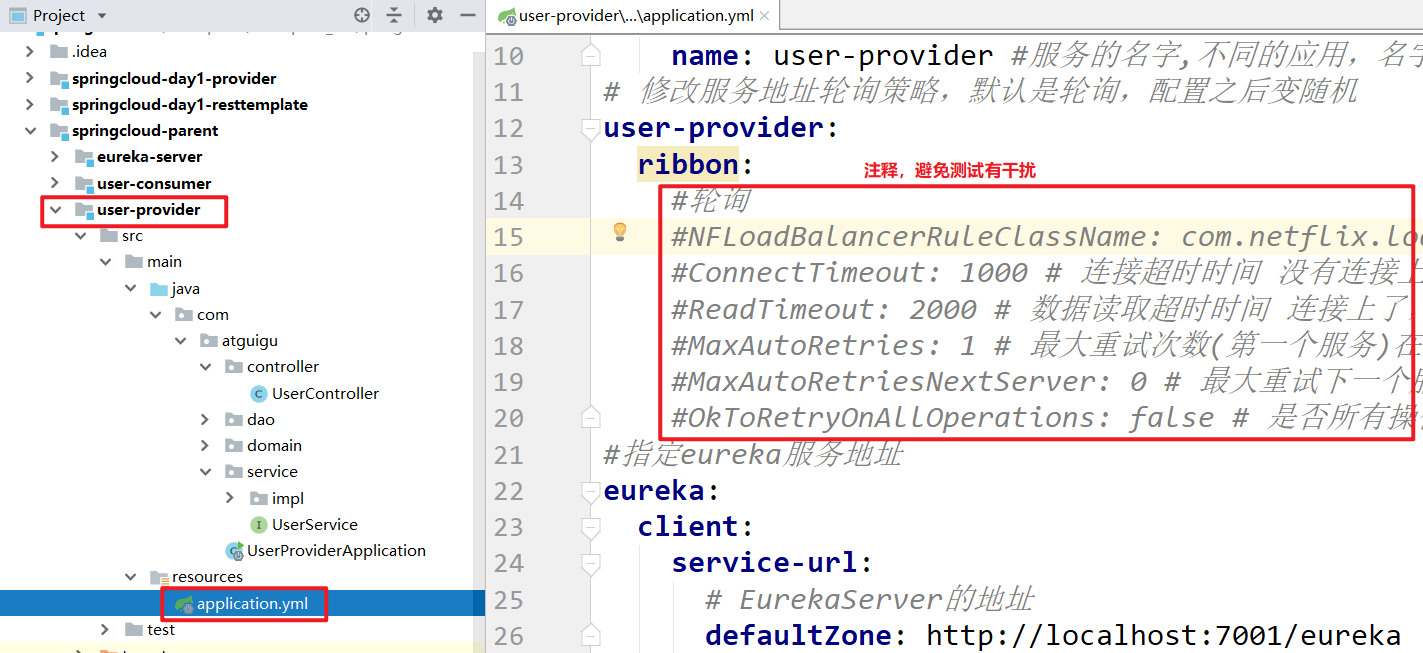
在 user-consumer 配置文件添加如下配置

修改服务地址轮询策略,默认是轮询,配置之后变随机
user-provider:
  ribbon:
    #轮询
    NFLoadBalancerRuleClassName: com.netflix.loadbalancer.RoundRobinRule
    ConnectTimeout: 1000 # 连接超时时间 没有连接上
    ReadTimeout: 2000 # 数据读取超时时间 连接上了,连上之后开始计时,但读取数据需要花费很长时间
    MaxAutoRetries: 1 # 最大重试次数(第一个服务)在第一次连接超时之后,在重新连接一次
    MaxAutoRetriesNextServer: 0 # 最大重试下一个服务次数(集群的情况才会用到)
    OkToRetryOnAllOperations: false # 是否所有操作都进行重试
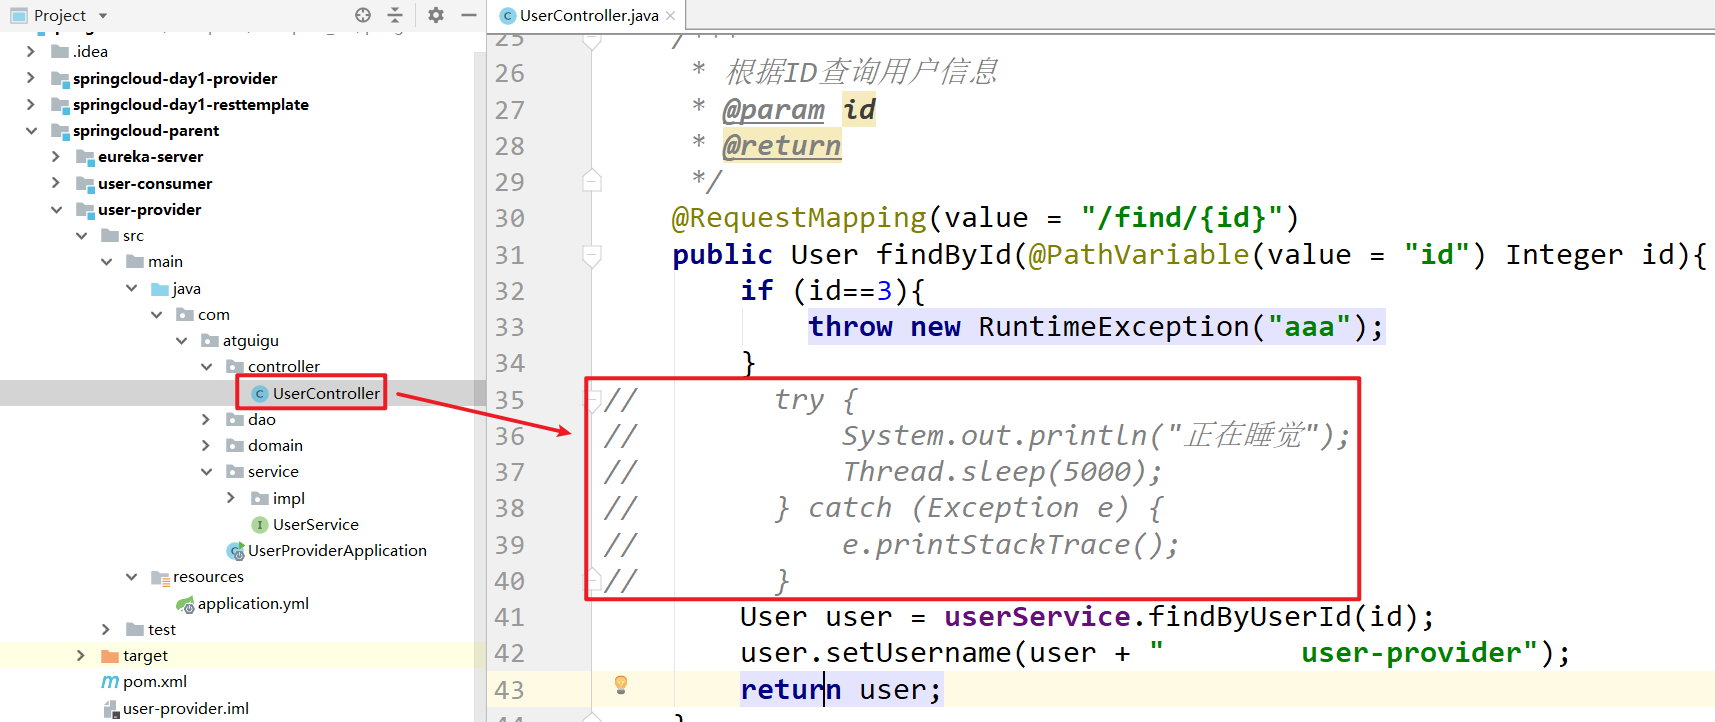
① 测试 ReadTimeout 读取超时
在 UserController 添加连接超时时间

运行测试连接超时 http://localhost:18082/feign/2
ReadTimeout: 2000 读取超时时间是2秒,休眠10秒,肯定连接超时
ReadTimeout: 15000 读取超时时间是15 秒,休眠10秒,可以读取数据
② 测试 ConnectTimeout 超时 ,随意写一个不存在的IP地址,测试连接超时时间

运行测试连接超时 http://localhost:18082/feign/2
③ 测试 MaxAutoRetries 重试机制
修改 ReadTimeout: 5000 5秒读取超时 ,会重新在连接一次

# 1.2.4 熔断器支持
feign整合Hystrix熔断器
Feign默认也有对Hystrix的集成!
实现步骤:
- 在配置文件application.yml中开启feign熔断器支持
- 编写FallBack处理类,实现FeignClient客户端
- 在@FeignClient注解中,指定FallBack处理类。
- 测试 (1)开启Hystrix
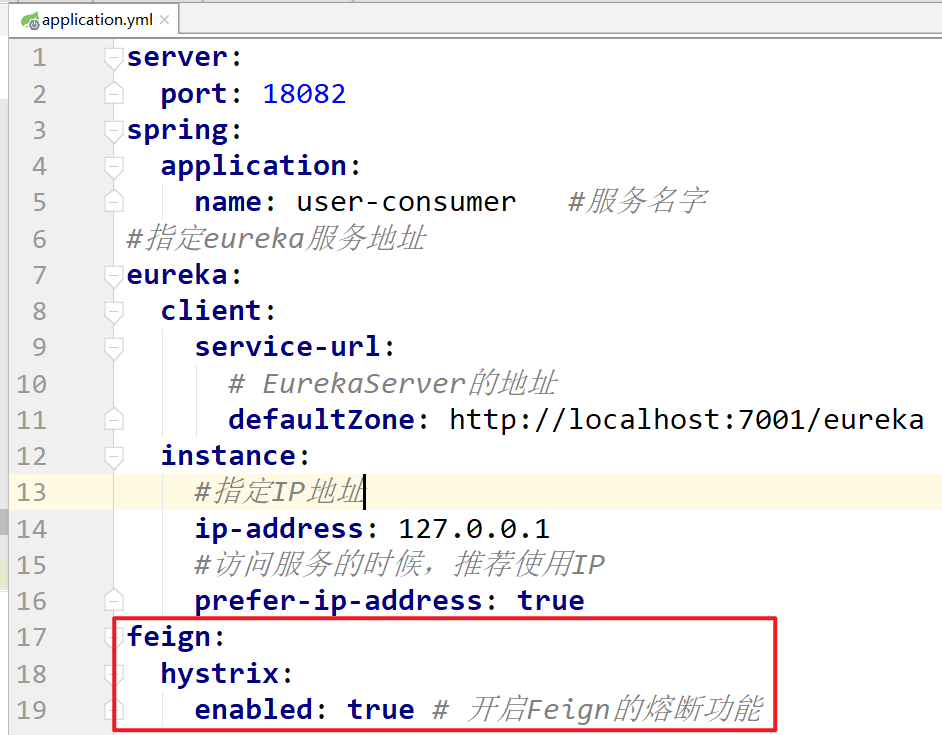
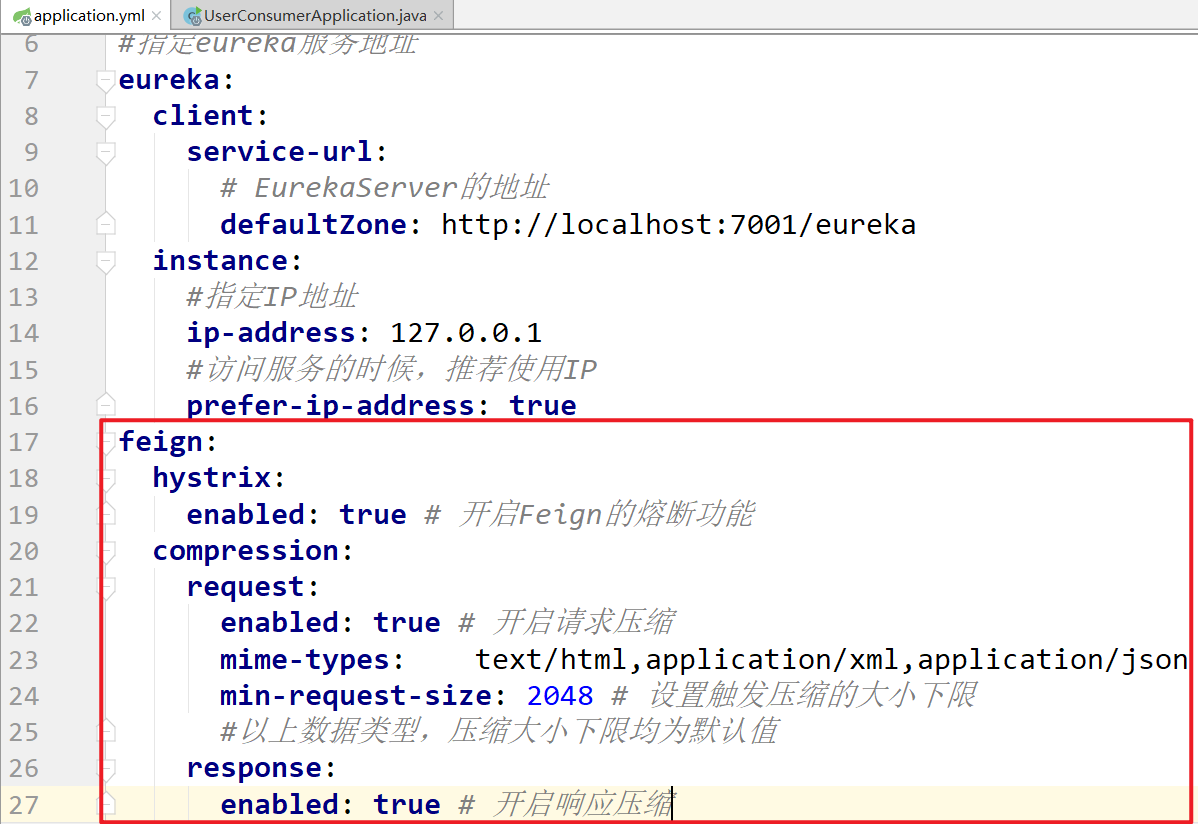
在 user-consumer 配置文件 application.yml 中开启 feign 熔断器支持:默认关闭
feign:
hystrix:
enabled: true # 开启Feign的熔断功能
(2)熔断降级类创建
修改user-consumer,创建一个类com.atguigu.feign.fallback.UserClientFallback,实现刚才编写的UserClient,作为FallBack的处理类,代码如下:
package com.atguigu.feign.fallback;

import com.atguigu.domain.User;
import com.atguigu.feign.UserClient;
import org.springframework.stereotype.Component;

/**
 * UserClientFallback
 *
 * @Author: 马伟奇
 * @CreateTime: 2020-03-22
 * @Description:
 */
@Component
public class UserClientFallback implements UserClient {
    @Override
    public User findById(Integer id) {
        User user = new User();
        user.setUsername("服务熔断");
        return user;
    }
}
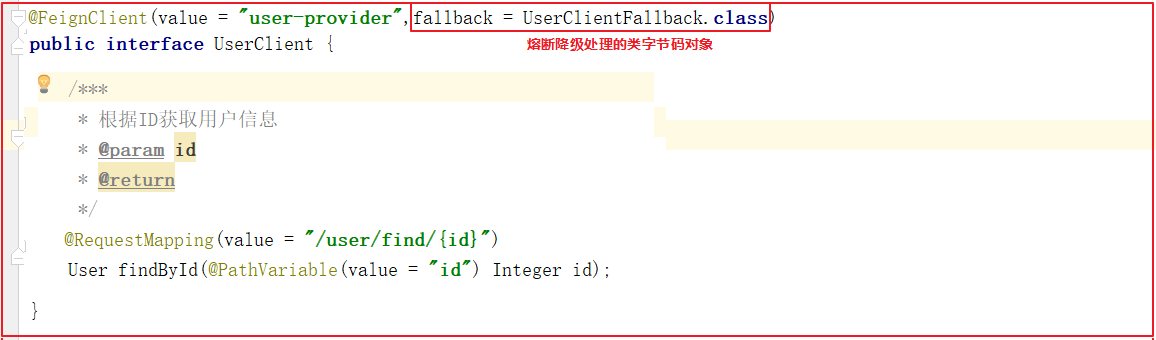
(3)指定Fallback处理类
在@FeignClient注解中,指定FallBack处理类
package com.atguigu.feign;

import com.atguigu.domain.User;
import com.atguigu.feign.fallback.UserClientFallback;
import org.springframework.cloud.openfeign.FeignClient;
import org.springframework.web.bind.annotation.PathVariable;
import org.springframework.web.bind.annotation.RequestMapping;

/**
 * UserClient
 *
 * @Author: 马伟奇
 * @CreateTime: 2020-03-22
 * @Description:
 */
//@FeignClient(value = "要调用微服务的名字")
//fallback = UserClientFallback.class 指定当前feign接口发生熔断降级处理类
@FeignClient(value = "user-provider",fallback = UserClientFallback.class)
public interface UserClient {
    /***
     * 根据ID查询用户信息
     * @param id
     * @return
     */
    @RequestMapping(value = "/user/find/{id}")
    User findById(@PathVariable(value = "id") Integer id);
}
避免测试干扰注释掉配置文件当中的链接超时时间
(4)测试
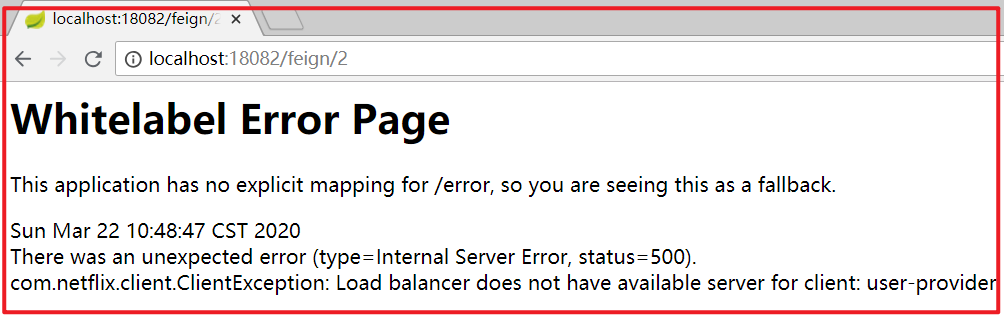
关闭服务消费方,请求http://localhost:18082/feign/3,效果如下:
# 1.2.5 请求压缩
SpringCloudFeign支持对请求和响应进行GZIP压缩,以减少通信过程中的性能损耗。
user-consumer通过配置开启请求与响应的压缩功能:(简单压缩)
feign:
	compression:
        request:
            enabled: true # 开启请求压缩
        response:
            enabled: true # 开启响应压缩
也可以对请求的数据类型,以及触发压缩的大小下限进行设置(完整压缩)
#  Feign配置
feign:
	compression:
		request:
			enabled: true # 开启请求压缩
			mime-types:	text/html,application/xml,application/json # 设置压缩的数据类型
			min-request-size: 2048 # 设置触发压缩的大小下限
			#以上数据类型,压缩大小下限均为默认值
		response:
            enabled: true # 开启响应压缩
# 1.2.6 Feign的日志级别配置
通过loggin.level.xx=debug来设置日志级别。然而这个对Feign客户端不会产生效果。因为@FeignClient注解修饰的客户端在被代理时,都会创建一个新的Feign.Logger实例。我们需要额外通过配置类的方式指定这个日志的级别才可以。
实现步骤:
- 在application.yml配置文件中开启日志级别配置
- 编写配置类,定义日志级别bean。
- 在接口的@FeignClient中指定配置类
- 重启项目,测试访问 实现过程:
(1)普通日志等级配置
在user-consumer的配置文件中设置com.atguigu包下的日志级别都为debug

com.atguigu 包下的日志级别都为Debug
logging:
  level:
    com.atguigu: debug
(2)Feign日志等级配置
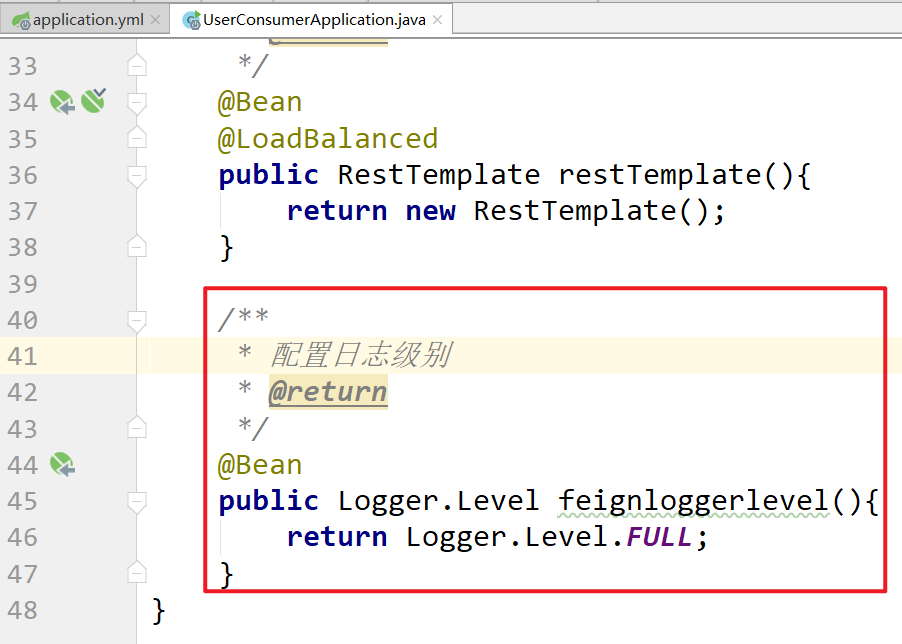
在user-consumer中的application启动类com.atguigu.UserConsumerApplication,定义日志级别
package com.atguigu;

import feign.Logger;
import org.springframework.boot.SpringApplication;
import org.springframework.boot.autoconfigure.SpringBootApplication;
import org.springframework.cloud.client.circuitbreaker.EnableCircuitBreaker;
import org.springframework.cloud.client.discovery.EnableDiscoveryClient;
import org.springframework.cloud.client.loadbalancer.LoadBalanced;
import org.springframework.cloud.openfeign.EnableFeignClients;
import org.springframework.context.annotation.Bean;
import org.springframework.web.client.RestTemplate;


/**
 * UserConsumerApplication
 *
 * @Author: 马伟奇
 * @CreateTime: 2020-03-18
 * @Description:
 */
@SpringBootApplication
@EnableDiscoveryClient  //开启Eureka客户端发现功能
@EnableCircuitBreaker
@EnableFeignClients(basePackages = {"com.atguigu.feign"})
public class UserConsumerApplication {
    public static void main(String[] args) {
        SpringApplication.run(UserConsumerApplication.class,args);
    }

    /***
     * 将RestTemplate的实例放到Spring容器中
     * @return
     */
    @Bean
    @LoadBalanced
    public RestTemplate restTemplate(){
        return new RestTemplate();
    }

    /**
     * 配置日志级别
     * @return
     */
    @Bean
    public Logger.Level feignloggerlevel(){
        return Logger.Level.FULL;
    }
}
日志级别说明:
Feign支持4中级别: NONE:不记录任何日志,默认值 BASIC:仅记录请求的方法,URL以及响应状态码和执行时间 HEADERS:在BASIC基础上,额外记录了请求和响应的头信息 FULL:记录所有请求和响应的明细,包括头信息、请求体、元数据 运行程序 http://localhost:18082/feign/2

重启项目,即可看到每次访问的日志, 文件压缩

1.2.7 Feign 工作原理 ① 在开发微服务应用时,我们会在主程序入口添加 @EnableFeignClients 配置的扫描包路径。如果没配置,默认为启动类的包路径。
② 当程序启动时,会进行包扫描,扫描所有 @FeignClient 的注解的类,并将这些信息注入 Spring IOC 容器中。
③ 校验 @FeignClient 修饰的类,包括类必须是 interface ,以及@FeignClient的fallback及fallbackFactory配置的必须是接口的实现类。
# 1.3 小结
Feign的作用:不再使用拼接URL的方式实现远程调用,以接口调用的方式实现远程调用,简化了远程调用的实现方式,增强了远程调用的功能,例如:增加了负载均衡、熔断、压缩、日志启用。
掌握Feign的使用过程
properties 1.引入Feign依赖包 2.创建Feign接口,feign接口中需要指定调用的服务名字 3.使用@EnabledFeignClients启用Feign功能 掌握Feign的负载均衡配置 properties 在配置文件中配置 {spring.application.name}🎀负载均衡属性配置 掌握Feign的熔断配置 properties 1.在application.yml中开启Hystrix 2.给Feign接口创建一个实现类 3.给Feign指定fallback类 掌握Feign的压缩配置 properties 在application.yml中指定压缩属性即可 掌握Feign的日志配置 properties 1.在application.yml中开启普通日志等级 2.创建一个类,定义Feign日志等级 3.在Feign接口中指定定义日志的配置
# 2 网关 Spring Cloud Gateway
# 2.1 目标
网关的作用 会配置动态路由 会配置过滤器 能自定义全局过滤器 API 网关出现的原因是微服务架构的出现,不同的微服务一般会有不同的网络地址,而外部客户端可能需要调用多个服务的接口才能完成一个业务需求,如果让客户端直接与各个微服务通信,会有以下的问题:
客户端会多次请求不同的微服务,增加了客户端的复杂性。 存在跨域请求,在一定场景下处理相对复杂。 认证复杂,每个服务都需要独立认证。 难以重构,随着项目的迭代,可能需要重新划分微服务。例如,可能将多个服务合并成一个或者将一个服务拆分成多个。如果客户端直接与微服务通信,那么重构将会很难实施。 某些微服务可能使用了防火墙 / 浏览器不友好的协议,直接访问会有一定的困难。 以上这些问题可以借助 API 网关解决。API 网关是介于客户端和服务器端之间的中间层,所有的外部请求都会先经过 API 网关这一层。也就是说,API 的实现方面更多的考虑业务逻辑,而安全、性能、监控可以交由 API 网关来做,这样既提高业务灵活性又不缺安全性,典型的架构图如图所示:
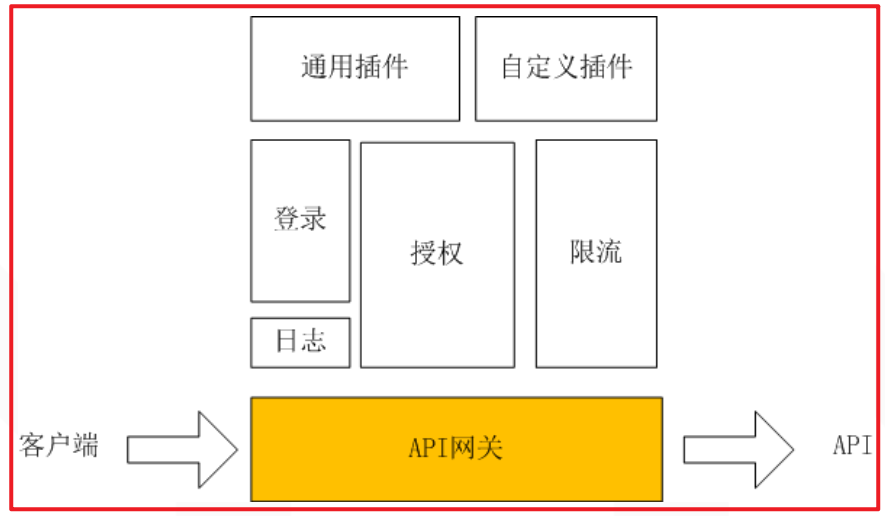
使用 API 网关后的优点如下:
易于监控。可以在网关收集监控数据并将其推送到外部系统进行分析。 易于认证。可以在网关上进行认证,然后再将请求转发到后端的微服务,而无须在每个微服务中进行认证。 减少了客户端与各个微服务之间的交互次数。
# 2.2 讲解
# 2.2.1 Gateway 简介
Spring Cloud Gateway 是Spring Cloud团队的一个全新项目,基于Spring 5.0、SpringBoot2.0、Project Reactor 等技术开发的网关。 旨在为微服务架构提供一种简单有效统一的API路由管理方式。
Spring Cloud Gateway 作为SpringCloud生态系统中的网关,目标是替代Netflix Zuul。Gateway不仅提供统一路由方式,并且基于Filter链的方式提供网关的基本功能。例如:安全,监控/指标,和限流。
本身也是一个微服务,需要注册到Eureka
网关的核心功能:过滤、路由
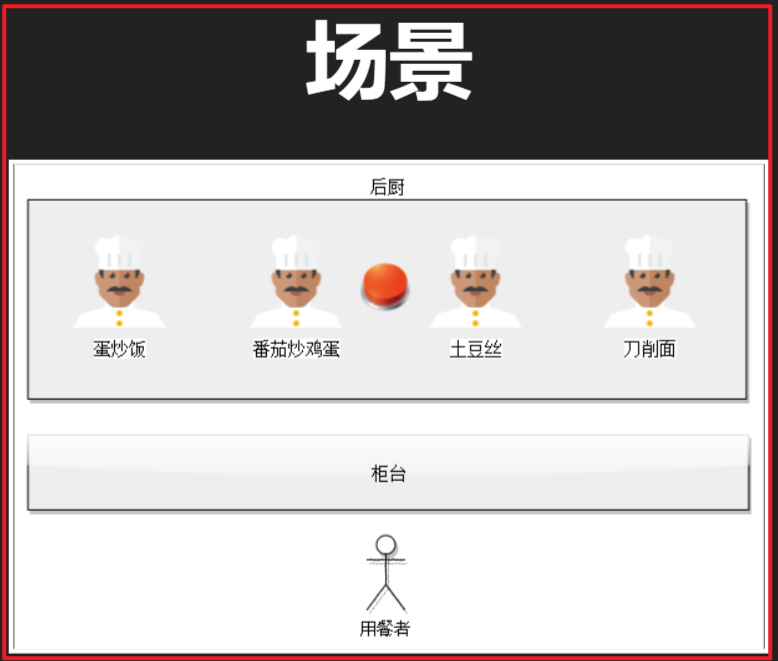
核心概念:通过画图解释
路由(route):
断言Predicate函数:路由转发规则
过滤器(Filter):

# 2.2.2 快速入门
实现步骤:
- 创建gateway-service工程SpringBoot
- 编写基础配置
- 编写路由规则,配置静态路由策略
- 启动网关服务进行测试 实现过程:
(1)创建一个子工程 gateway-service

(2)pom.xml依赖
<?xml version="1.0" encoding="UTF-8"?>
<project xmlns="http://maven.apache.org/POM/4.0.0"
         xmlns:xsi="http://www.w3.org/2001/XMLSchema-instance"
         xsi:schemaLocation="http://maven.apache.org/POM/4.0.0 http://maven.apache.org/xsd/maven-4.0.0.xsd">
    <parent>
        <artifactId>springcloud-parent</artifactId>
        <groupId>com.atguigu</groupId>
        <version>1.0-SNAPSHOT</version>
    </parent>
    <modelVersion>4.0.0</modelVersion>

    <artifactId>gateway-service</artifactId>

    <dependencies>
        <!--网关依赖-->
        <dependency>
            <groupId>org.springframework.cloud</groupId>
            <artifactId>spring-cloud-starter-gateway</artifactId>
        </dependency>
        <!-- Eureka客户端 -->
        <dependency>
            <groupId>org.springframework.cloud</groupId>
            <artifactId>spring-cloud-starter-netflix-eureka-client</artifactId>
        </dependency>
    </dependencies>
</project>
(3)启动类
创建启动类com.atguigu.GatewayApplication,代码如下:
package com.atguigu;

import org.springframework.boot.SpringApplication;
import org.springframework.boot.autoconfigure.SpringBootApplication;
import org.springframework.cloud.client.discovery.EnableDiscoveryClient;

/**
 * GatewayApplication
 *
 * @Author: 马伟奇
 * @CreateTime: 2020-03-22
 * @Description:
 */
@SpringBootApplication
@EnableDiscoveryClient
public class GatewayApplication {
    public static void main(String[] args) {
        SpringApplication.run(GatewayApplication.class,args);
    }
}
(4) application.yml 配置
# 注释版本
server:
  port: 18084
spring:
  application:
    name: api-gateway # 应用名
# Eureka服务中心配置
eureka:
  client:
    service-url:
      # 注册Eureka Server集群
      defaultZone: http://127.0.0.1:7001/eureka
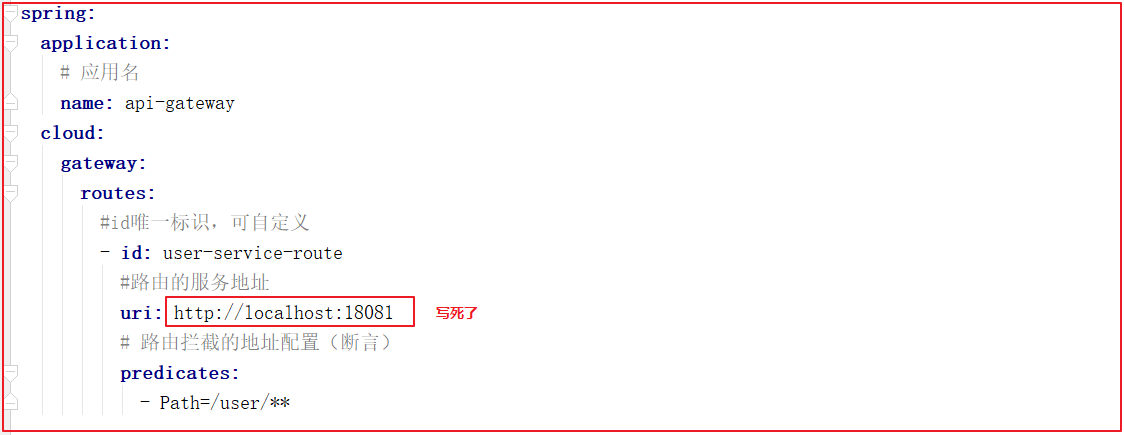
# 2.2.3 路由配置

通过网关配置一个路由功能,用户访问网关的时候,如果用户请求的路径是以/user开始,则路由到user-provider服务去,修改application.yml配置即可实现,配置如下:

spring:
  application:
    # 应用名
    name: api-gateway
  cloud:
    gateway:
      routes:
      # 用户所有以/user开始的请求,都给http://localhost:18081服务处理
      #id唯一标识,可自定义 , 随便写,可以写小红,小花都行
      - id: user-service-route
        #路由的服务地址
        uri: http://localhost:18081
        # 路由拦截的地址配置(断言)
        # /user/**所有以/user开始的请求都将被路由到uri指定的服务地址,
        # 将该请求交给uri指定的服务处理,比如请求:http://localhost:18084/user/find/2会把请求交给http://localhost:18081/user/find/2处理
        predicates:
        - Path=/user/**
概念解释:
Route(路由):路由是网关的基本单元,由ID、URI、一组Predicate、一组Filter组成,根据Predicate进行匹配转发。 Predicate(谓语、断言):路由转发的判断条件 Filter(过滤器):过滤器是路由转发请求时所经过的过滤逻辑,可用于修改请求、响应内容。 启动GatewayApplication测试
访问http://localhost:18084/user/find/2会访问user-provider服务,效果如下:
# 2.2.4 动态路由
刚才路由规则中,我们把路径对应服务地址写死了!如果服务提供者集群的话,这样做不合理。应该是根据服务名称,去Eureka注册中心查找服务对应的所有实例列表,然后进行动态路由!
修改映射配置:通过服务名称获取:
修改application.yml
因为已经配置了Eureka客户端,可以从Eureka获取服务的地址信息,修改application.yml文件如下:
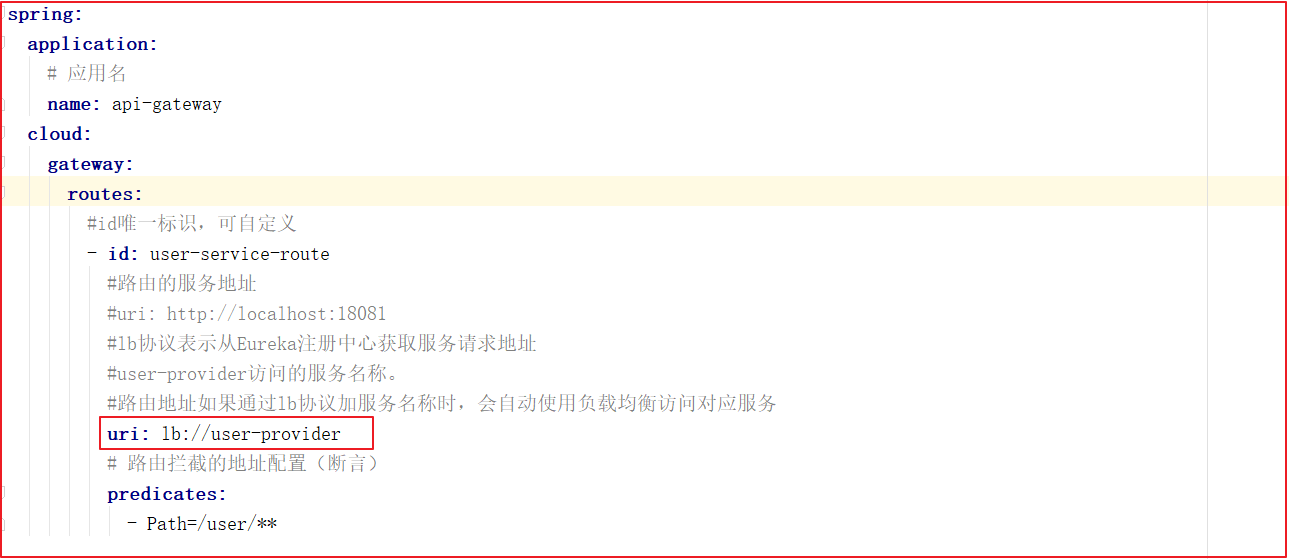
上图代码如下:
spring:
  application:
    # 应用名
    name: api-gateway
  cloud:
    gateway:
      routes:
        #id唯一标识,可自定义
        - id: user-service-route
          #路由的服务地址
          #uri: http://localhost:18081 请求负载均衡算法Load Balance
          #lb协议表示从Eureka注册中心获取服务请求地址
          #user-provider访问的服务名称。
          #路由地址如果通过lb协议加服务名称时,会自动使用负载均衡访问对应服务
          uri: lb://user-provider
          # 路由拦截的地址配置(断言)
          predicates:
            - Path=/user/**
路由配置中uri所用的协议为lb时,gateway将把user-provider解析为实际的主机和端口,并通过Ribbon进行负载均衡。http://localhost:18084/user/find/2

# 2.2.5 过滤器
过滤器作为Gateway的重要功能。常用于请求鉴权、服务调用时长统计、修改请求或响应header、限流、去除路径等等…
# 2.2.5.1 过滤器的分类
默认过滤器:出厂自带,实现好了拿来就用,不需要实现 全局默认过滤器 局部默认过滤器 自定义过滤器:根据需求自己实现,实现后需配置,然后才能用哦。 全局过滤器:作用在所有路由上。 局部过滤器:配置在具体路由下,只作用在当前路由上。 默认过滤器几个,常见如下:
过滤器名称 说明 AddRequestHeader 对匹配上的请求加上Header AddRequestParameters 对匹配上的请求路由 AddResponseHeader 对从网关返回的响应添加Header StripPrefix 对匹配上的请求路径去除前缀 详细说明官方链接
# 2.2.5.2 默认过滤器配置
默认过滤器有两个:全局默认过滤器和局部默认过滤器。
全局过滤器:对输出响应头设置属性
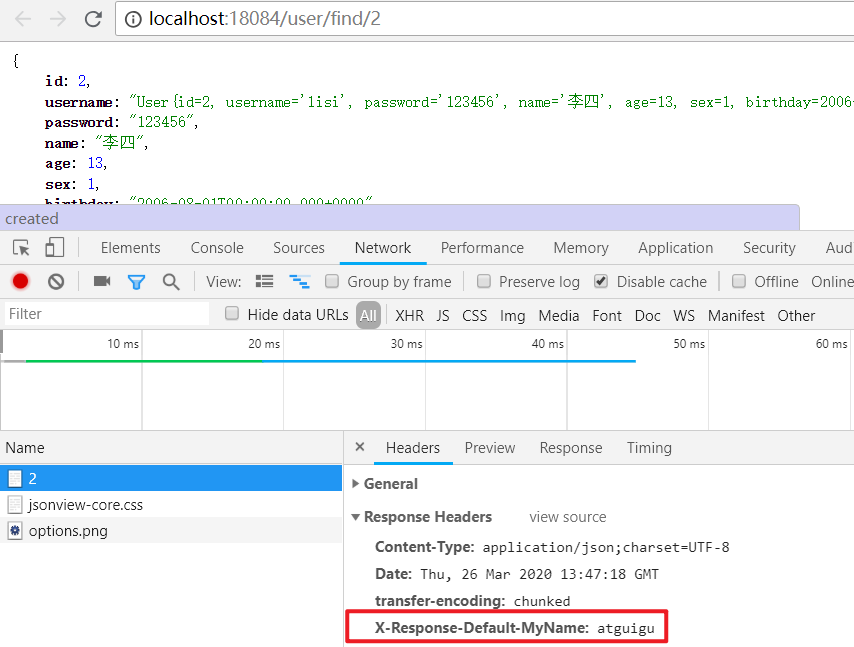
对输出的响应设置其头部属性名称为X-Response-Default-MyName,值为atguigu
修改 gateway-service 的 yml 配置文件
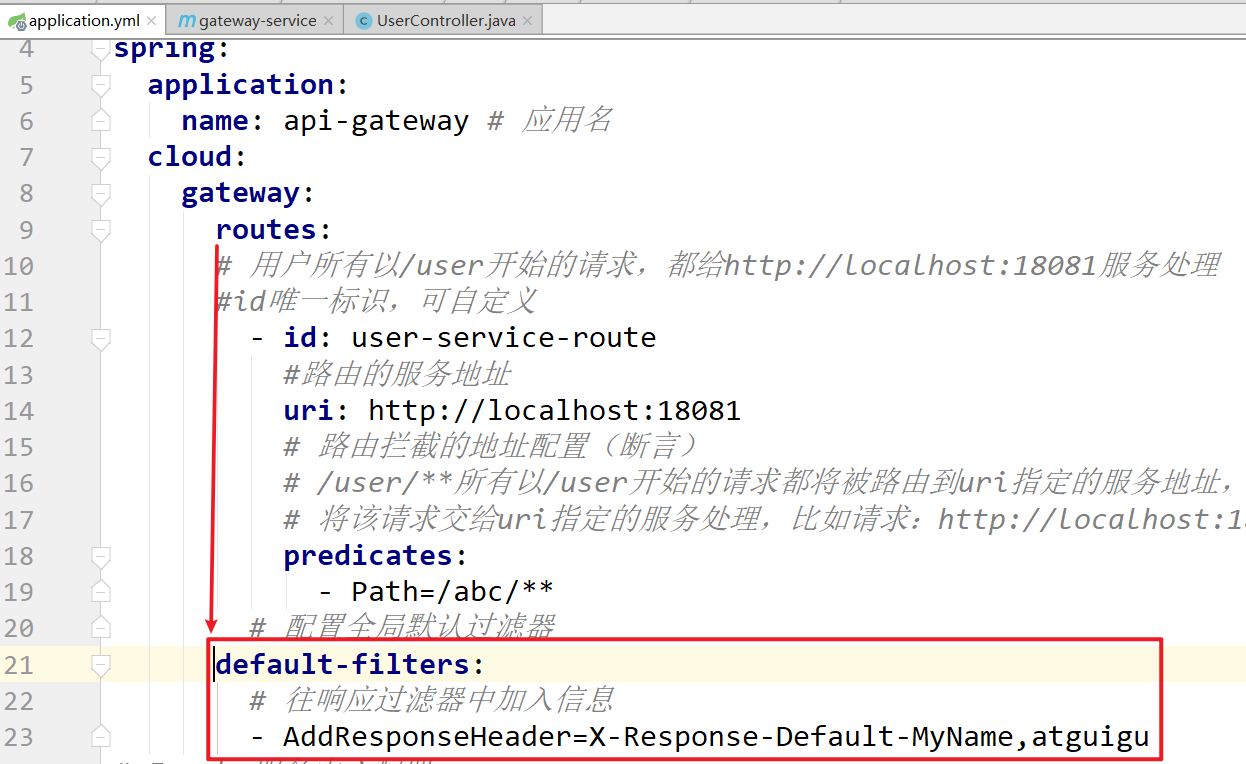
spring:
  cloud:
    gateway:
     # 配置全局默认过滤器
      default-filters:
      # 往响应过滤器中加入信息
        - AddResponseHeader=X-Response-Default-MyName,atguigu
查看浏览器响应头信息!
局部过滤器:通过局部默认过滤器,修改请求路径。局部过滤器在这里介绍两种:添加路径前缀、去除路径前缀。
第一:添加路径前缀:
在gateway中可以通过配置路由的过滤器PrefixPath 实现映射路径中的前缀
配置请求地址添加路径前缀过滤器

上图配置如下:
# 注释版本
server:
  port: 18084
spring:
  application:
    name: api-gateway # 应用名
  cloud:
    gateway:
      routes:
      # 用户所有以/user开始的请求,都给http://localhost:18081服务处理
      #id唯一标识,可自定义
        - id: user-service-route
          #路由的服务地址
          uri: lb://user-provider
          # 路由拦截的地址配置(断言)
          # /user/**所有以/user开始的请求都将被路由到uri指定的服务地址,
          # 将该请求交给uri指定的服务处理,比如请求:http://localhost:18084/user/find/2会把请求交给http://localhost:18081/user/find/2处理
          predicates:
          #  - Path=/user/**
            - Path=/**
          # 配置全局默认过滤器
          # 给每次请求都添加一个前缀 /user比如请求:http://localhost:18084/2-->http://localhost:18084/user/2
          filters:
            - PrefixPath=/user
      # 配置全局默认过滤器
      default-filters:
      # 往响应过滤器中加入信息
        - AddResponseHeader=X-Response-Default-MyName,atguigu
# Eureka服务中心配置
eureka:
  client:
    service-url:
      # 注册Eureka Server集群
      defaultZone: http://127.0.0.1:7001/eureka
路由地址信息:
配置 访问地址 路由地址 PrefixPath=/user http://localhost:18084/find/2 http://localhost:18081/user/find/2 全局和局部的区别:全局是对所有的id有效,局部只是对某一个id有效
请求:http://localhost:18084/find/2 会自动添加/user

第二:去除路径前缀:
在gateway中通过配置路由过滤器StripPrefix,实现映射路径中地址的去除。通过StripPrefix=1来指定路由要去掉的前缀个数。如:路径/api/user/1将会被路由到/user/1。
http://localhost:18084/api/user/2 可以去掉指定个数的前缀 http://localhost:18084/user/2
配置去除路径前缀过滤器

上图配置如下:
spring:
  application:
    # 应用名
    name: api-gateway
  cloud:
    gateway:
      routes:
        #id唯一标识,可自定义
        - id: user-service-route
          #路由的服务地址
          #uri: http://localhost:18081
          #lb协议表示从Eureka注册中心获取服务请求地址
          #user-provider访问的服务名称。
          #路由地址如果通过lb协议加服务名称时,会自动使用负载均衡访问对应服务
          uri: lb://user-provider
          # 路由拦截的地址配置(断言)
          predicates:
            - Path=/**
          filters:
            # 请求地址添加路径前缀过滤器
            #- PrefixPath=/user
            # 去除路径前缀过滤器 添加前缀和去掉前缀不要一起使用
            - StripPrefix=1
      default-filters:
        - AddResponseHeader=X-Response-Default-MyName,atguigu
路由地址信息:
配置 访问地址 路由地址
StripPrefix=1 http://localhost:18084/api/user/find/2 http://localhost:18081/user/find/2
StripPrefix=2 http://localhost:18084/api/r/user/find/2 http://localhost:18081/user/find/2

# 2.2.5.3 自定义过滤器案例
自定义过滤器也有两个:全局自定义过滤器,和局部自定义过滤器。
自定义全局过滤器的案例,自定义局部过滤器的案例。
自定义全局过滤器的案例:模拟登陆校验。
基本逻辑:如果请求中有Token参数,则认为请求有效放行,如果没有则拦截提示授权无效
# 2.2.5.3.1 全局过滤器自定义:
实现步骤:
1.在gateway-service工程编写全局过滤器类GlobalFilter,Ordered 2.编写业务逻辑代码 3.访问接口测试,加token和不加token。 全局过滤器作用范围:所有请求都会被拦截。
实现过程:
在gateway-service中创建com.atguigu.filter.LoginGlobalFilter全局过滤器类,代码如下:
package com.atguigu.filter;

import org.springframework.cloud.gateway.filter.GatewayFilterChain;
import org.springframework.cloud.gateway.filter.GlobalFilter;
import org.springframework.core.Ordered;
import org.springframework.core.annotation.Order;
import org.springframework.http.HttpStatus;
import org.springframework.http.server.reactive.ServerHttpRequest;
import org.springframework.http.server.reactive.ServerHttpResponse;
import org.springframework.stereotype.Component;
import org.springframework.util.StringUtils;
import org.springframework.web.server.ServerWebExchange;
import reactor.core.publisher.Mono;

import java.lang.annotation.Annotation;

/**
 * LoginGlobalFilter
 *
 * @Author: 马伟奇
 * @CreateTime: 2020-03-22
 * @Description:
 *   如果项目只有一个过滤器,只需要实现GlobalFilter接口
 *   Ordered:表示项目有多个过滤器的时候,过滤器执行的先后顺序
 */
@Component
public class LoginGlobalFilter implements GlobalFilter, Ordered {


    /**
     * 过滤拦截
     * @param exchange
     * @param chain
     * @return
     */
    @Override
    public Mono<Void> filter(ServerWebExchange exchange, GatewayFilterChain chain) {
        System.out.println("全局拦截器");
        //  request获取
        ServerHttpRequest request = exchange.getRequest();
        // response获取
        ServerHttpResponse response = exchange.getResponse();
        // 获取请求参数
        String token = request.getQueryParams().getFirst("token");
        // 判断token是否为null,如果用户请求参数中没有token,则表示用户未登录
        if (StringUtils.isEmpty(token)){
            // 没有登录,状态设置401
            response.setStatusCode(HttpStatus.UNAUTHORIZED);
            // 结束请求
            return response.setComplete();
        }
        // 如果用户传递了一个token,则表示用户已经登录 ,直接放行
        return chain.filter(exchange);
    }

    /***
     * 定义过滤器执行顺序
     * 返回值越小,越靠前执行
     * @return
     */
    @Override
    public int getOrder() {
        return 0;
    }
}
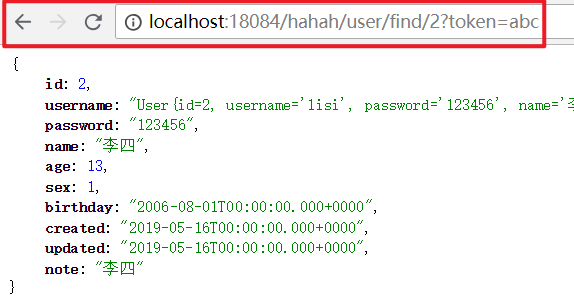
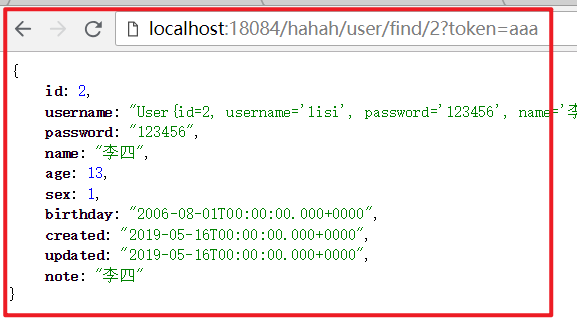
测试:不携带token http://localhost:18084/hahah/user/find/2效果如下:

测试:携带token http://localhost:18084/hahah/user/find/2?token=abc 此时可以正常访问。
# 2.2.5.3.2 局部过滤器定义
自定义局部过滤器,该过滤器在控制台输出配置文件中指定名称的请求参数及参数的值
实现步骤:
- 在gateway-service中编写MyParamGatewayFilterFactory类 继承AbstractGatewayFilterFactory类
- 实现业务代码:循环请求参数中是否包含name,如果包含则输出参数值
- 修改配置文件
- 访问请求测试,带name参数 局部过滤器作用范围:该局部过滤器在哪个id下配置,则该局部过滤器只针对该id的路由规则有效。
实现过程:
在gateway_service中编写MyParamGatewayFilterFactory类
package com.atguigu.filter;

import org.springframework.cloud.gateway.filter.GatewayFilter;
import org.springframework.cloud.gateway.filter.GatewayFilterChain;
import org.springframework.cloud.gateway.filter.factory.AbstractGatewayFilterFactory;
import org.springframework.stereotype.Component;
import org.springframework.web.server.ServerWebExchange;
import reactor.core.publisher.Mono;

/**
 * MyParamGatewayFilterFactory
 *
 * @Author: 马伟奇
 * @CreateTime: 2020-03-22
 * @Description:
 */
@Component
public class MyParamGatewayFilterFactory extends AbstractGatewayFilterFactory {

    /**
     * 拦截当前id对应的请求
     * @param config
     * @return
     */
    @Override
    public GatewayFilter apply(Object config) {
        return new GatewayFilter() {
            @Override
            public Mono<Void> filter(ServerWebExchange exchange, GatewayFilterChain chain) {
                System.out.println("局部拦截器");
                return chain.filter(exchange);
            }
        };
    }

    /***
     * 构造函数
     */
    public MyParamGatewayFilterFactory() {
        super(MyParamGatewayFilterFactory.Config.class);
    }


    /****
     * 在该类执行初始化后,可以在这里执行相关初始化操作
     */
    public static class Config {
    }
}
修改application.yml配置文件
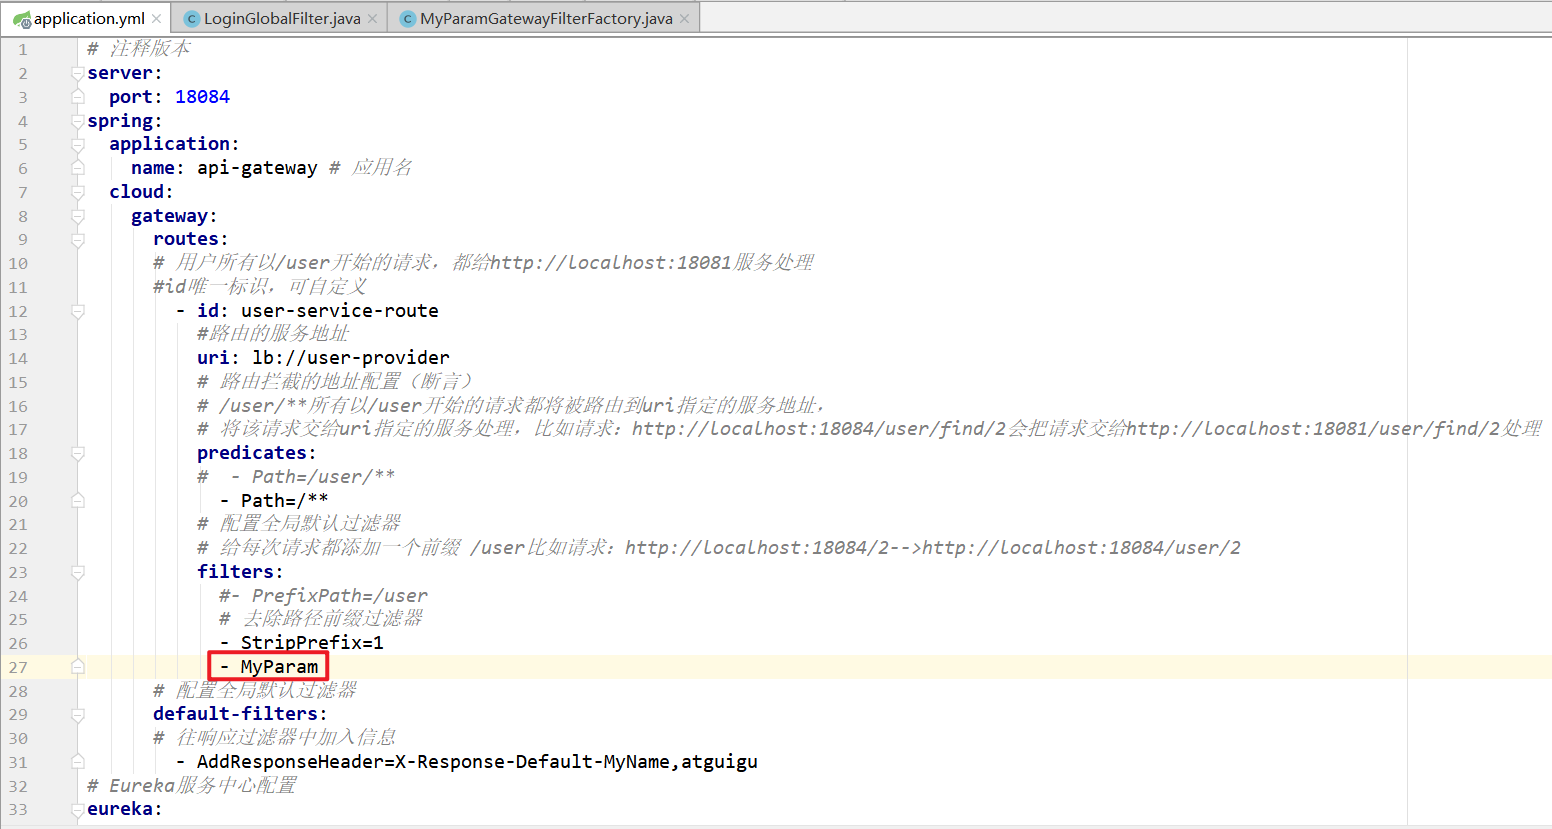
测试访问,访问http://localhost:18084/hahah/user/find/2?token=aaa会输出。
# 2.2.6 微服务架构加入Gateway后
.jpg)
不管是来自客户端的请求,还是服务内部调用。一切对服务的请求都可经过网关。
网关实现鉴权、动态路由等等操作。
Gateway就是我们服务的统一入口
# 2.3 小结
网关的作用
properties
1.为微服务架构提供一种简单有效统一的API路由管理方式 2.可以在网关中实现微服务鉴权、安全控制、请求监控、限流 会配置动态路由 properties 使用lb配置,能根据服务名字动态请求。 会配置过滤器 properties 默认过滤器:default-filters: 能自定义全局过滤器 properties 编写过滤器类,实现GlobalFilter和Ordered,在filter方法中实现过滤。
# 3 配置中心
参考阿里讲义
← 第1天 SpringCloud 分布式事务 →